A leaky kitchen sink drain can be a major inconvenience and can lead to water damage if left untreated. Luckily, repairing a leaky drain is a relatively simple task that can be done at home without the need for a professional plumber. In this article, we will discuss the top 10 steps for repairing a leaky kitchen sink drain and provide tips on how to prevent future leaks.How to Repair a Leaky Kitchen Sink Drain


How to Repair a Leaky Kitchen Sink Drain


The first step in fixing a leaky kitchen sink drain is to identify the source of the leak. In most cases, the leak is caused by a loose or worn out gasket or seal. To fix this, you will need to remove the drain and replace the gasket or seal. Make sure to turn off the water supply before starting any repairs.How to Fix a Leaky Kitchen Sink Drain


How to Fix a Leaky Kitchen Sink Drain


Repairing a leaky kitchen sink drain is a task that can easily be done by yourself. All you need are a few tools and some basic DIY skills. This will not only save you money but also give you a sense of accomplishment. Plus, you won't have to wait for a professional to come and fix the problem, which can sometimes take days.DIY Kitchen Sink Drain Repair


DIY Kitchen Sink Drain Repair


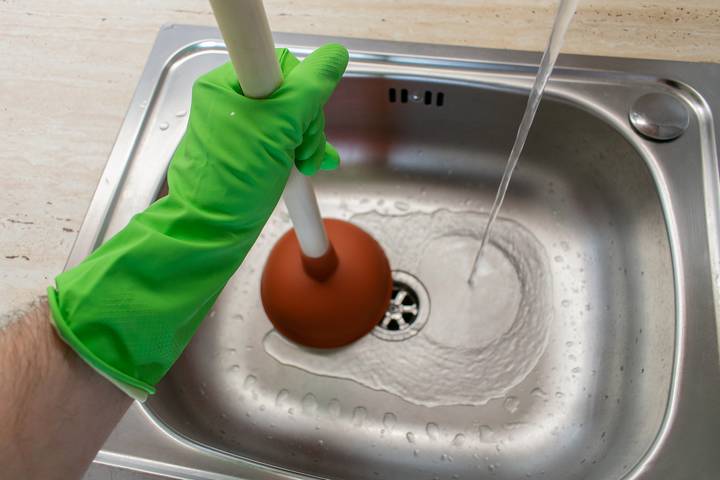
Step 1: Turn off the water supply to the sink. Step 2: Use pliers to loosen the nuts and remove the drain pipe. Step 3: Clean the drain and the surrounding area to remove any debris or buildup. Step 4: Inspect the gasket or seal for any signs of wear or damage. Step 5: If the gasket or seal is damaged, replace it with a new one. Step 6: Apply plumber's putty around the drain opening. Step 7: Reattach the drain pipe and tighten the nuts with pliers. Step 8: Turn on the water supply and check for any leaks. Step 9: If there are still leaks, tighten the nuts further or replace the gasket or seal again. Step 10: Once there are no more leaks, clean up any excess putty and test the drain by running water through it.Steps to Repair a Leaky Kitchen Sink Drain

Steps to Repair a Leaky Kitchen Sink Drain


There are several common causes of a leaky kitchen sink drain. The most common is a worn out or damaged gasket or seal. Other causes include loose or damaged fittings, clogs in the drain, and cracked pipes. It is important to identify the cause of the leak before attempting to fix it.Common Causes of a Leaky Kitchen Sink Drain


Common Causes of a Leaky Kitchen Sink Drain


To repair a leaky kitchen sink drain, you will need the following tools:Tools Needed for Repairing a Leaky Kitchen Sink Drain


Tools Needed for Repairing a Leaky Kitchen Sink Drain

Here are a few tips to keep in mind when repairing a leaky kitchen sink drain:Tips for Repairing a Leaky Kitchen Sink Drain


Tips for Repairing a Leaky Kitchen Sink Drain


If you are not comfortable with DIY repairs or the leak is too severe, it is best to call a professional plumber for kitchen sink drain repair services. They have the necessary skills and tools to fix the problem efficiently and effectively. While it may cost more, it can save you time and ensure the leak is properly fixed.Professional Kitchen Sink Drain Repair Services


Professional Kitchen Sink Drain Repair Services


The best way to prevent a leaky kitchen sink drain is to take preventative measures. This includes regularly cleaning the drain and surrounding area, avoiding putting harmful substances down the drain, and checking for any signs of wear or damage to the gasket or seal. It is also important to address any leaks as soon as they are noticed to prevent further damage.How to Prevent a Leaky Kitchen Sink Drain


How to Prevent a Leaky Kitchen Sink Drain


There are a few signs that indicate your kitchen sink drain may need repair:Signs That Your Kitchen Sink Drain Needs Repair

Signs That Your Kitchen Sink Drain Needs Repair


How to Repair a Kitchen Sink Leaky Drain: A Step-by-Step Guide

Identify the Source of the Leak
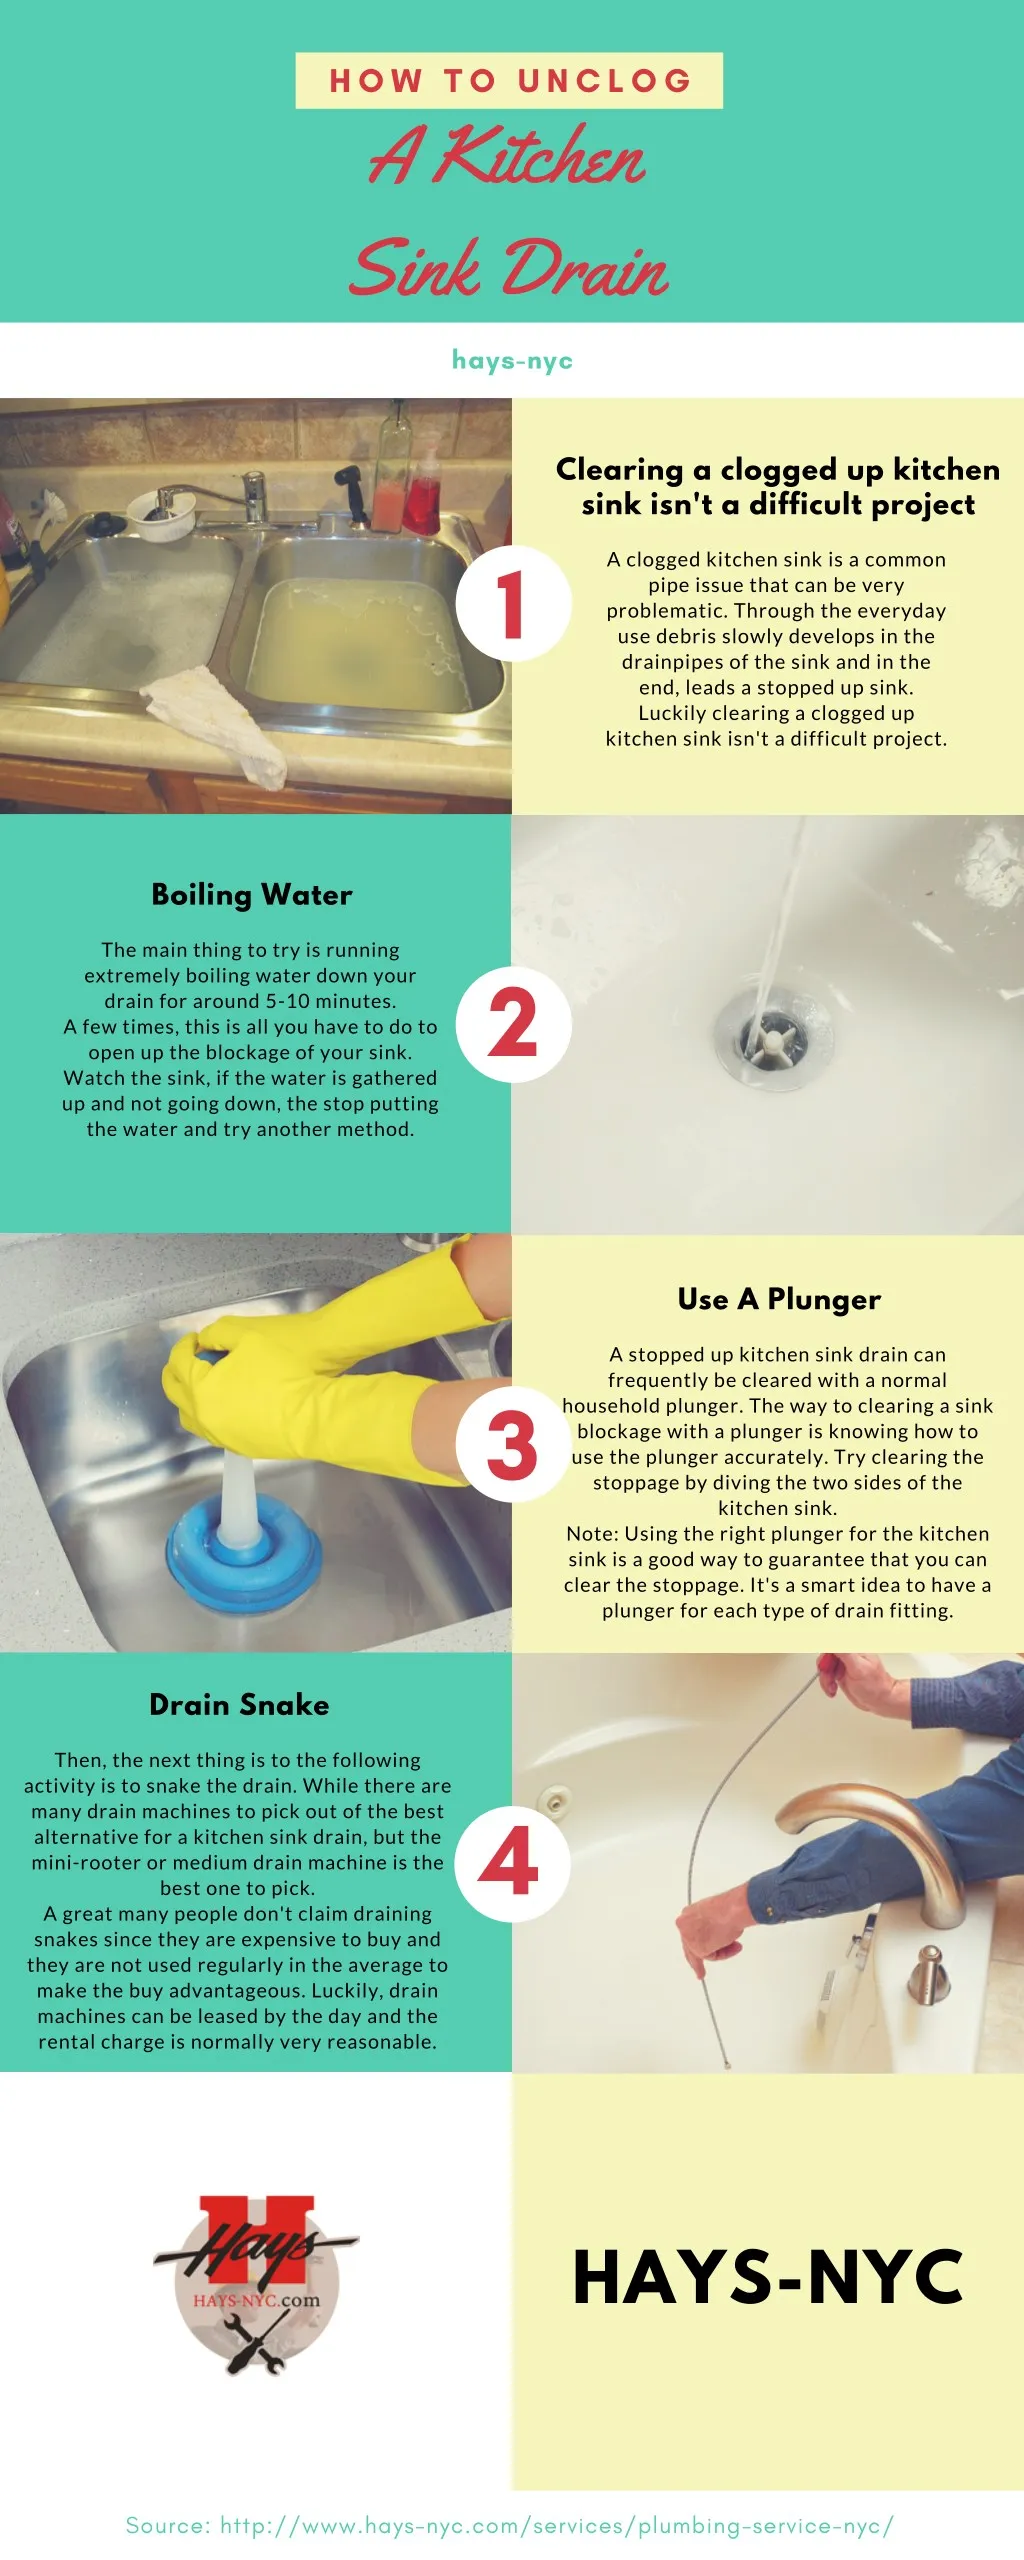
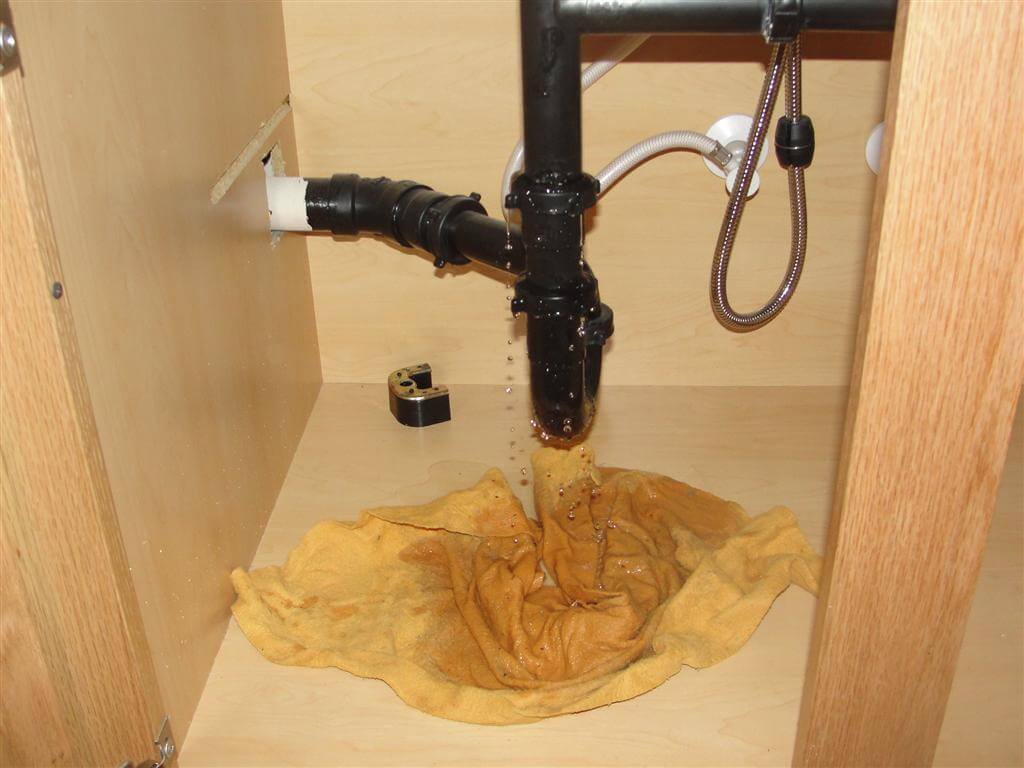
 The first step in repairing a leaky drain in your kitchen sink is to identify where the leak is coming from. Start by checking the drain basket, which is the area where the water drains out of the sink. If there is water pooling around the basket, it is likely the source of the leak. You can also check the pipes under the sink for any signs of water or corrosion. Once you have pinpointed the source of the leak, you can move on to the next step.
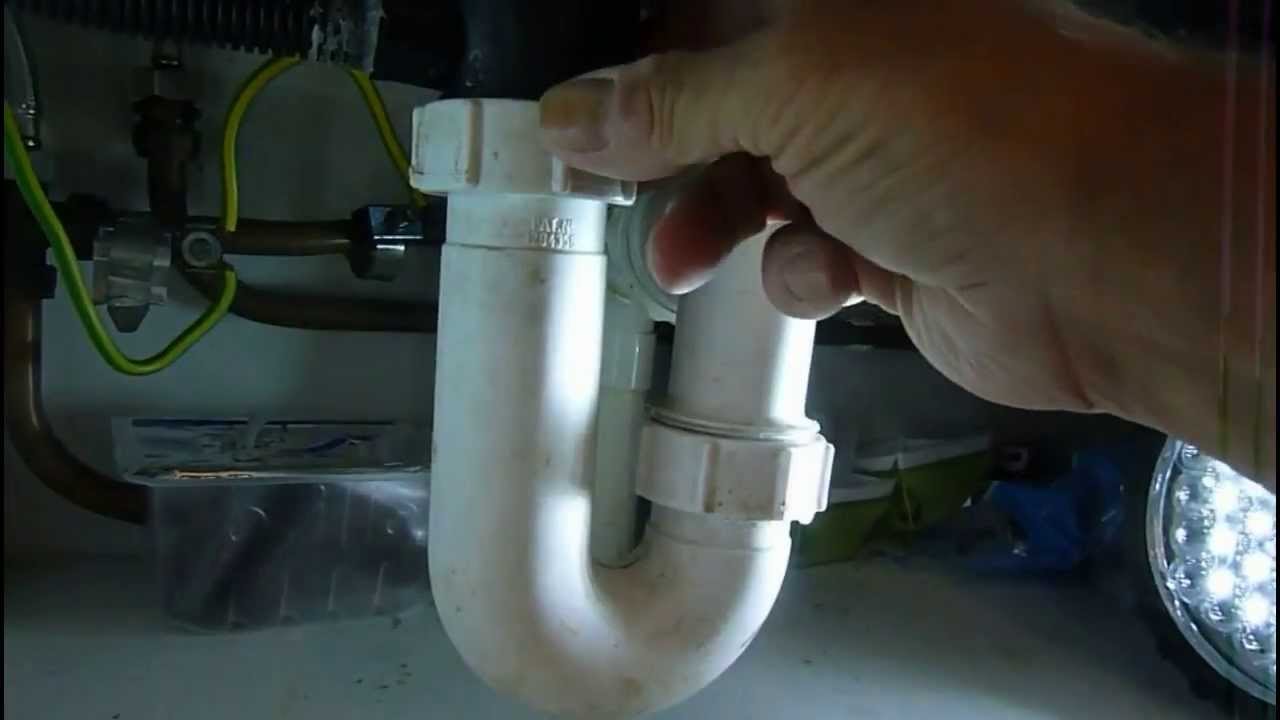
Turn Off the Water Supply
 Before you begin any repair work, it is important to turn off the water supply to the sink. This will prevent any further water from leaking and allow you to work without any distractions. The water supply can usually be shut off by turning the knobs under the sink in a clockwise direction. If you are unsure how to turn off the water supply, you can also turn off the main water supply to your house.
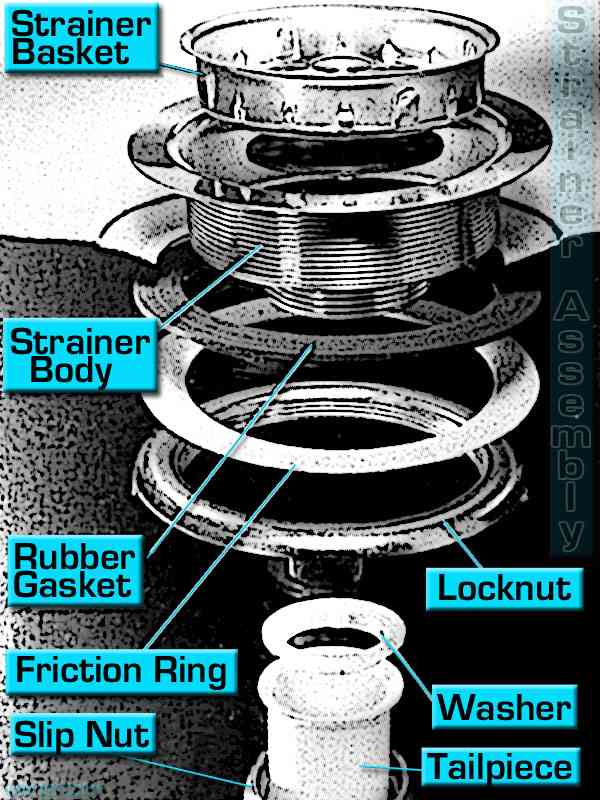
Disassemble the Drain Basket
 To repair a leaky drain, you will need to disassemble the drain basket. Start by removing the sink strainer, which is the part that catches food debris. Then, use a wrench to loosen and remove the locknut that holds the drain basket in place. Once the locknut is removed, you can lift out the drain basket and remove any old putty or gunk that may be causing the leak.
Apply Fresh Putty
 After cleaning the area, apply a fresh layer of plumbers putty around the drain opening. This will create a watertight seal when the drain basket is reinstalled. Make sure to evenly distribute the putty around the opening and press it down gently to ensure it adheres properly.
Reassemble the Drain Basket
 With the new putty in place, it is time to reassemble the drain basket. Place the basket back into the drain opening and secure it with the locknut. Use a wrench to tighten the locknut, making sure not to over-tighten it. This can cause damage to the sink and may lead to future leaks.
Turn the Water Supply Back On
 Once the drain basket is securely in place, you can turn the water supply back on. Check for any leaks around the drain basket and pipes. If everything looks good, you have successfully repaired your kitchen sink leaky drain.
In Conclusion
, repairing a kitchen sink leaky drain may seem like a daunting task, but with the right tools and knowledge, it can be easily done. By following these simple steps, you can save yourself time and money by fixing the leak yourself. Remember to always turn off the water supply before beginning any repair work and to use proper safety precautions. If you are unsure or uncomfortable with performing the repairs yourself, it is always best to call a professional plumber.
Once the drain basket is securely in place, you can turn the water supply back on. Check for any leaks around the drain basket and pipes. If everything looks good, you have successfully repaired your kitchen sink leaky drain.
In Conclusion
, repairing a kitchen sink leaky drain may seem like a daunting task, but with the right tools and knowledge, it can be easily done. By following these simple steps, you can save yourself time and money by fixing the leak yourself. Remember to always turn off the water supply before beginning any repair work and to use proper safety precautions. If you are unsure or uncomfortable with performing the repairs yourself, it is always best to call a professional plumber.