If you've noticed a leaky or clogged bathroom sink drain, it may be time to replace it. While this may seem like a daunting task, it's actually a relatively simple DIY project that can save you money on hiring a plumber. With the right tools and materials, you can replace your bathroom sink drain in just a few easy steps. Follow this step-by-step guide to learn how.How to Replace a Bathroom Sink Drain


How to Replace a Bathroom Sink Drain


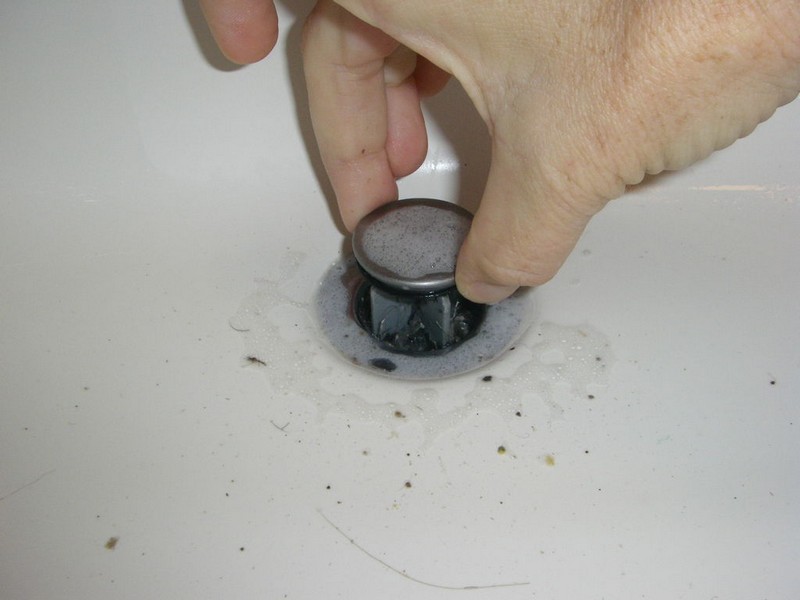
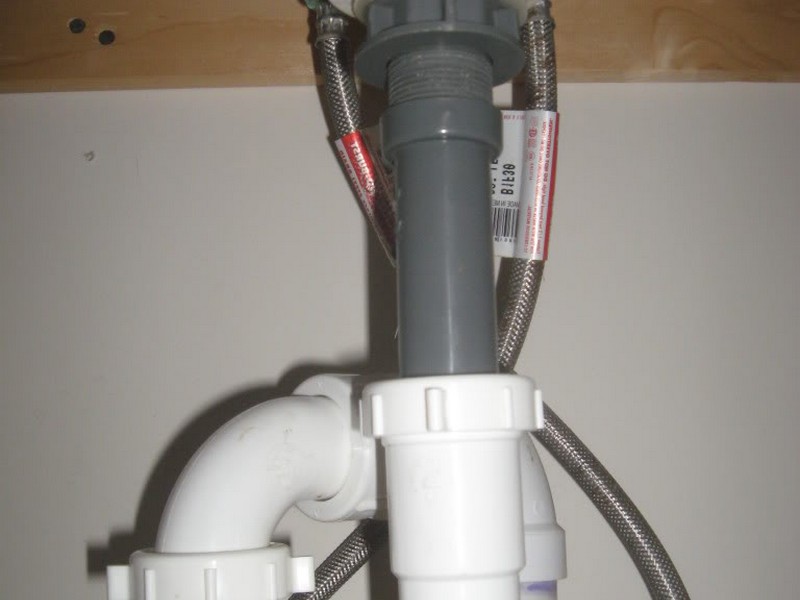
The first step in replacing a bathroom sink drain is to gather all the necessary tools and materials. You will need a pipe wrench, pliers, a screwdriver, plumber's putty, and a new drain assembly. Make sure to turn off the water supply to your sink before beginning any work. Once you have everything you need, follow these steps: Step 1: Remove the old drain assembly by loosening the slip nut at the bottom of the sink with a pipe wrench. Then, unscrew the drain flange from the top of the sink using pliers. Step 2: Clean the area around the sink drain hole and remove any remaining putty or debris. This will ensure a proper seal for the new drain assembly. Step 3: Roll a small amount of plumber's putty into a thin, snake-like shape and wrap it around the underside of the new drain flange. Step 4: Place the new drain flange into the sink drain hole and press down firmly to create a seal with the putty. Step 5: From underneath the sink, screw the drain flange into place using the provided drain assembly and a screwdriver. Step 6: Slide the slip nut onto the new drain assembly and tighten it with a pipe wrench. This will secure the new drain in place. Step 7: Turn the water supply back on and test the new drain for leaks. If everything looks good, you're all set!Replacing a Bathroom Sink Drain: Your Step-by-Step Guide


Replacing a Bathroom Sink Drain: Your Step-by-Step Guide


Replacing a bathroom sink drain is a simple DIY project that can save you time and money. By following these steps and using the right tools and materials, you can easily replace your old, leaky drain with a new one. Plus, with the satisfaction of completing the project yourself, you'll feel like a DIY pro.DIY: Replacing a Bathroom Sink Drain


DIY: Replacing a Bathroom Sink Drain


If you're new to DIY projects, replacing a bathroom sink drain may seem intimidating. However, with these tips and tricks, you'll be able to tackle this project with ease: Tip 1: Before beginning, watch a few tutorials online to get a better understanding of the process. Tip 2: Use a bucket or towel to catch any excess water that may come out while removing the old drain. Tip 3: Make sure to tighten all connections securely to avoid any future leaks. Tip 4: If the old drain is difficult to remove, use a penetrating oil to loosen it up. Tip 5: Take your time and be patient. Rushing through the process can lead to mistakes and a poorly installed drain.Replacing a Bathroom Sink Drain: Tips and Tricks


Replacing a Bathroom Sink Drain: Tips and Tricks


While replacing a bathroom sink drain may seem straightforward, there are a few common mistakes that can easily be avoided: Mistake 1: Not turning off the water supply before beginning work. Mistake 2: Forgetting to clean the area around the drain hole, which can lead to an improper seal. Mistake 3: Using too much plumber's putty, which can cause it to squeeze out and create a messy installation. Mistake 4: Not tightening all connections securely, which can lead to future leaks. Mistake 5: Rushing through the installation, which can result in mistakes and an improperly installed drain.Replacing a Bathroom Sink Drain: Common Mistakes to Avoid


Replacing a Bathroom Sink Drain: Common Mistakes to Avoid


In order to successfully replace your bathroom sink drain, you will need the following tools and materials: Tools: Pipe wrench, pliers, screwdriver. Materials: Plumber's putty, new drain assembly.Replacing a Bathroom Sink Drain: Tools and Materials You'll Need

Replacing a Bathroom Sink Drain: Tools and Materials You'll Need

If you encounter any problems during the installation process, here are some common issues and how to troubleshoot them: Issue 1: The new drain assembly is too long or too short. Solution: Measure the drain hole before purchasing a new assembly to ensure a proper fit. If the assembly is too long, you can cut it to size using a hacksaw. Issue 2: The new drain is leaking. Solution: Check that all connections are tightened securely. If the leak persists, you may need to remove the drain and reapply the putty more evenly. Issue 3: The old drain is difficult to remove. Solution: Use a penetrating oil to loosen the connections before trying to remove the drain again.Replacing a Bathroom Sink Drain: Troubleshooting Common Issues
Replacing a Bathroom Sink Drain: Troubleshooting Common Issues

When it comes to choosing a replacement drain assembly for your bathroom sink, there are a few things to consider: Size: Measure the diameter of your drain hole to ensure a proper fit. Material: Choose a durable material, such as brass or stainless steel, for long-lasting use. Style: Consider the style of your sink and choose a drain assembly that complements it.Replacing a Bathroom Sink Drain: How to Choose the Right Replacement
Replacing a Bathroom Sink Drain: How to Choose the Right Replacement


While hiring a professional plumber to replace your bathroom sink drain may seem like the easier option, it can also be costly. With the right tools and materials, replacing a drain can be a simple DIY project that can save you money. However, if you're not confident in your DIY skills, it's best to leave it to the professionals.Replacing a Bathroom Sink Drain: Professional vs. DIY

Replacing a Bathroom Sink Drain: Professional vs. DIY
When tackling any DIY project, it's important to keep safety in mind. Here are a few precautions to take when replacing a bathroom sink drain: Safety 1: Make sure to turn off the water supply before beginning work. Safety 2: Wear safety goggles and gloves to protect your eyes and hands from any debris. Safety 3: Use caution when handling tools to avoid any injuries. Safety 4: If you encounter any electrical components, make sure to turn off the power before continuing work. Safety 5: If you're unsure of how to safely complete the project, it's best to hire a professional. By following this step-by-step guide and keeping these tips and tricks in mind, you can easily replace your bathroom sink drain and prevent any future leaks or clogs. With the satisfaction of completing the project yourself and the money you'll save, it's a win-win situation. So don't wait any longer, gather your tools and materials and get started on replacing your bathroom sink drain today!Replacing a Bathroom Sink Drain: Safety Precautions to Keep in Mind


Replacing a Bathroom Sink Drain: Safety Precautions to Keep in Mind
Why Replacing Your Bathroom Sink Drain is Important for Your House Design

The Importance of a Functional Sink Drain
 The bathroom sink is an essential component of any house design. It is where we wash our hands, brush our teeth, and carry out other daily hygiene routines. However, a clogged or malfunctioning sink drain can quickly become a nuisance and disrupt the functionality of your bathroom. Not only can it cause unpleasant odors and slow draining, but it can also lead to water damage and mold growth. Therefore, it is crucial to replace your bathroom sink drain to maintain a functional and hygienic space.
The Benefits of Upgrading Your Sink Drain
 Upgrading your bathroom sink drain can not only improve its functionality but also enhance the overall design of your bathroom. With advancements in technology, there are now a variety of sink drain options available on the market. From sleek and modern designs to more traditional and classic styles, you can choose a sink drain that complements your house design and adds a touch of elegance to your bathroom. Additionally, modern sink drains come equipped with features such as pop-up stoppers and strainers, making them more convenient and user-friendly.
The Process of Replacing Your Bathroom Sink Drain
 Replacing your bathroom sink drain may seem like a daunting task, but with the right tools and knowledge, it can be a simple and straightforward process. First, you will need to shut off the water supply to your sink and remove any excess water from the drain. Next, you will need to unscrew and remove the old drain using a wrench or pliers. Once the old drain is removed, you can then install the new drain using plumber's putty and a new rubber gasket. Finally, make sure to test the new drain for any leaks and reattach the water supply if everything is in working order.
Conclusion
 In conclusion, replacing your bathroom sink drain is not only important for maintaining a functional and hygienic space, but it can also add to the overall design aesthetic of your bathroom. With a variety of options available, you can choose a sink drain that fits your house design and meets your needs. So don't wait until your sink drain causes problems, upgrade it now and enjoy a more efficient and stylish bathroom.