Replacing a kitchen sink nut may seem like a daunting task, but with the right tools and knowledge, it can be a simple and straightforward process. Whether your sink nut is damaged or you simply want to upgrade to a new one, this guide will walk you through the steps of replacing a kitchen sink nut.How to Replace a Kitchen Sink Nut


How to Replace a Kitchen Sink Nut


If you notice a leak under your kitchen sink, it may be due to a worn out nut and washer. These small but essential parts help to secure the sink to the countertop and prevent water from leaking. To replace them, follow these steps: Step 1: Turn off the water supply to the sink by shutting off the valves under the sink. Step 2: Use a wrench to loosen and remove the old nut and washer from under the sink. Step 3: Place the new washer over the sink's drain and secure it in place with the new nut. Step 4: Tighten the nut with a wrench until it is snug, but not too tight to avoid damaging the sink or countertop.How to Replace a Kitchen Sink Nut and Washer


How to Replace a Kitchen Sink Nut and Washer


Replacing a kitchen sink nut can be done in a few simple steps. Follow this step-by-step guide and you'll have a new sink nut installed in no time. Step 1: Turn off the water supply to the sink. Step 2: Use a wrench to loosen and remove the old nut from under the sink. Step 3: Place the new nut over the sink's drain and line it up with the bolt that secures the sink to the countertop. Step 4: Use the wrench to tighten the nut, securing the sink in place.Replacing a Kitchen Sink Nut: Step-by-Step Guide


Replacing a Kitchen Sink Nut: Step-by-Step Guide


Do-it-yourself projects can be both satisfying and cost-effective. When it comes to replacing a kitchen sink nut, it is a task that can easily be done on your own. Follow the steps outlined in this guide and you'll have a new sink nut installed without having to call a professional.DIY: Replacing a Kitchen Sink Nut


DIY: Replacing a Kitchen Sink Nut


Some kitchen sinks may have a nut and bolt system to secure them in place. If this is the case for your sink, follow these steps to replace the nut and bolt: Step 1: Turn off the water supply to the sink. Step 2: Use a wrench to loosen and remove the old nut and bolt from under the sink. Step 3: Place the new nut and bolt in their designated spots and tighten them with a wrench.Replacing a Kitchen Sink Nut and Bolt


Replacing a Kitchen Sink Nut and Bolt


To replace a kitchen sink nut, you will need a few tools that can easily be found at your local hardware store: - Wrench - to loosen and tighten the nut - Screwdriver - to remove any screws that may be holding the sink in place - New Nut and Washer/Bolt - to replace the old, worn out onesTools Needed for Replacing a Kitchen Sink Nut


Tools Needed for Replacing a Kitchen Sink Nut


While replacing a kitchen sink nut may seem like a simple task, there are some common mistakes that can be easily avoided: - Over-tightening the nut - this can cause damage to the sink or countertop - Not turning off the water supply - this can lead to a messy and potentially damaging leak - Forgetting to replace the washer or bolt - these parts are essential for preventing leaksReplacing a Kitchen Sink Nut: Common Mistakes to Avoid


Replacing a Kitchen Sink Nut: Common Mistakes to Avoid


Here are a few helpful tips and tricks to keep in mind when replacing a kitchen sink nut: - Use a plumber's putty - this can help create a watertight seal between the sink and the nut - Have someone hold the sink in place - this can make it easier to install the new nut and prevent any movement or shifting - Double check for leaks - after installing the new nut, turn the water supply back on and check for any leaks before using the sink againReplacing a Kitchen Sink Nut: Tips and Tricks

Replacing a Kitchen Sink Nut: Tips and Tricks

If your kitchen sink has a gasket in addition to the nut, follow these steps to replace both: Step 1: Turn off the water supply to the sink. Step 2: Use a wrench to loosen and remove the old nut and gasket from under the sink. Step 3: Place the new gasket over the sink's drain and secure it in place with the new nut. Step 4: Tighten the nut with a wrench until it is snug, but not too tight to avoid damaging the sink or countertop.How to Replace a Kitchen Sink Nut and Gasket


How to Replace a Kitchen Sink Nut and Gasket


If you encounter any issues while replacing a kitchen sink nut, here are some common problems and how to troubleshoot them: - The nut won't budge - try using a lubricant, such as WD-40, to help loosen the nut - The new nut won't tighten - make sure the sink is properly aligned and consider using a new nut and washer/bolt - Water is still leaking - double check that the nut is tightened enough and that no pieces of the old washer or gasket are stuck in the drain With these tips and steps, replacing a kitchen sink nut can be a manageable and successful DIY project. Remember to take your time and be careful not to damage any of the sink's components. And if you encounter any issues, don't hesitate to call a professional for assistance.Replacing a Kitchen Sink Nut: Troubleshooting Common Issues
Replacing a Kitchen Sink Nut: Troubleshooting Common Issues

Replacing a Kitchen Sink Nut: A DIY Guide

Introduction
 When it comes to house design, the kitchen is often considered the heart of the home. It is a place where family and friends gather to cook, eat, and socialize. As such, it is important to keep your kitchen in top shape. One common issue that homeowners face is a loose or damaged kitchen sink nut. This small but crucial component is responsible for holding your kitchen sink in place, and when it becomes loose or damaged, it can cause leaks and other problems. In this article, we will guide you through the process of
replacing a kitchen sink nut
, so you can keep your kitchen functioning smoothly.
When it comes to house design, the kitchen is often considered the heart of the home. It is a place where family and friends gather to cook, eat, and socialize. As such, it is important to keep your kitchen in top shape. One common issue that homeowners face is a loose or damaged kitchen sink nut. This small but crucial component is responsible for holding your kitchen sink in place, and when it becomes loose or damaged, it can cause leaks and other problems. In this article, we will guide you through the process of
replacing a kitchen sink nut
, so you can keep your kitchen functioning smoothly.
Gather Your Tools and Materials
 Before you begin the process of replacing the kitchen sink nut, it is important to gather all the necessary tools and materials. You will need a set of pliers, an adjustable wrench, a screwdriver, and a new kitchen sink nut. It is important to
use the right tools
to avoid causing further damage to your sink or plumbing.
Before you begin the process of replacing the kitchen sink nut, it is important to gather all the necessary tools and materials. You will need a set of pliers, an adjustable wrench, a screwdriver, and a new kitchen sink nut. It is important to
use the right tools
to avoid causing further damage to your sink or plumbing.
Turn Off the Water Supply
 The first step in replacing a kitchen sink nut is to turn off the water supply. This will prevent any water from flowing while you work, reducing the risk of flooding or other accidents. Locate the shut-off valves under the sink and turn them off by twisting the handles clockwise. If you cannot find the shut-off valves, you may need to turn off the main water supply to your house.
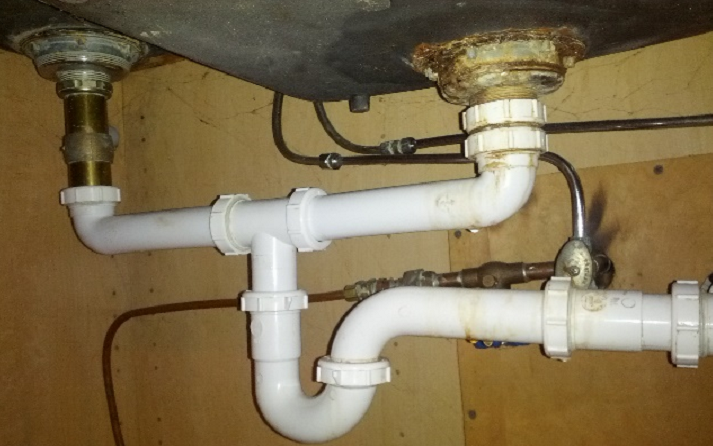
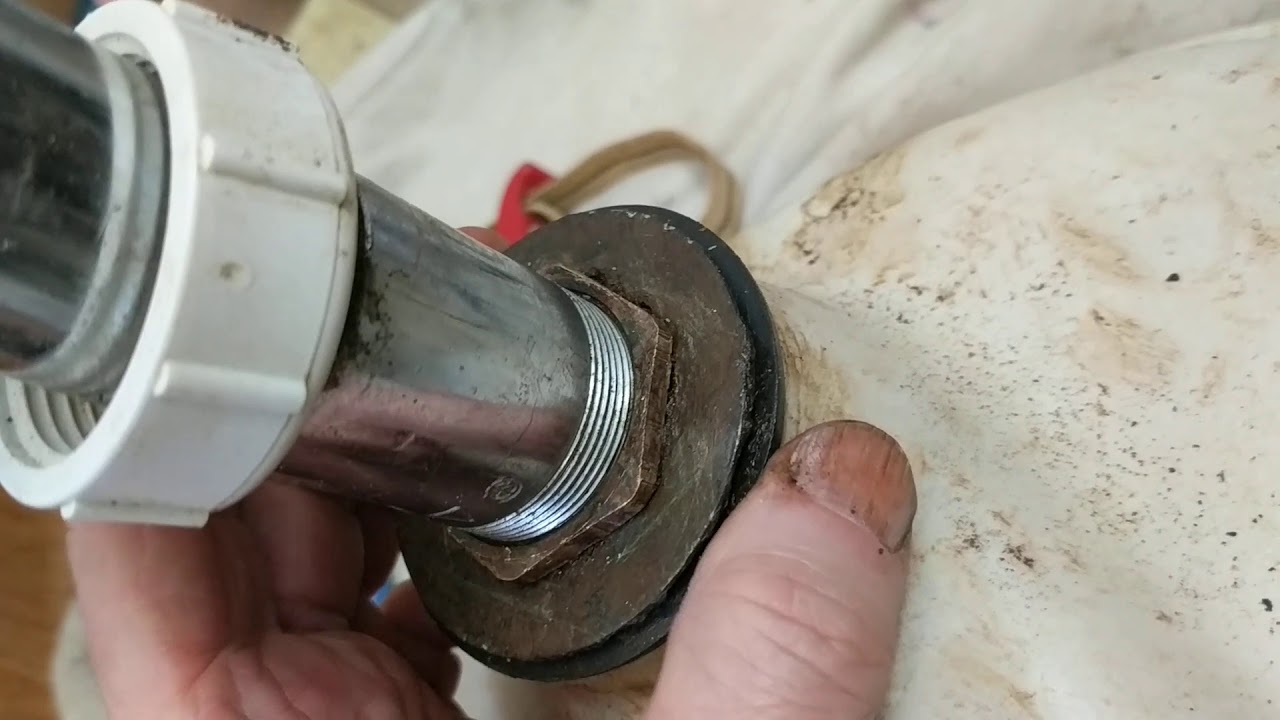
Remove the Old Nut
/how-to-install-a-sink-drain-2718789-hero-b5b99f72b5a24bb2ae8364e60539cece.jpg) Using your pliers or adjustable wrench, grip the old nut and turn it counterclockwise to loosen it. If the nut is too tight, you can use a lubricant such as WD-40 to help loosen it. Once the nut is loose, you can remove it by hand. If it is stuck, you may need to use your pliers to break it off.
Using your pliers or adjustable wrench, grip the old nut and turn it counterclockwise to loosen it. If the nut is too tight, you can use a lubricant such as WD-40 to help loosen it. Once the nut is loose, you can remove it by hand. If it is stuck, you may need to use your pliers to break it off.
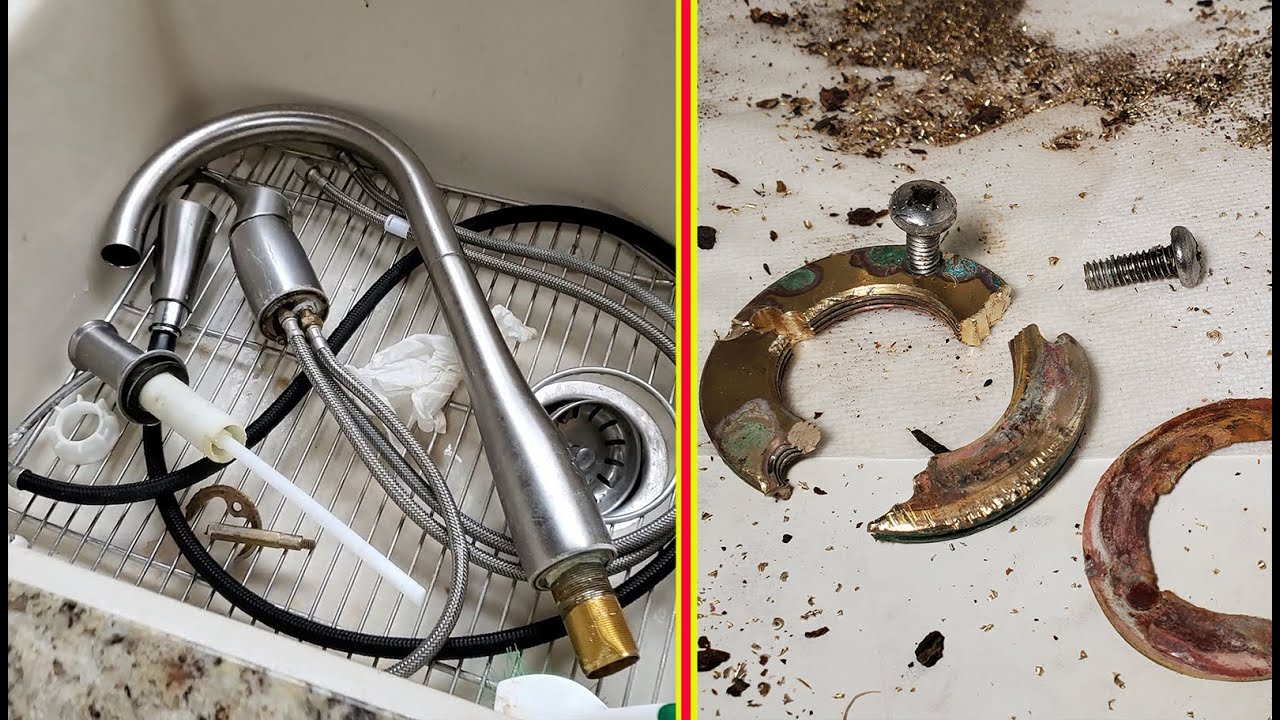
Clean and Prepare the Area
 After removing the old nut, you should clean and prepare the area for the new one. Use a rag to wipe away any debris or old putty from the sink and the surrounding area. If there is any damage to the sink or the area where the nut sits, you may need to
repair it
before proceeding.
After removing the old nut, you should clean and prepare the area for the new one. Use a rag to wipe away any debris or old putty from the sink and the surrounding area. If there is any damage to the sink or the area where the nut sits, you may need to
repair it
before proceeding.
Install the New Nut
 Take your new kitchen sink nut and place it in the same spot where the old one was. Use your pliers or adjustable wrench to tighten it clockwise. Make sure it is snug but not too tight, as this can cause damage. If your new nut comes with a gasket, place it between the nut and the sink for a watertight seal.
Turn the Water Supply Back On
 After the new nut is installed, turn the water supply back on and check for any leaks. If there are no leaks, you have successfully replaced your kitchen sink nut. If you notice any leaks, you may need to tighten the nut a little more or use plumber's tape for a better seal.
In conclusion,
replacing a kitchen sink nut
is a simple DIY task that can save you time and money in the long run. By following these steps and using the right tools, you can keep your kitchen sink in top shape and avoid any potential plumbing issues. Remember to always turn off the water supply before attempting any repairs and consult a professional if you are unsure or uncomfortable with the process. Happy fixing!
After the new nut is installed, turn the water supply back on and check for any leaks. If there are no leaks, you have successfully replaced your kitchen sink nut. If you notice any leaks, you may need to tighten the nut a little more or use plumber's tape for a better seal.
In conclusion,
replacing a kitchen sink nut
is a simple DIY task that can save you time and money in the long run. By following these steps and using the right tools, you can keep your kitchen sink in top shape and avoid any potential plumbing issues. Remember to always turn off the water supply before attempting any repairs and consult a professional if you are unsure or uncomfortable with the process. Happy fixing!