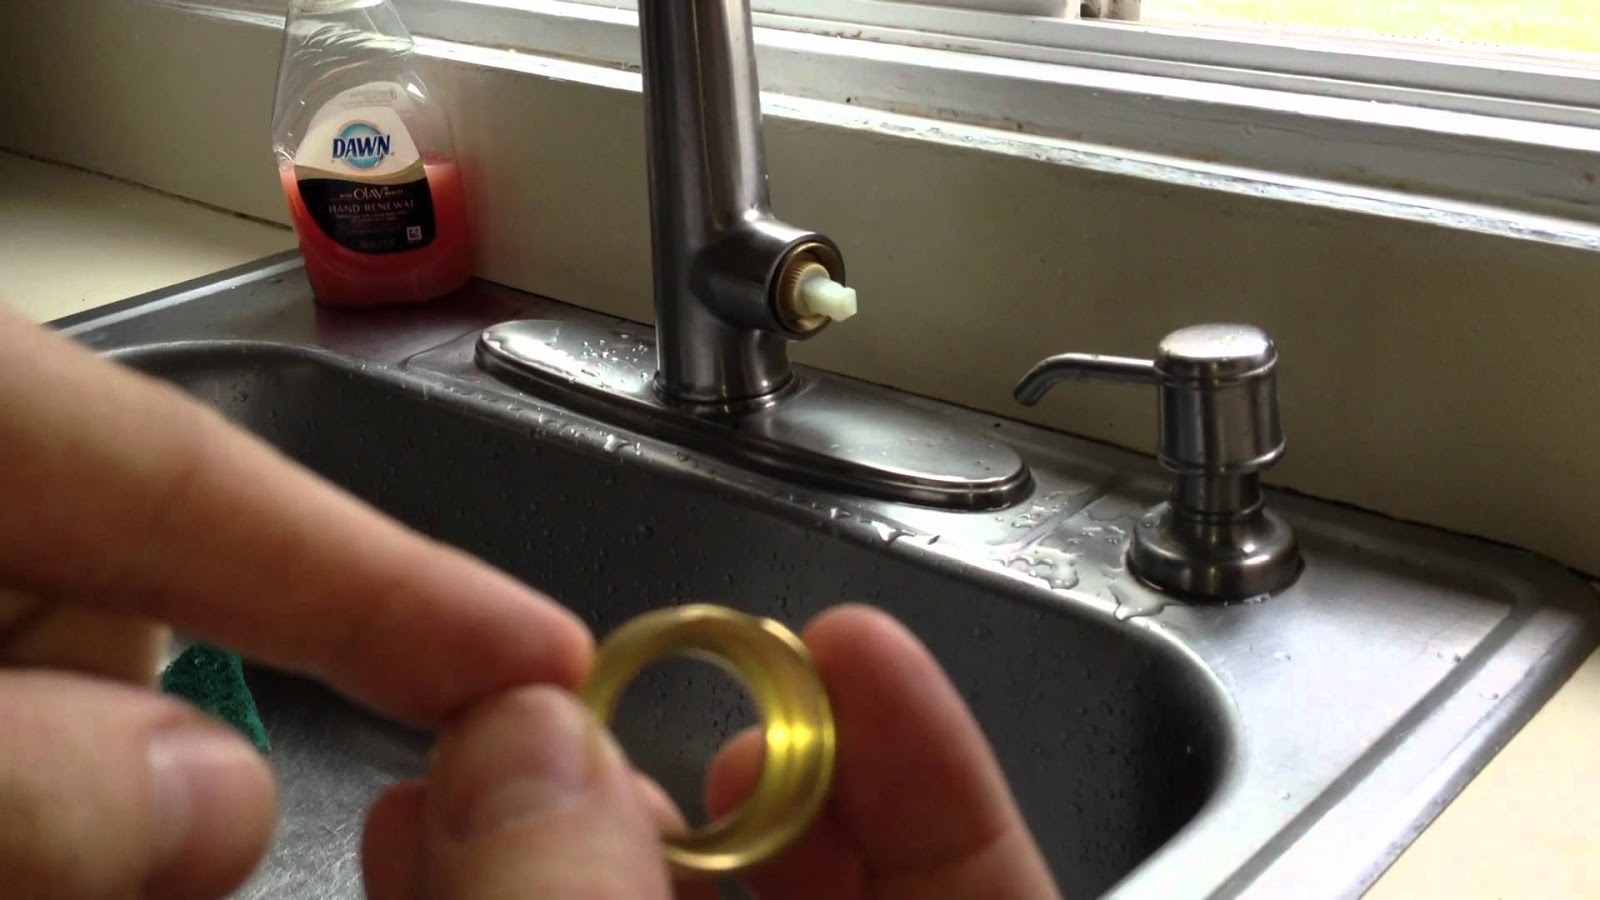
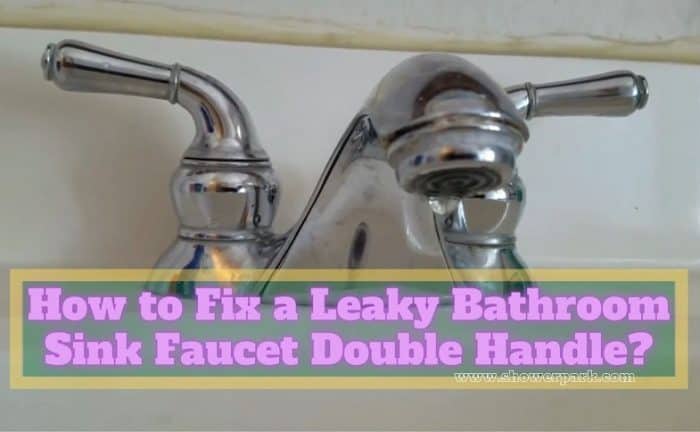
If you have a double handle kitchen sink faucet, you may have experienced the frustration of a leaky faucet. Not only can it be annoying to constantly hear the drip-drip of water, but it can also lead to wasted water and a higher water bill. Luckily, fixing a leaky kitchen sink faucet is a relatively simple task that you can do yourself. Follow these steps to fix a leaky kitchen sink faucet with double handles. Step 1: Turn off the water supply. Before you begin any repairs, you want to make sure the water supply to your kitchen sink is turned off. Look under your sink for the shut-off valves and turn them to the off position. Step 2: Remove the handles. Using a screwdriver, remove the handles from your kitchen sink faucet. This will expose the valve stems. Step 3: Replace the O-rings. The most common cause of a leaky kitchen sink faucet is worn out O-rings. These are small rubber rings that seal the valve stem and prevent water from leaking out. Use pliers to remove the old O-rings and replace them with new ones. Step 4: Replace the valve seats. If your O-rings are in good condition but you still have a leak, the valve seats may be the problem. Use a valve seat wrench to remove the old seats and replace them with new ones. Step 5: Reassemble the faucet. Once you have replaced the O-rings and valve seats, reassemble the faucet by putting the handles back on and tightening the screws. Step 6: Turn the water supply back on. Once you have reassembled the faucet, turn the water supply back on and test your faucet. If there are no more leaks, congratulations – you have successfully fixed your leaky kitchen sink faucet!How to Fix a Leaky Kitchen Sink Faucet Double Handle


How to Fix a Leaky Kitchen Sink Faucet Double Handle


:max_bytes(150000):strip_icc()/repair-a-two-handle-cartridge-faucet-1824887-04-9236640018c941eb970815539aa094e2.jpg)


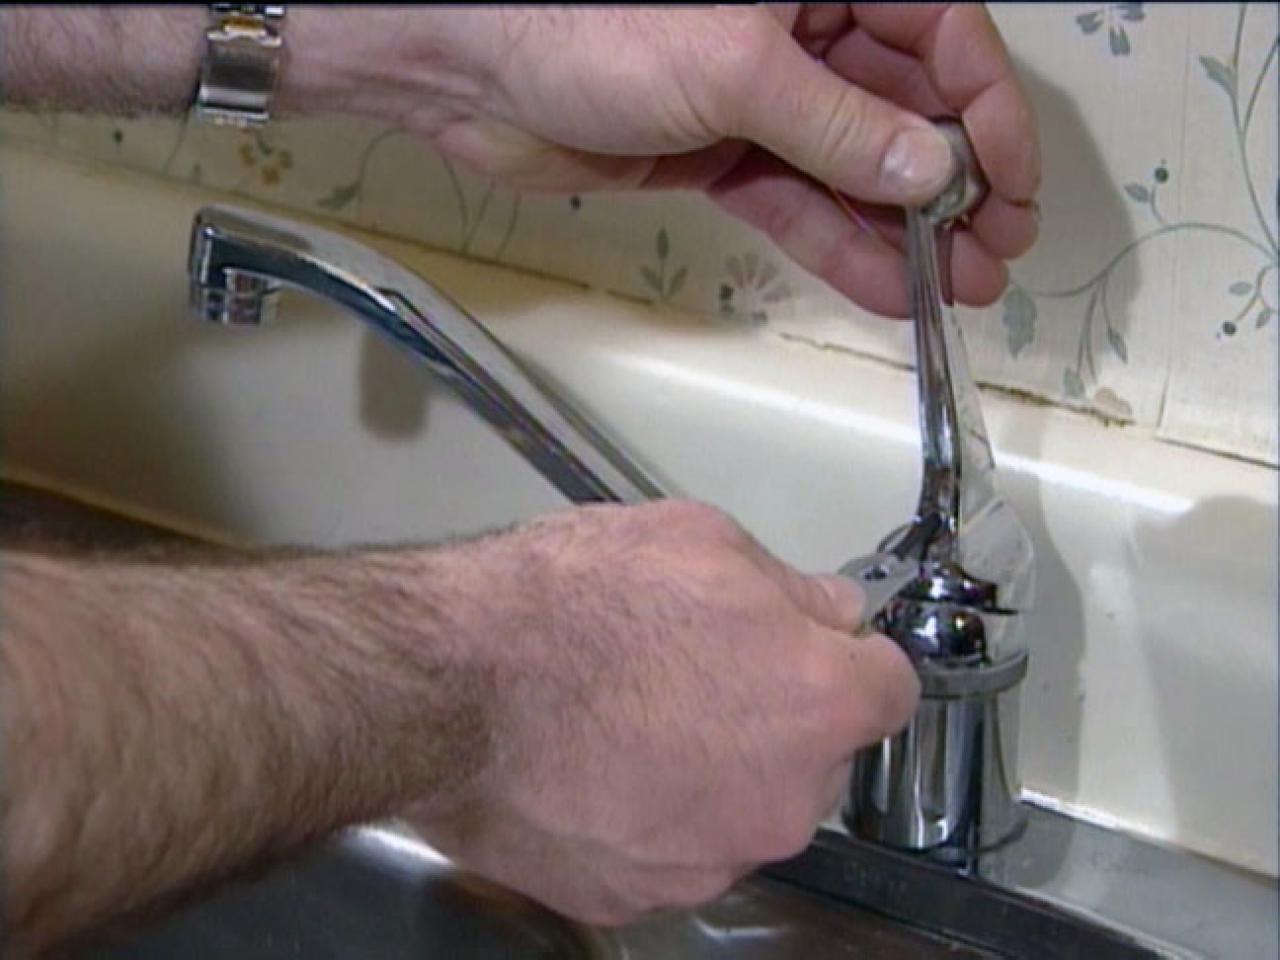
If you have a single handle kitchen sink faucet, fixing a leak may seem like a daunting task. However, with the right tools and a little know-how, you can easily fix a leaky kitchen sink faucet with a single handle. Follow these steps to get your faucet back to working properly. Step 1: Turn off the water supply. Just like with a double handle faucet, the first step is to turn off the water supply to your kitchen sink. Look under your sink for the shut-off valves and turn them off. Step 2: Remove the handle. Using a screwdriver, remove the handle from your kitchen sink faucet. This will expose the cartridge. Step 3: Replace the O-rings. Just like with a double handle faucet, the O-rings are the most likely culprit for a leaky single handle faucet. Use pliers to remove the old O-rings and replace them with new ones. Step 4: Replace the cartridge. If the O-rings were not the problem, the cartridge may be the issue. Use pliers to remove the old cartridge and replace it with a new one. Step 5: Reassemble the faucet. Once you have replaced the necessary parts, reassemble the faucet by putting the handle back on and tightening the screw. Step 6: Turn the water supply back on. With everything reassembled, turn the water supply back on and test your faucet. If there are no more leaks, you have successfully fixed your leaky single handle kitchen sink faucet!How to Fix a Leaky Kitchen Sink Faucet Single Handle


How to Fix a Leaky Kitchen Sink Faucet Single Handle


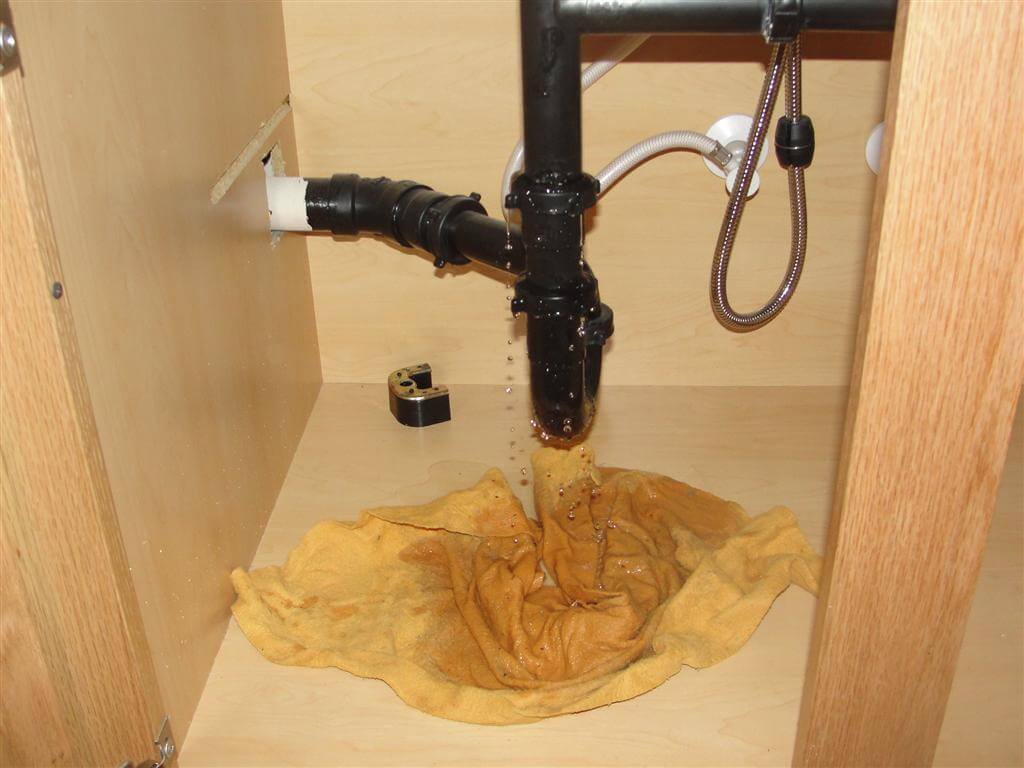
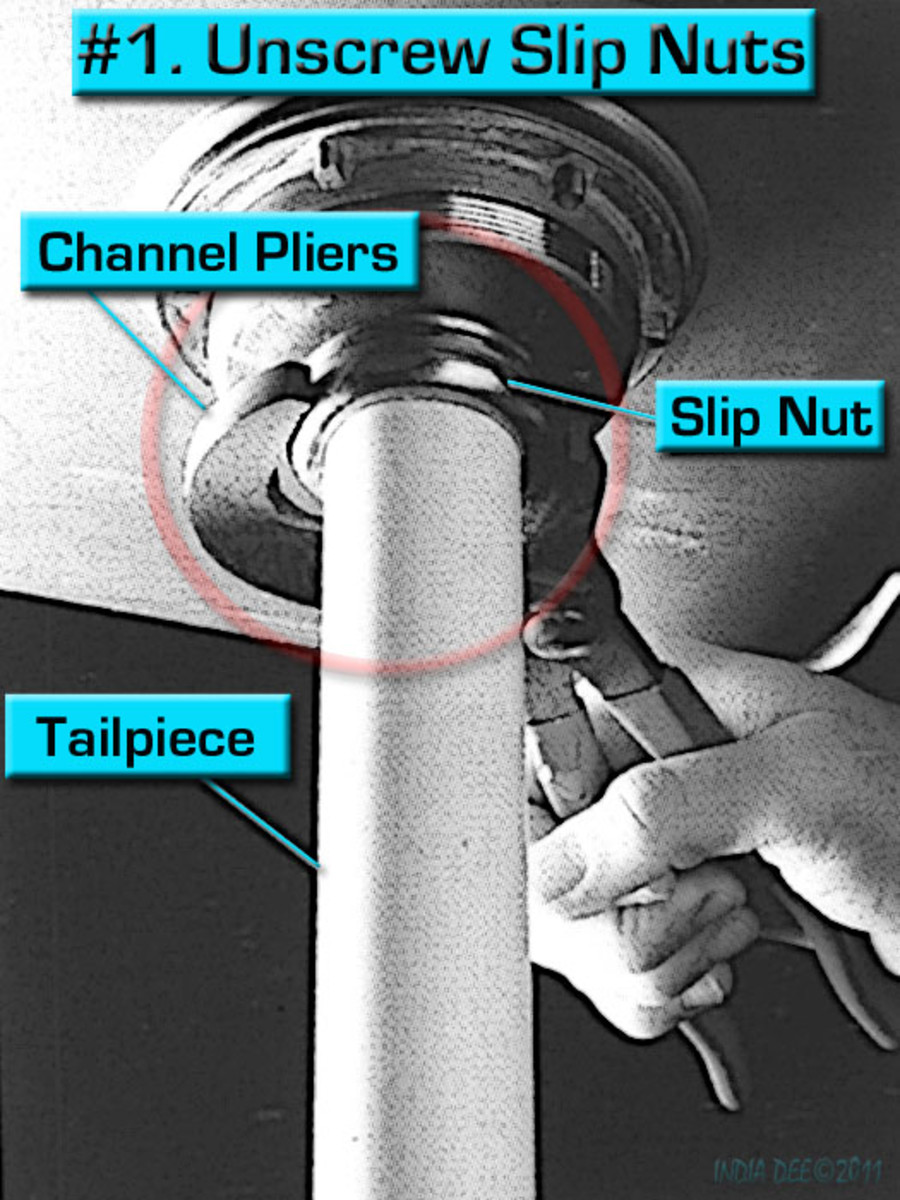
A leaky kitchen sink drain can be a messy and frustrating problem to deal with. Not only can it cause damage to your cabinets and floors, but it can also lead to unpleasant odors in your kitchen. Fortunately, repairing a leaky kitchen sink drain is a simple task that you can do yourself. Follow these steps to fix a leaky kitchen sink drain. Step 1: Identify the source of the leak. The first step in repairing a leaky kitchen sink drain is to identify where the leak is coming from. This will help you determine what parts need to be replaced or repaired. Step 2: Tighten the slip nuts. The most common cause of a leaky kitchen sink drain is loose slip nuts. Simply use a wrench to tighten the slip nuts and see if that stops the leak. Step 3: Replace the gasket. If tightening the slip nuts does not stop the leak, the gasket may be the problem. Use a wrench to remove the old gasket and replace it with a new one. Step 4: Check the drain pipe. If the gasket is not the issue, the drain pipe may be the source of the leak. Inspect the drain pipe for any cracks or damage and replace it if necessary. Step 5: Reassemble the drain. Once you have replaced any necessary parts, reassemble the drain and test for any remaining leaks.How to Repair a Leaky Kitchen Sink Drain


How to Repair a Leaky Kitchen Sink Drain


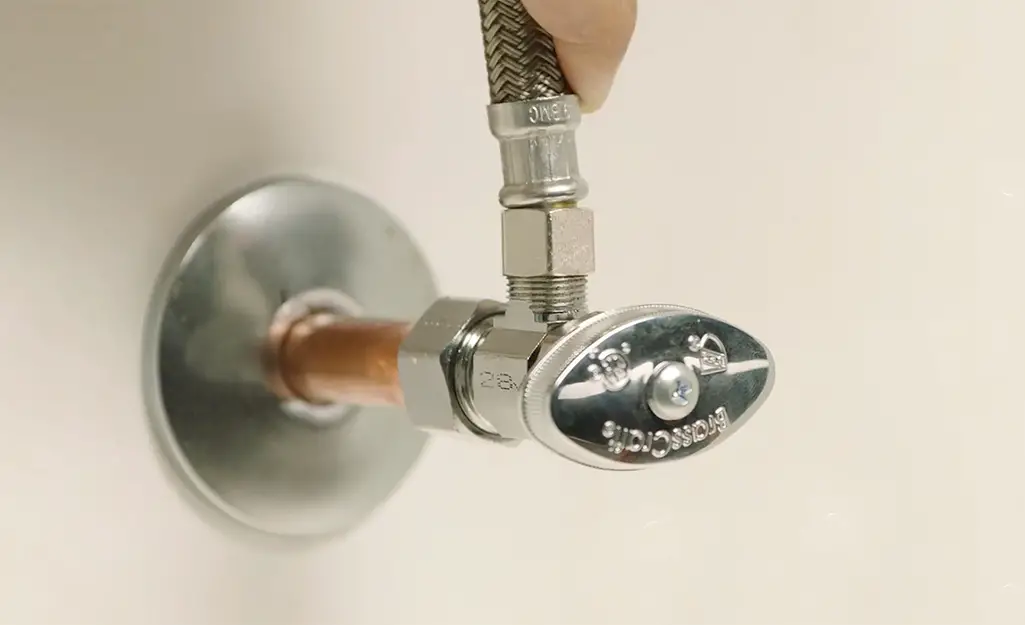
If you have a leaky hot water valve under your kitchen sink, it is important to replace it as soon as possible to prevent further damage. This may seem like a daunting task, but with the right tools and steps, you can easily replace a kitchen sink hot water valve yourself. Here's what you need to do. Step 1: Turn off the water supply. Before you begin any repairs, make sure to turn off the water supply to your kitchen sink. Look for the shut-off valves under your sink and turn them off. Step 2: Remove the old valve. Use pliers to loosen and remove the old hot water valve. Make sure to have a bucket or towel handy to catch any water that may leak out. Step 3: Install the new valve. Place the new hot water valve in its place and tighten it with pliers. Make sure it is securely in place. Step 4: Turn the water supply back on. Once the new valve is installed, turn the water supply back on and test for any leaks. If there are no leaks, you have successfully replaced your kitchen sink hot water valve!How to Replace a Kitchen Sink Hot Water Valve


How to Replace a Kitchen Sink Hot Water Valve


A leaky kitchen sink sprayer can be a nuisance and can also lead to wasted water. Luckily, fixing a leaky sprayer is a simple task that you can do yourself. Follow these steps to get your kitchen sink sprayer back to working properly. Step 1: Turn off the water supply. Just like with any other repairs, the first step is to turn off the water supply to your kitchen sink. Look under your sink for the shut-off valves and turn them off. Step 2: Check the spray head and hose. The most common cause of a leaky kitchen sink sprayer is a cracked or damaged spray head or hose. Inspect these parts for any damage and replace them if necessary. Step 3: Tighten connections. If the spray head and hose are not the problem, check the connections between the sprayer and the hose and tighten them if necessary. Step 4: Replace the diverter. If the connections are not the issue, the diverter may be the culprit. Use pliers to remove the old diverter and replace it with a new one. Step 5: Turn the water supply back on. With everything reassembled, turn the water supply back on and test your sprayer. If there are no more leaks, you have successfully fixed your leaky kitchen sink sprayer!How to Fix a Leaky Kitchen Sink Sprayer


How to Fix a Leaky Kitchen Sink Sprayer


A leaky kitchen sink basket strainer can be a messy problem to deal with. Not only can it cause damage to your cabinets and floors, but it can also lead to unpleasant odors in your kitchen. Fortunately, fixing a leaky basket strainer is a simple task that you can do yourself. Follow these steps to get your kitchen sink basket strainer back to working properly. Step 1: Identify the source of the leak. The first step in repairing a leaky kitchen sink basket strainer is to identify where the leak is coming from. This will help you determine what parts need to be replaced or repaired. Step 2: Tighten the drain basket. The most common cause of a leaky basket strainer is a loose drain basket. Use pliers to tighten the basket and see if that stops the leak. Step 3: Replace the putty. If tightening the drain basket does not stop the leak, the putty may be the problem. Remove the old putty and replace it with a new one. Step 4: Check the connections. If the putty is not the issue, check the connections between the basket and the drain pipe and tighten them if necessary. Step 5: Reassemble the basket strainer. Once you have replaced any necessary parts, reassemble the basket strainer and test for any remaining leaks.How to Fix a Leaky Kitchen Sink Basket Strainer

How to Fix a Leaky Kitchen Sink Basket Strainer


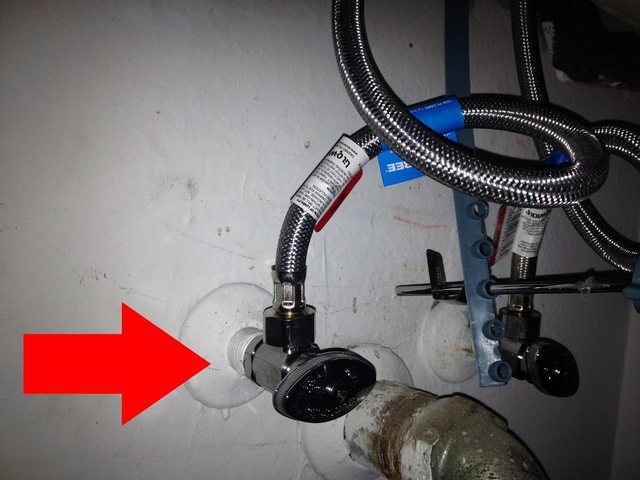
If you have a leaky shut off valve under your kitchen sink, it is important to fix it as soon as possible to prevent further damage. This may seem like a daunting task, but with the right tools and steps, you can easily fix a leaky shut off valve yourself. Here's what you need to do. Step 1: Turn off the water supply. Before you begin any repairs, make sure to turn off the water supply to your kitchen sink. Look for the shut-off valves under your sink and turn them off. Step 2: Remove the old valve. Use pliers to loosen and remove the old shut off valve. Make sure to have a bucket or towel handy to catch any water that may leak out. Step 3: Install the new valve. Place the new shut off valve in its place and tighten it with pliers. Make sure it is securely in place. Step 4: Turn the water supply back on. Once the new valve is installed, turn the water supply back on and test for any leaks. If there are no leaks, you have successfully replaced your kitchen sink shut off valve!How to Fix a Leaky Kitchen Sink Shut Off Valve


How to Fix a Leaky Kitchen Sink Shut Off Valve


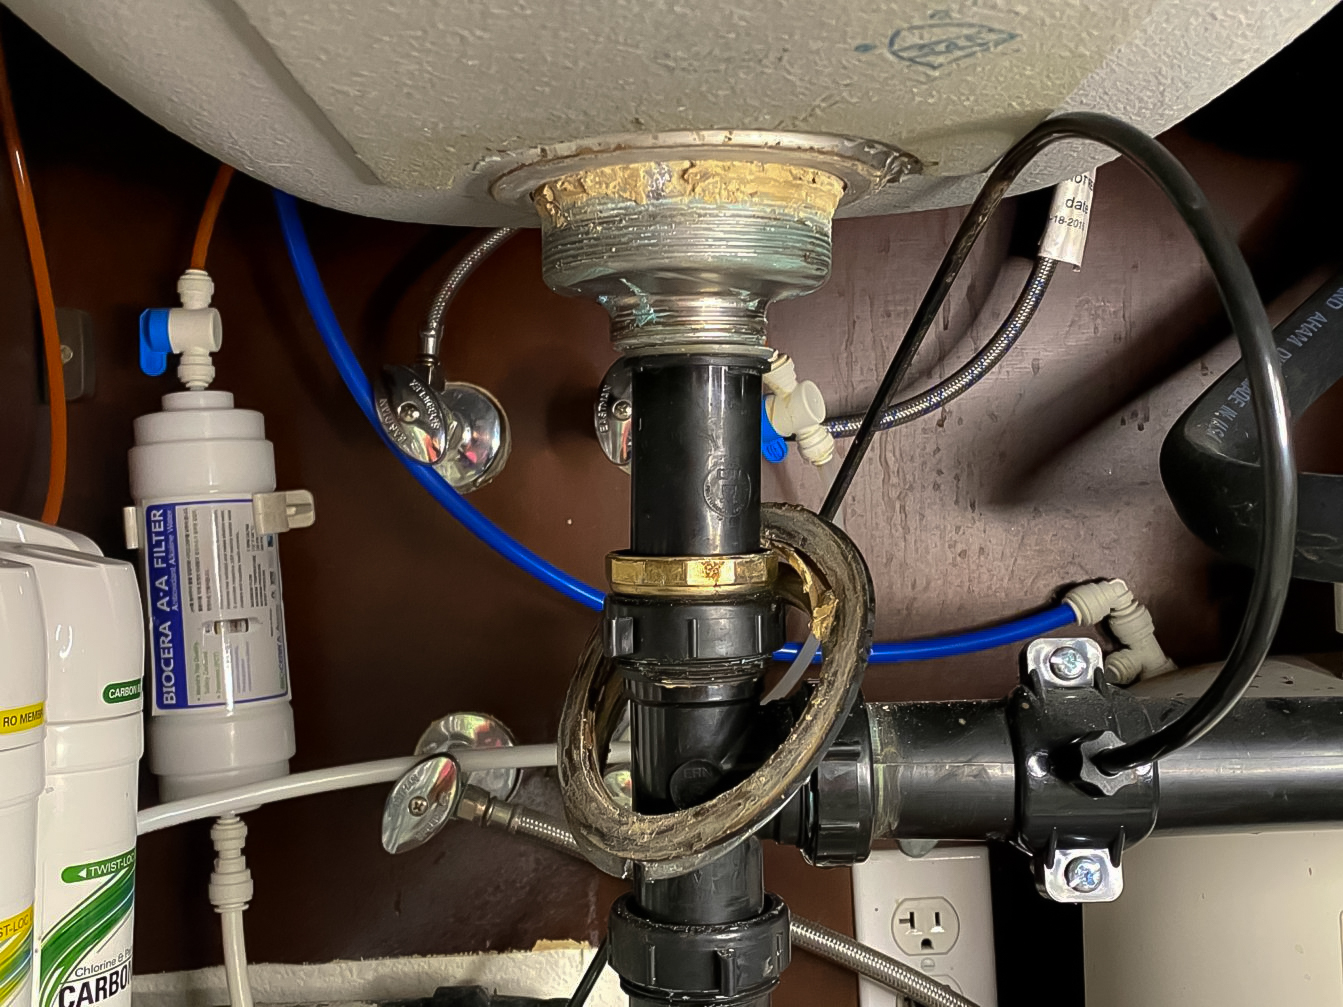
A leaky kitchen sink drain pipe can be a messy and frustrating problem to deal with. Not only can it cause damage to your cabinets and floors, but it can also lead to unpleasant odors in your kitchen. Fortunately, fixing a leaky drain pipe is a simple task that you can do yourself. Follow these steps to get your kitchen sink drain pipe back to working properly. Step 1: Identify the source of the leak. The first step in repairing a leaky kitchen sink drain pipe is to identify where the leak is coming from. This will help you determine what parts need to be replaced or repaired. Step 2: Tighten the connections. The most common cause of a leaky drain pipe is loose connections. Use pliers to tighten the connections and see if that stops the leak. Step 3: Replace the gasket. If tightening the connections does not stop the leak, the gasket may be the problem. Use a wrench to remove the old gasket and replace it with a new one. Step 4: Check the pipe for damage. If the gasket is not the issue, the pipe itself may be damaged. Inspect the pipe for any cracks or damage and replace it if necessary. Step 5: Reassemble the drain pipe. Once you have replaced any necessary parts, reassemble the drain pipe and test for any remaining leaks.How to Fix a Leaky Kitchen Sink Drain Pipe


How to Fix a Leaky Kitchen Sink Drain Pipe
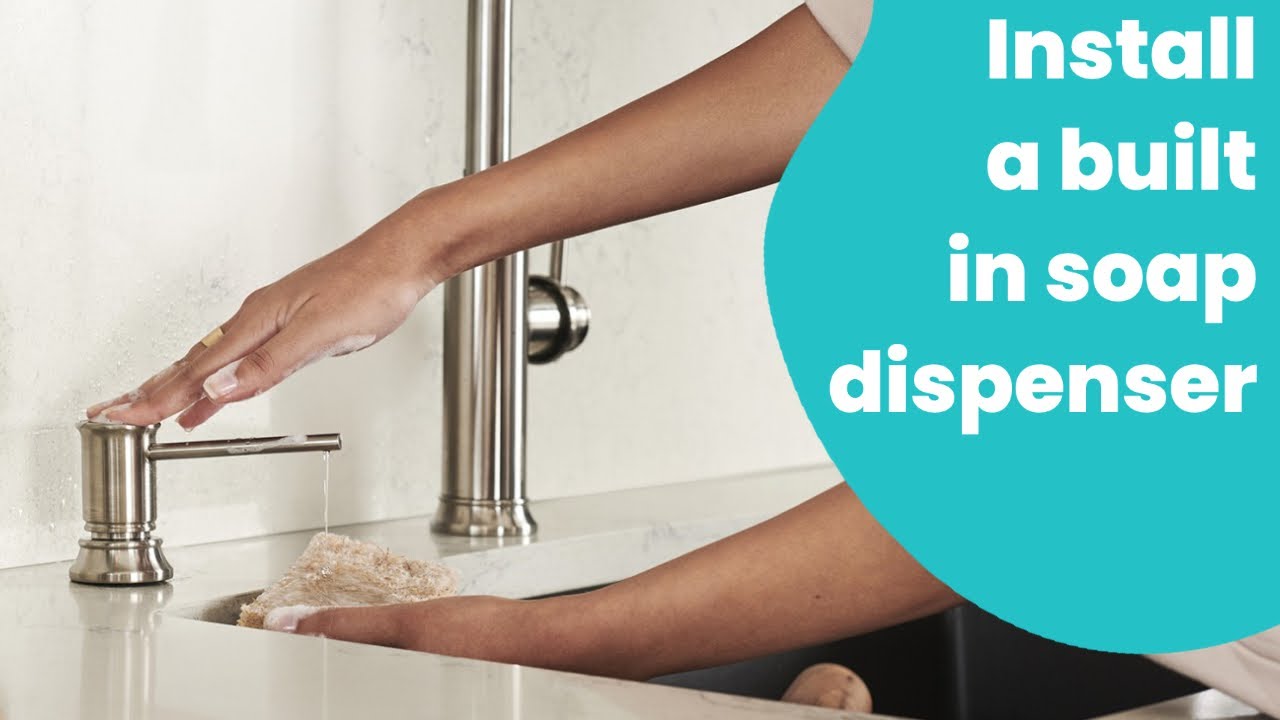
A leaky kitchen sink soap dispenser can be a messy and frustrating problem to deal with. Not only can it cause damage to your cabinets and floors, but it can also waste soap. Fortunately, fixing a leaky soap dispenser is a simple task that you can do yourself. Follow these steps to get your kitchen sink soap dispenser back to working properly. Step 1: Identify the source of the leak. The first step in repairing a leaky kitchen sink soap dispenser is to identify where the leak is coming from. This will help you determine what parts need to be replaced or repaired. Step 2: Tighten the connections. The most common cause of a leaky soap dispenser is loose connections. Use pliers to tighten the connections and see if that stops the leak. Step 3: Replace the gasket. If tightening the connections does not stop the leak, the gasket may be the problem. Use a wrench to remove the old gasket and replace it with a new one. Step 4: Check the pump mechanism. If the gasket is not the issue, the pump mechanism may be damaged. Inspect the pump for any cracks or damage and replace it if necessary. Step 5: Reassemble the soap dispenser. Once you have replaced any necessary parts, reassemble the soap dispenser and test for any remaining leaks.How to Fix a Leaky Kitchen Sink Soap Dispenser

How to Fix a Leaky Kitchen Sink Soap Dispenser


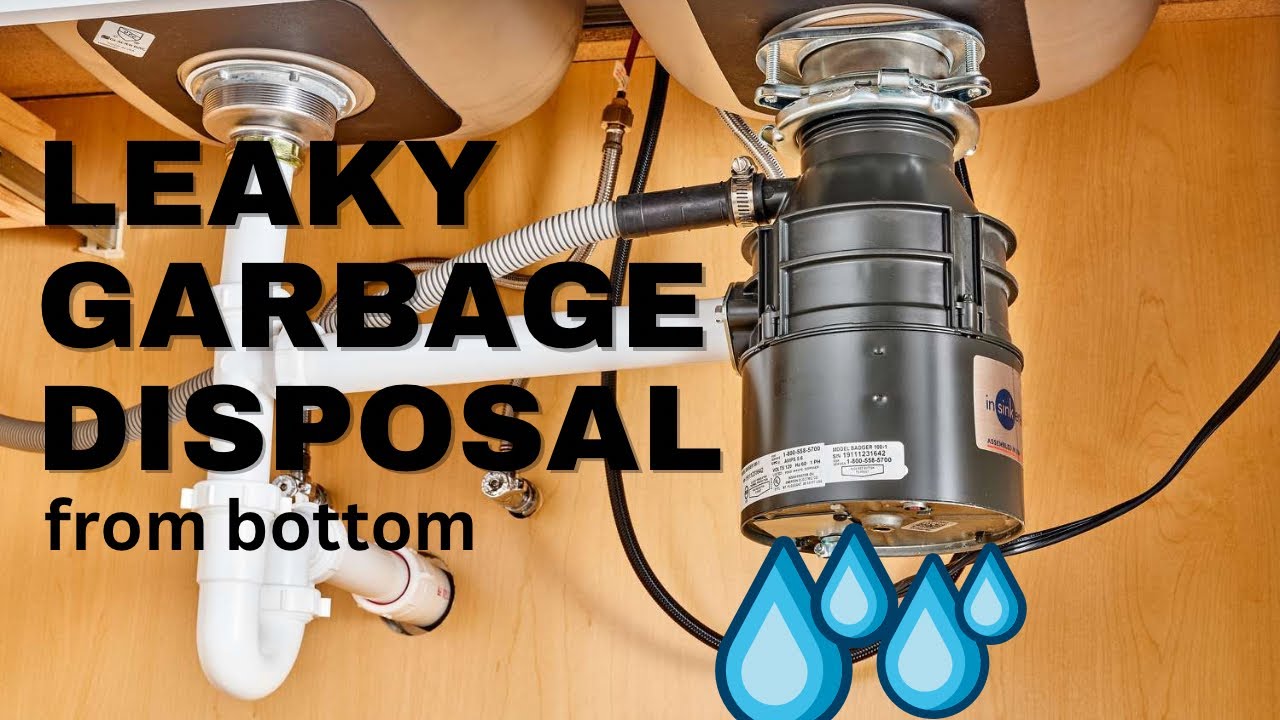
A leaky kitchen sink garbage disposal can be a messy and frustrating problem to deal with. Not only can it cause damage to your cabinets and floors, but it can also lead to unpleasant odors in your kitchen. Fortunately, fixing a leaky garbage disposal is a simple task that you can do yourself. Follow these steps to get your kitchen sink garbage disposal back to working properly.How to Fix a Leaky Kitchen Sink Garbage Disposal


How to Fix a Leaky Kitchen Sink Garbage Disposal


A Common Household Issue: Kitchen Sink Hot Water Valve Leak

When it comes to maintaining a well-functioning house, addressing small issues as soon as they arise is essential. One of the most common problems homeowners face is a kitchen sink hot water valve leak . This may seem like a minor inconvenience at first, but if left unattended, it can lead to bigger and more expensive problems. In this article, we will discuss the causes and solutions for a kitchen sink hot water valve leak , helping you keep your house in top-notch condition.
What Causes a Kitchen Sink Hot Water Valve Leak?

Before we can fix the issue, it's important to understand the root cause. A kitchen sink hot water valve leak can be caused by a variety of factors, including wear and tear, poor installation, or a malfunctioning valve. Over time, the constant use of the hot water valve can cause it to deteriorate and develop small cracks or holes. This can also happen if the valve was not properly installed, leading to a loose connection or faulty seal. Additionally, a malfunctioning valve can also be the culprit, especially if it is old or has not been serviced regularly.
Solutions for a Kitchen Sink Hot Water Valve Leak

Fortunately, a kitchen sink hot water valve leak is a common issue that can be easily fixed. The first step is to turn off the hot water supply to the sink to prevent further damage. Next, inspect the valve for any visible cracks or damage. If the valve appears to be worn out, it will need to be replaced. This can be done by a professional plumber or as a DIY project if you have the necessary tools and knowledge. However, if the valve is still in good condition, it may just need to be tightened or have the seal replaced.
Another solution for a kitchen sink hot water valve leak is to install a shut-off valve. This can be especially helpful if the hot water valve is constantly leaking or if you frequently need to turn it off. A shut-off valve can easily be installed by a professional plumber and will provide a quick and easy way to turn off the hot water supply to the sink when needed.
Preventing Kitchen Sink Hot Water Valve Leaks

To avoid future kitchen sink hot water valve leaks , it's important to perform regular maintenance on your plumbing system. This includes checking for any leaks, tightening connections, and replacing worn out parts. Additionally, be mindful of the hot water valve's placement when using cleaning products or storing items under the sink, as these can cause damage to the valve over time.
In conclusion, a kitchen sink hot water valve leak may seem like a small problem, but it can lead to bigger issues if not addressed promptly. With proper maintenance and timely repairs, you can keep your kitchen sink running smoothly and prevent any potential water damage to your home. Remember to always consult a professional plumber if you are unsure how to fix a kitchen sink hot water valve leak yourself.