If you're looking to upgrade your kitchen sink, installing a new sink sprayer can be a game changer. It not only makes cleaning dishes and washing produce easier, but it also adds a touch of convenience to your daily routine. Don't worry, you don't need to hire a professional to install a new kitchen sink sprayer. With a few tools and some basic knowledge, you can easily do it yourself.1. How to Install a Kitchen Sink Sprayer


1. How to Install a Kitchen Sink Sprayer


Installing a new kitchen sink sprayer is a simple DIY project that can be completed in just a few steps. The key is to have all the necessary tools and materials ready before you begin. This includes a new sink sprayer, adjustable wrench, plumber's tape, and a bucket or towel to catch any water that may leak out during the installation process.2. DIY Kitchen Sink Sprayer Installation


2. DIY Kitchen Sink Sprayer Installation
:max_bytes(150000):strip_icc()/how-to-install-a-sink-drain-2718789-hero-24e898006ed94c9593a2a268b57989a3.jpg)


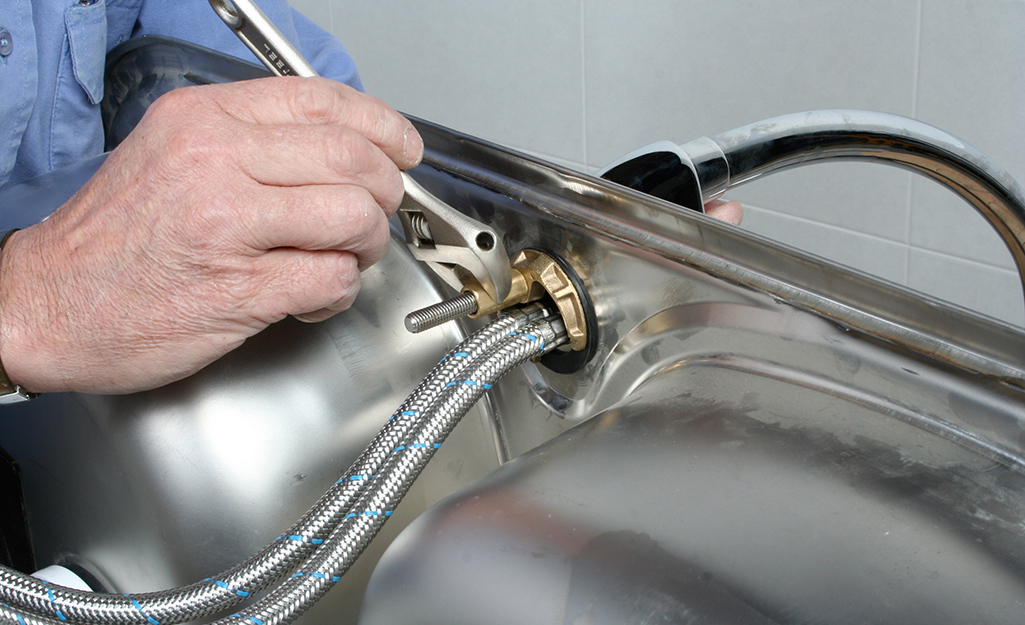
Before you start, make sure to turn off the water supply to your sink. You can do this by shutting off the water valves under the sink or by turning off the main water supply to your house. Once the water is turned off, follow these steps to install your new kitchen sink sprayer: Step 1: Remove the old sprayer by unscrewing the nut that connects it to the sink. Step 2: Unscrew the spray head from the hose and remove any old plumber's tape. Step 3: Wrap plumber's tape around the threads of the hose and screw on the new spray head. Step 4: Place the rubber gasket from the new sprayer onto the sink hole. Step 5: Thread the hose through the sink hole and screw on the mounting nut from underneath. Step 6: Use an adjustable wrench to tighten the mounting nut until the sprayer is secure. Step 7: Turn the water supply back on and test the new sprayer for any leaks.3. Step-by-Step Guide for Installing a New Kitchen Sink Sprayer


3. Step-by-Step Guide for Installing a New Kitchen Sink Sprayer


While the installation process may seem straightforward, there are a few tips that can make the task even easier: Tip 1: Make sure to clean the sink hole and surrounding area before installing the new sprayer to ensure a tight seal. Tip 2: Use plumber's tape on all threaded connections to prevent leaks. Tip 3: If your new sprayer does not come with a rubber gasket, you can use plumber's putty to create a seal around the sink hole. Tip 4: If your new sprayer has a hose that is too long, you can cut it to the desired length using a sharp utility knife.4. Easy Kitchen Sink Sprayer Installation Tips


4. Easy Kitchen Sink Sprayer Installation Tips


/how-to-install-a-sink-drain-2718789-hero-24e898006ed94c9593a2a268b57989a3.jpg)

There are a few things to keep in mind when installing a new kitchen sink sprayer: Water Pressure: If you notice a decrease in water pressure after installing the new sprayer, it could be due to a clogged aerator. Remove the aerator and clean it before reattaching it to the faucet. Compatibility: Make sure to check the specifications of your new sprayer to ensure it is compatible with your current faucet. If not, you may need to purchase a new faucet as well. Replacing vs. Repairing: If your current sprayer is not working properly, it may be tempting to just replace the spray head. However, it is often more cost-effective in the long run to replace the entire sprayer.5. Installing a New Kitchen Sink Sprayer: What You Need to Know


5. Installing a New Kitchen Sink Sprayer: What You Need to Know


The best way to install a new kitchen sink sprayer is to follow the manufacturer's instructions. This will ensure that the sprayer is installed correctly and will function properly. If you are unsure about any step of the installation process, do not hesitate to consult the manufacturer's website or contact their customer service department for assistance.6. The Best Way to Install a Kitchen Sink Sprayer

6. The Best Way to Install a Kitchen Sink Sprayer

Installing a new kitchen sink sprayer may seem like a daunting task, but with the right tools and knowledge, it can be a quick and simple process. By following the steps outlined above, you can have a new sprayer installed and ready to use in no time.7. Quick and Simple Kitchen Sink Sprayer Installation


7. Quick and Simple Kitchen Sink Sprayer Installation


If you are replacing an old kitchen sink sprayer, the process is very similar to installing a new one. The key difference is that you will need to remove the old sprayer and its mounting nut before installing the new one. Make sure to also clean the sink hole and surrounding area before attaching the new sprayer.8. How to Replace a Kitchen Sink Sprayer


8. How to Replace a Kitchen Sink Sprayer


If you are a beginner when it comes to DIY projects, installing a new kitchen sink sprayer is a great place to start. It does not require any specialized skills or tools, and the entire process can be completed in just a few steps. Plus, the sense of accomplishment you will feel after successfully installing a new sprayer will motivate you to take on more home improvement projects in the future.9. Installing a New Kitchen Sink Sprayer: A Beginner's Guide


9. Installing a New Kitchen Sink Sprayer: A Beginner's Guide
:max_bytes(150000):strip_icc()/installing-a-kitchen-sink-sprayer-2718817-02-01cfd18f0299484c910d4e6a50af463e.jpg)


While installing a new kitchen sink sprayer is a relatively simple task, there are a few common mistakes that can cause issues down the road. These include not using plumber's tape, not cleaning the sink hole before installation, and not tightening the mounting nut enough. By following the tips and steps outlined in this article, you can avoid these mistakes and ensure a smooth and successful installation process.10. Common Mistakes to Avoid When Installing a Kitchen Sink Sprayer


10. Common Mistakes to Avoid When Installing a Kitchen Sink Sprayer

:max_bytes(150000):strip_icc()/installing-a-kitchen-sink-sprayer-2718817-hero-2b7047468d594da6be2494ba0eebb480.jpg)
:max_bytes(150000):strip_icc()/installing-a-kitchen-sink-sprayer-2718817-07-362bee47568f48bab7f3bdff600e4092.jpg)
:max_bytes(150000):strip_icc()/installing-a-kitchen-sink-sprayer-2718817-05-36c4e6f6c5f34c7abed7277ee47c70c2.jpg)

Why You Should Consider Installing a New Kitchen Sink Sprayer

The Importance of a Functional Kitchen Sink Sprayer
 When it comes to house design, the kitchen is often considered the heart of the home. It's where you prepare and cook meals, entertain guests, and spend quality time with your family. As such, it's crucial to have a functional and efficient kitchen. One essential component of a well-designed kitchen is a reliable
kitchen sink sprayer
. This small but mighty tool allows you to easily clean dishes, wash fruits and vegetables, and even fill up pots and pans with ease. However, over time, your old kitchen sink sprayer may start to malfunction or become outdated. In this case, it's time to consider installing a new one.
When it comes to house design, the kitchen is often considered the heart of the home. It's where you prepare and cook meals, entertain guests, and spend quality time with your family. As such, it's crucial to have a functional and efficient kitchen. One essential component of a well-designed kitchen is a reliable
kitchen sink sprayer
. This small but mighty tool allows you to easily clean dishes, wash fruits and vegetables, and even fill up pots and pans with ease. However, over time, your old kitchen sink sprayer may start to malfunction or become outdated. In this case, it's time to consider installing a new one.
Benefits of Installing a New Kitchen Sink Sprayer
 Improved Functionality:
If you've been struggling with a leaky or clogged kitchen sink sprayer, installing a new one can greatly improve its functionality. Newer models are designed with advanced technology that allows for a stronger and more precise spray, making cleaning tasks much easier and efficient.
Enhanced Aesthetics:
Your kitchen sink sprayer is not just a functional tool, but it also adds to the overall aesthetics of your kitchen. By installing a new one, you can choose from a wide range of designs, finishes, and styles to match your kitchen's design and give it a fresh and updated look.
Convenience and Versatility:
With a new kitchen sink sprayer, you'll have the option to choose from different spray settings, such as a powerful jet spray or a gentle aerated spray. This allows for more versatility in your kitchen and makes it easier to clean different types of dishes and surfaces.
Improved Functionality:
If you've been struggling with a leaky or clogged kitchen sink sprayer, installing a new one can greatly improve its functionality. Newer models are designed with advanced technology that allows for a stronger and more precise spray, making cleaning tasks much easier and efficient.
Enhanced Aesthetics:
Your kitchen sink sprayer is not just a functional tool, but it also adds to the overall aesthetics of your kitchen. By installing a new one, you can choose from a wide range of designs, finishes, and styles to match your kitchen's design and give it a fresh and updated look.
Convenience and Versatility:
With a new kitchen sink sprayer, you'll have the option to choose from different spray settings, such as a powerful jet spray or a gentle aerated spray. This allows for more versatility in your kitchen and makes it easier to clean different types of dishes and surfaces.
How to Install a New Kitchen Sink Sprayer
 Installing a new kitchen sink sprayer may seem like a daunting task, but with the right tools and a little bit of DIY knowledge, it can be done in no time. First, you'll need to gather all the necessary materials, including a new kitchen sink sprayer, a basin wrench, and plumber's tape. Then, follow these simple steps:
1. Turn off the water supply to your kitchen sink by shutting off the valves under the sink.
2. Remove the old sprayer by loosening the nut that holds it in place with a basin wrench.
3. Clean the area where the old sprayer was attached using a cleaning agent to remove any residue.
4. Wrap plumber's tape around the threads of the new sprayer to prevent leaks.
5. Attach the new sprayer to the sink by tightening the nut with a basin wrench.
6. Turn the water supply back on and test the new sprayer for any leaks or malfunctions.
Installing a new kitchen sink sprayer may seem like a daunting task, but with the right tools and a little bit of DIY knowledge, it can be done in no time. First, you'll need to gather all the necessary materials, including a new kitchen sink sprayer, a basin wrench, and plumber's tape. Then, follow these simple steps:
1. Turn off the water supply to your kitchen sink by shutting off the valves under the sink.
2. Remove the old sprayer by loosening the nut that holds it in place with a basin wrench.
3. Clean the area where the old sprayer was attached using a cleaning agent to remove any residue.
4. Wrap plumber's tape around the threads of the new sprayer to prevent leaks.
5. Attach the new sprayer to the sink by tightening the nut with a basin wrench.
6. Turn the water supply back on and test the new sprayer for any leaks or malfunctions.
Conclusion
 In conclusion, installing a new kitchen sink sprayer is a simple and cost-effective way to improve the functionality and aesthetics of your kitchen. With the wide range of options available, you can choose one that fits your preferences and budget. So, if your old kitchen sink sprayer is causing you headaches, it's time to consider upgrading to a new one for a more enjoyable and efficient kitchen experience.


/how-to-install-a-sink-drain-2718789-hero-b5b99f72b5a24bb2ae8364e60539cece.jpg)