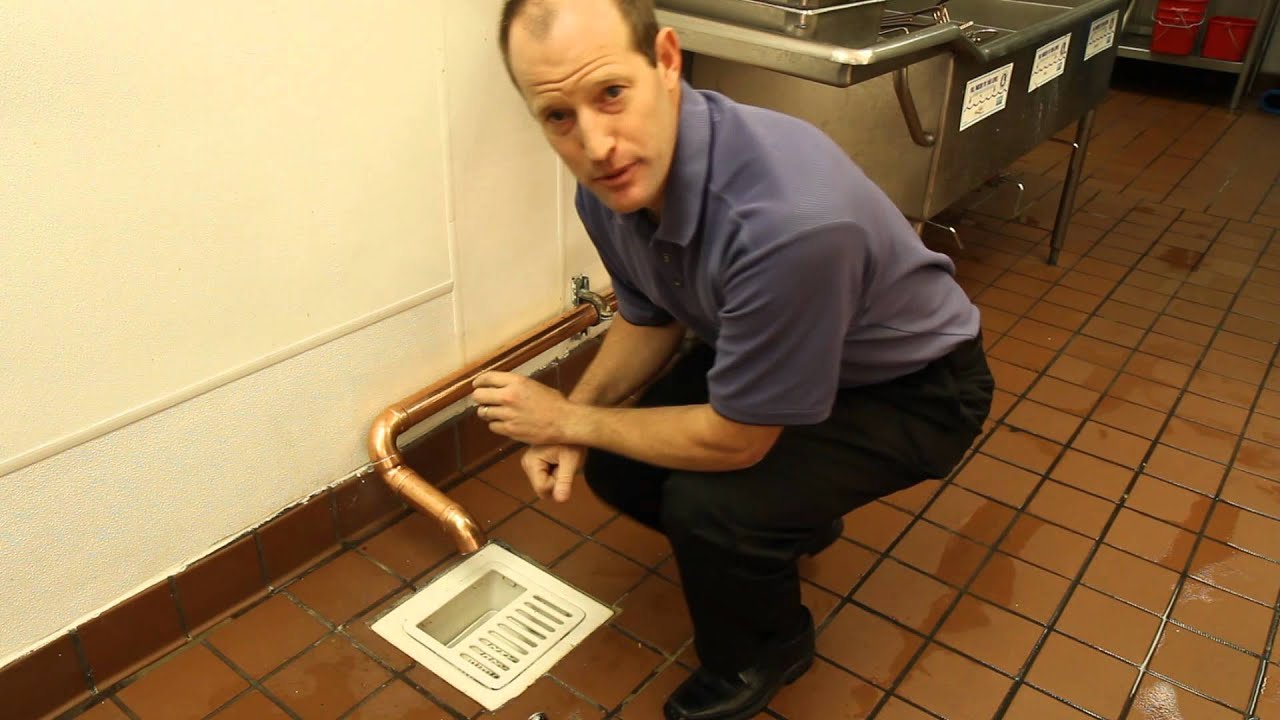
If you're in the process of remodeling your kitchen, one important task that you'll need to tackle is roughing in the kitchen sink drain. This involves installing the pipes and connections that will allow your sink to properly drain into the sewage system. While many people opt for the traditional method of roughing in the sink drain through the wall, some may prefer to go through the floor instead. In this guide, we'll walk you through the steps of roughing in a kitchen sink drain through the floor.How to Rough In a Kitchen Sink Drain Through the Floor


How to Rough In a Kitchen Sink Drain Through the Floor


Roughing in a kitchen sink drain through the floor may seem like a daunting task, but with the right tools and materials, it can be a smooth process. Here's a step-by-step guide to help you get started: Step 1: Plan and Measure The first step in any plumbing project is to plan and measure the area. This is especially important when roughing in a kitchen sink drain through the floor. Make sure you have accurate measurements of the area where the drain will be installed, as well as the location of any existing pipes or obstacles. Step 2: Gather Your Materials Next, gather all the necessary tools and materials for the project. This may include PVC pipes, elbows, couplings, a drain trap, and a drain basket. It's also a good idea to have a saw, drill, and other basic plumbing tools on hand. Step 3: Cut the Hole Using your measurements, cut a hole in the floor where the drain will be installed. Make sure the hole is large enough to fit the drain basket and allow for proper drainage. Step 4: Install the Drain Basket Place the drain basket in the hole and secure it in place with the provided screws. This will create a watertight seal between the basket and the floor. Step 5: Connect the Pipes Using your PVC pipes and fittings, connect the drain basket to the existing pipes or sewage system. Make sure all connections are secure and watertight. Step 6: Install the Drain Trap The drain trap is an important part of the sink drain system as it prevents sewer gas from entering your home. Install the drain trap between the drain basket and the existing pipes, making sure it is properly connected and sealed. Step 7: Test the System Once all the pipes are connected, turn on the water and test the system for any leaks or issues. If everything is working properly, you're all set!Roughing In a Kitchen Sink Drain Through the Floor: A Step-by-Step Guide


Roughing In a Kitchen Sink Drain Through the Floor: A Step-by-Step Guide


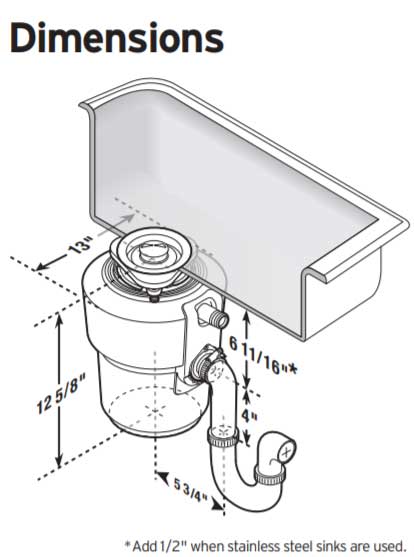
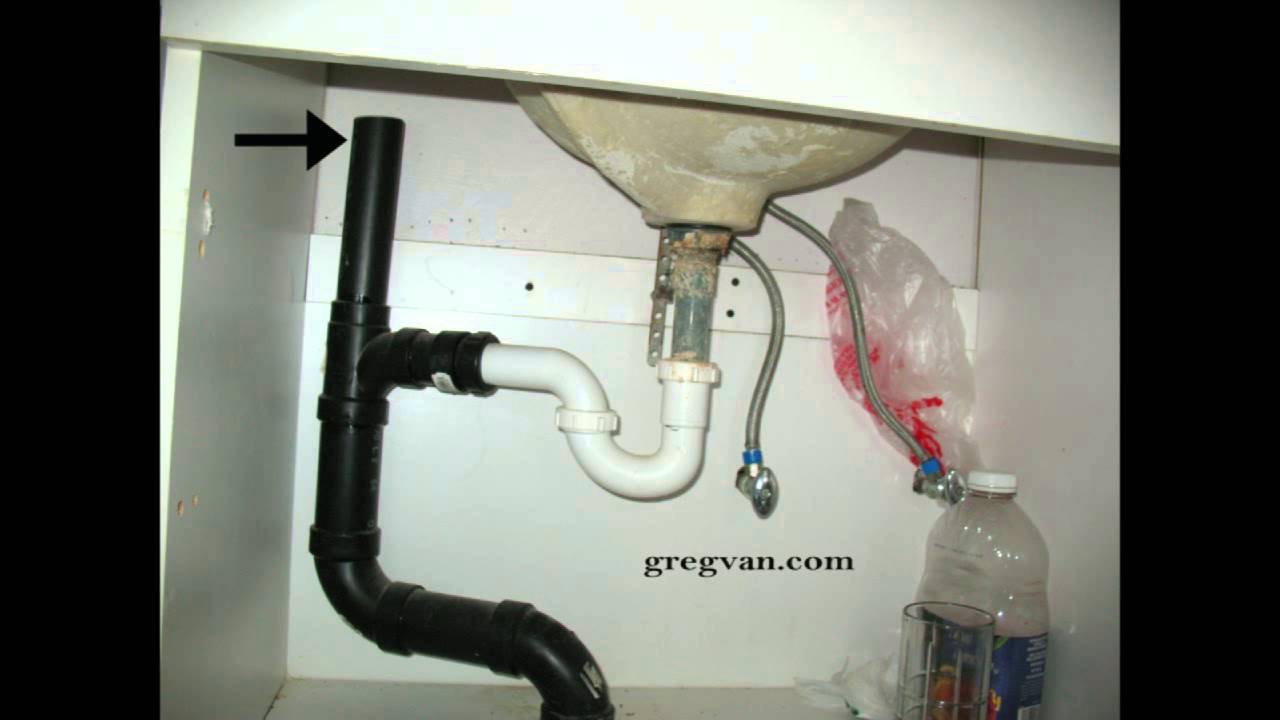
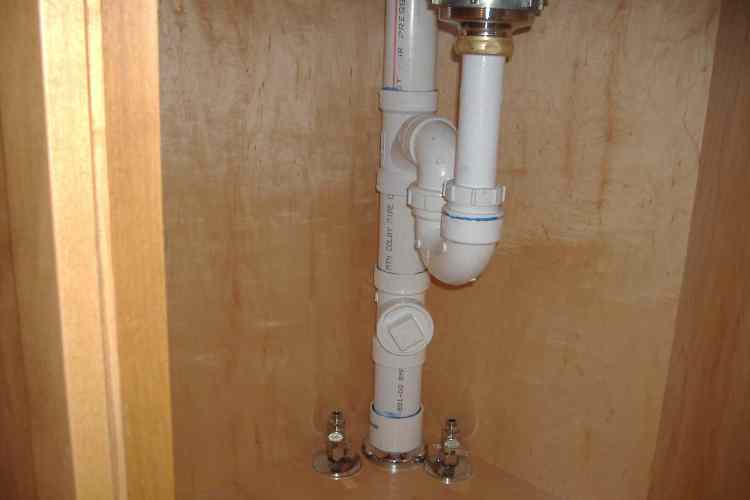
For a visual representation of the roughing in process, refer to the kitchen sink drain rough-in diagram below:Kitchen Sink Drain Rough-In Diagram


Kitchen Sink Drain Rough-In Diagram


Here are a few tips and tricks to keep in mind when roughing in a kitchen sink drain through the floor: Tip 1: Use PVC pipes and fittings for a more durable and long-lasting drain system. Tip 2: Make sure all connections are properly sealed to prevent any leaks. Tip 3: Have a plumber's putty or silicone caulk on hand to create a watertight seal around the drain basket. Tip 4: If you're unsure about any step, consult a professional plumber for assistance.Roughing In a Kitchen Sink Drain: Tips and Tricks

Roughing In a Kitchen Sink Drain: Tips and Tricks


Roughing in a kitchen sink drain through the floor may seem intimidating, but with the right knowledge and tools, it can be a manageable task. Here are a few things to keep in mind: 1. It's important to have accurate measurements of the area before cutting any holes or installing pipes. 2. Make sure all connections are properly sealed to prevent any leaks or issues in the future. 3. Use PVC pipes and fittings for a more durable and long-lasting drain system. 4. If you're unsure about any step, it's always best to consult a professional plumber for assistance.What You Need to Know About Roughing In a Kitchen Sink Drain Through the Floor


What You Need to Know About Roughing In a Kitchen Sink Drain Through the Floor


Roughing in a kitchen sink drain through a concrete floor may require a few extra steps, but the overall process is similar to roughing in a drain through a wooden floor. Here are a few things to keep in mind when dealing with a concrete floor: 1. You will need a drill with a masonry bit to create a hole in the concrete for the drain basket. 2. Use a hammer drill for larger holes or if you encounter any resistance while drilling. 3. Fill any gaps or holes around the drain basket with hydraulic cement to create a watertight seal.Roughing In a Kitchen Sink Drain Through Concrete Floor


Roughing In a Kitchen Sink Drain Through Concrete Floor


While roughing in a kitchen sink drain through the floor may seem straightforward, there are a few common mistakes that people make. Here are some to avoid: 1. Not having accurate measurements or planning before starting the project. 2. Not properly sealing connections, resulting in leaks and potential damage. 3. Using the wrong materials, such as metal pipes instead of PVC, which can lead to corrosion and other issues. 4. Not consulting a professional plumber when unsure about any step.Common Mistakes to Avoid When Roughing In a Kitchen Sink Drain Through the Floor
Common Mistakes to Avoid When Roughing In a Kitchen Sink Drain Through the Floor


To successfully rough in a kitchen sink drain through the floor, you will need the following tools and materials: 1. PVC pipes and fittings 2. Drain basket 3. Drain trap 4. Saw 5. Drill 6. Hammer drill (if dealing with a concrete floor) 7. Hydraulic cement (if dealing with a concrete floor)Tools and Materials Needed for Roughing In a Kitchen Sink Drain Through the Floor
Tools and Materials Needed for Roughing In a Kitchen Sink Drain Through the Floor


Now that we've discussed the steps and tips for roughing in a kitchen sink drain through the floor, here's a quick recap of the installation process: Step 1: Plan and measure the area where the drain will be installed. Step 2: Gather all necessary tools and materials. Step 3: Cut a hole in the floor for the drain basket. Step 4: Install the drain basket and secure it in place. Step 5: Connect the pipes and fittings to the drain basket. Step 6: Install the drain trap between the drain basket and the existing pipes. Step 7: Test the system for any leaks or issues.How to Install a Kitchen Sink Drain Through the Floor


How to Install a Kitchen Sink Drain Through the Floor
/how-to-install-a-sink-drain-2718789-hero-b5b99f72b5a24bb2ae8364e60539cece.jpg)


Here are some commonly asked questions about roughing in a kitchen sink drain through the floor: Q: Can I use metal pipes instead of PVC for the drain system? A: It's not recommended to use metal pipes as they can corrode over time and cause issues with your drainage system. Q: Do I need a plumber to rough in a kitchen sink drain through the floor? A: It's always best to consult a professional plumber, especially if you're unsure about any step or encounter any issues during the process. Q: Can I rough in a kitchen sink drain through a concrete floor? A: Yes, you can rough in a kitchen sink drain through a concrete floor, but it may require a few extra steps such as using a hammer drill and hydraulic cement. With this guide, roughing in a kitchen sink drain through the floor should be a manageable and successful task. Just remember to plan and measure accurately, use the right materials, and consult a professional plumber if needed. Happy remodeling!Roughing In a Kitchen Sink Drain Through the Floor: FAQs

Roughing In a Kitchen Sink Drain Through the Floor: FAQs
Rough In Kitchen Sink Drain Through Floor: A Guide to Proper Installation

The Importance of Proper Drainage in Kitchen Design
:max_bytes(150000):strip_icc()/how-to-install-a-sink-drain-2718789-hero-24e898006ed94c9593a2a268b57989a3.jpg) When it comes to designing a kitchen, there are many factors to consider. One crucial element that often gets overlooked is the sink drain. However, proper drainage is essential for a functional and efficient kitchen. Without it, you could be facing clogged pipes, foul odors, and potentially expensive plumbing issues. That's why it's crucial to understand the process of roughing in a kitchen sink drain through the floor.
When it comes to designing a kitchen, there are many factors to consider. One crucial element that often gets overlooked is the sink drain. However, proper drainage is essential for a functional and efficient kitchen. Without it, you could be facing clogged pipes, foul odors, and potentially expensive plumbing issues. That's why it's crucial to understand the process of roughing in a kitchen sink drain through the floor.
What is Roughing In?
The Process of Roughing In a Kitchen Sink Drain Through the Floor
 Now that we understand the importance of proper drainage and the concept of roughing in, let's discuss the process of installing a kitchen sink drain through the floor. Here are the steps you need to follow:
1. Plan and Measure
Before starting any installation, it's crucial to plan and measure the layout of your kitchen. This step will help determine the best location for your sink and the drain. Keep in mind that the sink should be close to the water supply and the main waste pipe.
2. Cut the Drain Hole
Using your measurements, cut a hole in the floor where the drain will be located. Make sure the hole is the same size as the drain pipe and is level with the floor.
3. Install the Drainpipe
Next, install the drainpipe into the hole you just cut. Make sure it's securely attached and sealed to prevent any leaks.
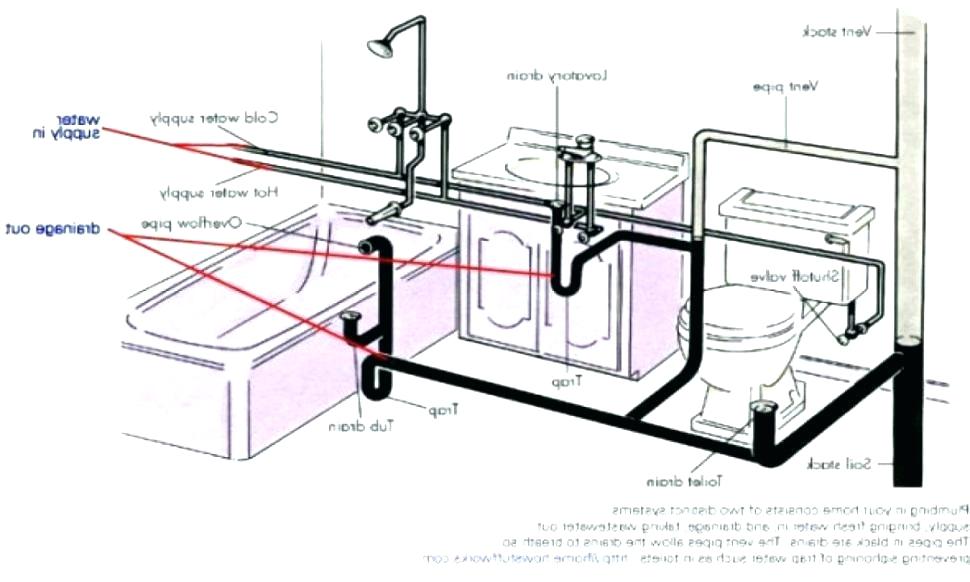
4. Install the P-Trap
The P-trap is a pipe that connects the sink to the main drainpipe and prevents sewer gas from entering your home. Install the P-trap onto the drainpipe in the appropriate location.
5. Connect the Sink
Once the P-trap is in place, it's time to connect the sink to the drainpipe. This step may require the use of a plumber's putty to create a tight seal.
Now that we understand the importance of proper drainage and the concept of roughing in, let's discuss the process of installing a kitchen sink drain through the floor. Here are the steps you need to follow:
1. Plan and Measure
Before starting any installation, it's crucial to plan and measure the layout of your kitchen. This step will help determine the best location for your sink and the drain. Keep in mind that the sink should be close to the water supply and the main waste pipe.
2. Cut the Drain Hole
Using your measurements, cut a hole in the floor where the drain will be located. Make sure the hole is the same size as the drain pipe and is level with the floor.
3. Install the Drainpipe
Next, install the drainpipe into the hole you just cut. Make sure it's securely attached and sealed to prevent any leaks.
4. Install the P-Trap
The P-trap is a pipe that connects the sink to the main drainpipe and prevents sewer gas from entering your home. Install the P-trap onto the drainpipe in the appropriate location.
5. Connect the Sink
Once the P-trap is in place, it's time to connect the sink to the drainpipe. This step may require the use of a plumber's putty to create a tight seal.
Common Mistakes to Avoid
 When roughing in a kitchen sink drain through the floor, there are a few common mistakes that you should avoid. These include:
1. Not Planning Ahead
As mentioned earlier, proper planning is crucial when it comes to installing a kitchen sink drain through the floor. Make sure to measure and plan before making any cuts or installations.
2. Improperly Sealing Pipes
Leaky pipes can cause significant damage and lead to costly repairs. Make sure to properly seal all connections to prevent any leaks.
3. Incorrectly Installing the P-Trap
The P-trap must be installed correctly to prevent sewer gas from entering your home. Make sure to follow the manufacturer's instructions carefully.
When roughing in a kitchen sink drain through the floor, there are a few common mistakes that you should avoid. These include:
1. Not Planning Ahead
As mentioned earlier, proper planning is crucial when it comes to installing a kitchen sink drain through the floor. Make sure to measure and plan before making any cuts or installations.
2. Improperly Sealing Pipes
Leaky pipes can cause significant damage and lead to costly repairs. Make sure to properly seal all connections to prevent any leaks.
3. Incorrectly Installing the P-Trap
The P-trap must be installed correctly to prevent sewer gas from entering your home. Make sure to follow the manufacturer's instructions carefully.
In Conclusion
 Roughing in a kitchen sink drain through the floor may seem like a daunting task, but with proper planning and the right steps, it can be done successfully. Remember to measure, plan, and follow the manufacturer's instructions carefully to ensure a functional and efficient kitchen. Proper drainage is essential for a well-designed kitchen, so don't overlook this crucial step in your home design process.