Installing a top mount kitchen sink may seem like a daunting task, but with the right tools and knowledge, it can be a simple DIY project. In this guide, we will take you through the step-by-step process of installing a top mount kitchen sink and provide helpful tips and tricks along the way. So, roll up your sleeves and let's get started!How to Install a Top Mount Kitchen Sink


How to Install a Top Mount Kitchen Sink


Before we dive into the installation process, it's important to understand the basics of a top mount kitchen sink. Also known as a drop-in sink or self-rimming sink, a top mount sink is placed on top of the countertop and has a visible rim that rests on the surface. This type of sink is the most common and easiest to install, making it a popular choice among homeowners. Now, let's get to the installation guide:Top Mount Kitchen Sink Installation Guide


Top Mount Kitchen Sink Installation Guide


Step 1: Gather your tools Before you begin, make sure you have all the necessary tools on hand. This includes a drill, screwdriver, plumber's putty, silicone sealant, and a wrench. It's also a good idea to have a friend or family member help you with the installation process. Step 2: Measure and mark the sink location Using a measuring tape, determine the size of your sink and mark its location on the countertop. Make sure to leave enough space for the sink's rim to rest on the countertop and for the faucet to be installed behind the sink. Step 3: Cut the hole for the sink Using a jigsaw or a hole saw, carefully cut out the marked area on the countertop. Make sure the hole is slightly smaller than the sink's actual size to ensure a snug fit. Step 4: Install the faucet and drain Before placing the sink, install the faucet and drain onto the sink according to the manufacturer's instructions. This will make it easier to install them later on once the sink is in place. Step 5: Apply plumber's putty Take a small amount of plumber's putty and apply it around the edge of the sink's rim. This will create a seal between the sink and the countertop and prevent any water from leaking. Step 6: Place the sink Carefully place the sink into the hole, making sure it is centered and level. Press down firmly to ensure the plumber's putty creates a tight seal. Step 7: Secure the sink Using mounting clips or brackets provided by the manufacturer, secure the sink to the underside of the countertop. This will prevent the sink from moving or shifting. Step 8: Connect the plumbing Connect the faucet and drain to the water supply and drain pipes. Use a wrench to tighten any connections and make sure there are no leaks. Step 9: Apply silicone sealant Using a silicone sealant, run a bead around the edge of the sink where it meets the countertop. This will provide an extra layer of protection against water damage. Step 10: Finish up Clean up any excess sealant and wipe down the sink and countertop. Let the sealant dry according to the manufacturer's instructions before using the sink.Step-by-Step Guide for Installing a Top Mount Kitchen Sink


Step-by-Step Guide for Installing a Top Mount Kitchen Sink


Installing a top mount kitchen sink can be a DIY project, but it's important to know your limits. If you don't feel comfortable with any of the steps, it's best to hire a professional plumber to ensure the job is done correctly.DIY Top Mount Kitchen Sink Installation


DIY Top Mount Kitchen Sink Installation


Tip #1: Measure twice, cut once. It's important to accurately measure the sink and the hole on the countertop to ensure a proper fit. Tip #2: Use a silicone sealant for a waterproof seal. This will prevent any water from leaking and causing damage to your countertop and cabinets. Tip #3: Have a helper. Installing a sink can be a two-person job, especially when it comes to lifting and securing the sink in place.Top Mount Kitchen Sink Installation Tips and Tricks

Top Mount Kitchen Sink Installation Tips and Tricks


Here's a quick checklist of the tools you'll need for a successful top mount kitchen sink installation: - Drill - Screwdriver - Plumber's putty - Silicone sealant - WrenchEssential Tools for Installing a Top Mount Kitchen Sink


Essential Tools for Installing a Top Mount Kitchen Sink


If you're considering installing a top mount kitchen sink, here are some important things to keep in mind: - Make sure the sink you choose fits your countertop. - Check the manufacturer's instructions for any specific installation requirements. - Take your time and follow the steps carefully to ensure a proper installation.Top Mount Kitchen Sink Installation: What You Need to Know

Top Mount Kitchen Sink Installation: What You Need to Know
/how-to-install-a-sink-drain-2718789-hero-24e898006ed94c9593a2a268b57989a3.jpg)
Mistake #1: Not measuring correctly. This can lead to a sink that doesn't fit or a hole in your countertop that is too big. Mistake #2: Not using a silicone sealant. Without a proper seal, water can leak and cause damage to your countertop and cabinets. Mistake #3: Rushing through the installation process. Take your time and follow the steps carefully to ensure a successful installation.Installing a Top Mount Kitchen Sink: Common Mistakes to Avoid

Installing a Top Mount Kitchen Sink: Common Mistakes to Avoid


If you've never installed a top mount kitchen sink before, don't worry. With the right tools and our step-by-step guide, you'll have a new sink in no time! Just remember to take your time and follow the instructions carefully.Top Mount Kitchen Sink Installation: A Beginner's Guide

Top Mount Kitchen Sink Installation: A Beginner's Guide
For those who are more experienced with DIY projects, here are some expert tips to help make your top mount kitchen sink installation even easier: - Use a jigsaw with a fine-toothed blade for a clean and precise cut. - Use a level to ensure the sink is installed evenly. - Have a bucket or towel on hand to catch any water that may drip from the pipes during installation. Now that you know how to install a top mount kitchen sink, it's time to put your knowledge into action. With the right tools and a little bit of patience, you can have a new sink in your kitchen in no time. Good luck!Expert Tips for Installing a Top Mount Kitchen Sink
Expert Tips for Installing a Top Mount Kitchen Sink

Why Choose a Top Mount Kitchen Sink?

Functionality
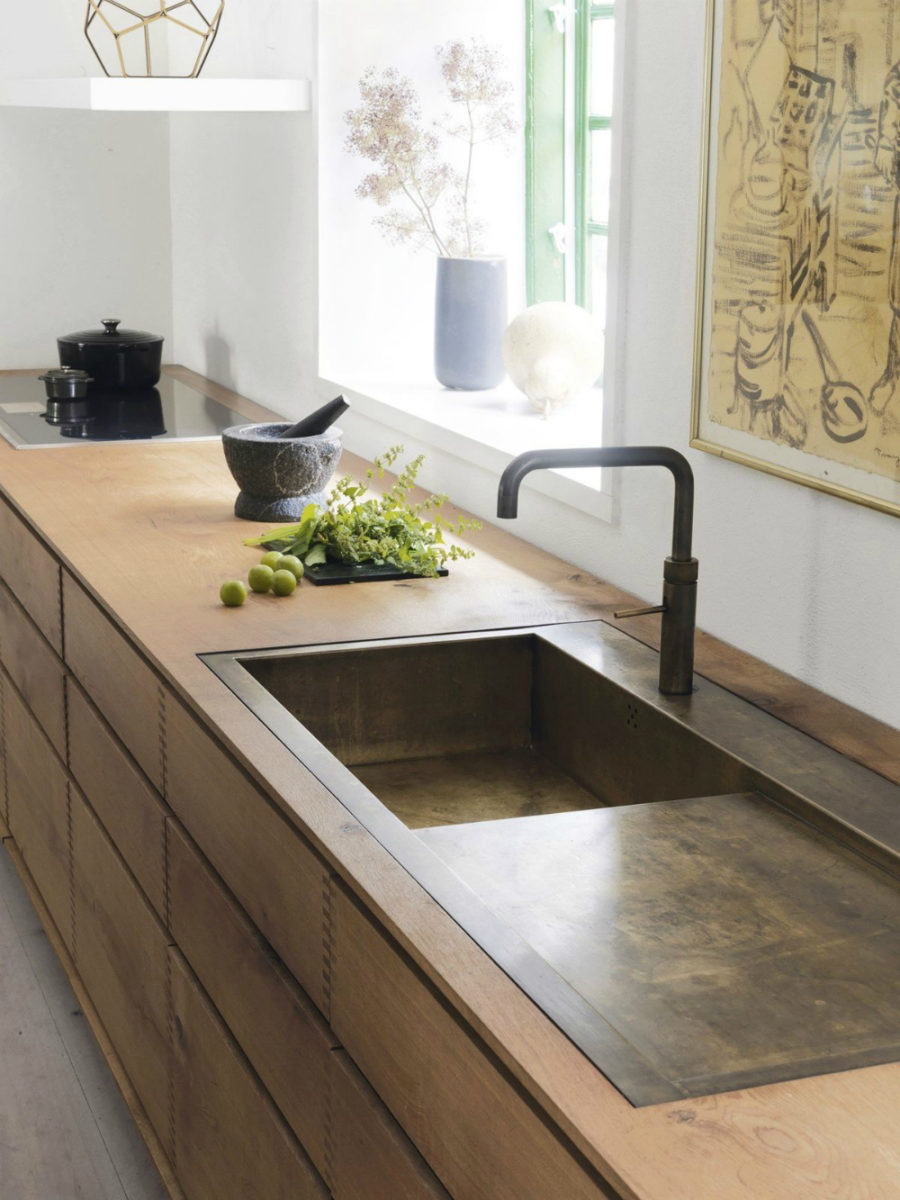
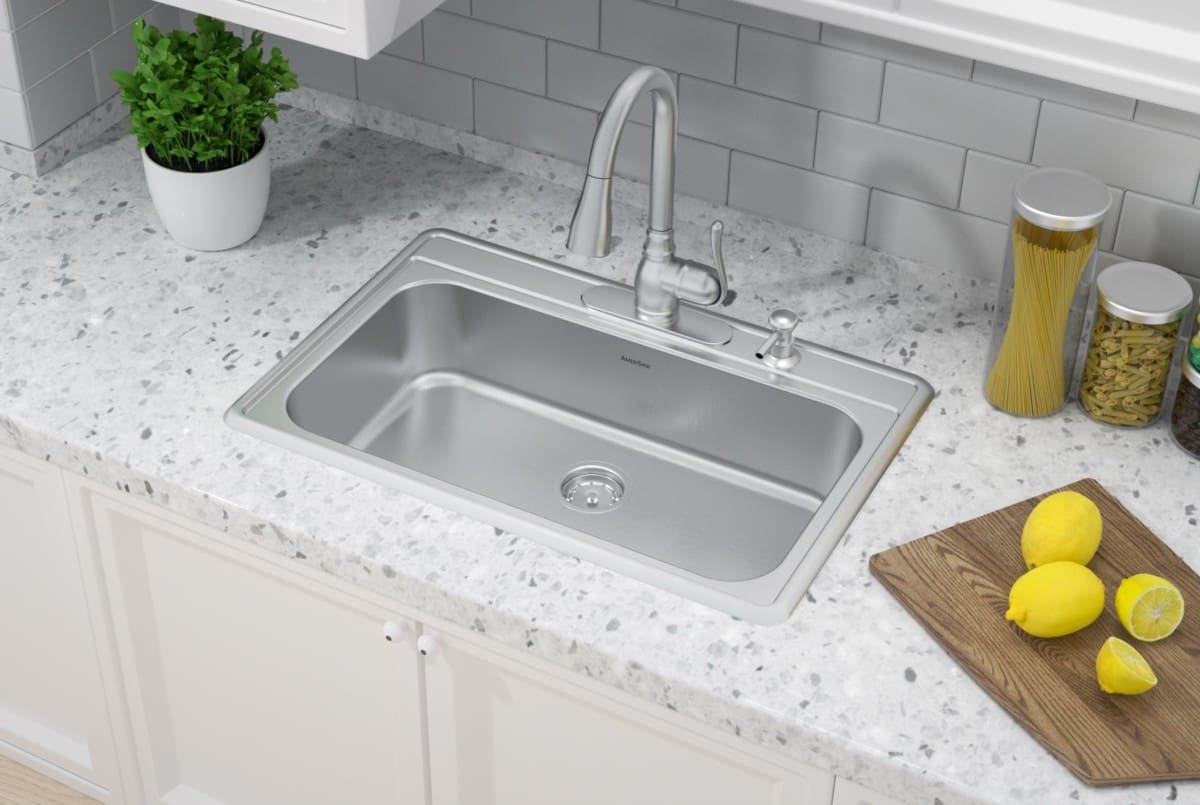
 A top mount kitchen sink, also known as a drop-in sink, is a popular choice for many homeowners. It is a sink that is installed from the top of the countertop, with the edges of the sink resting on top of the counter. This type of sink is versatile and can fit into any kitchen design, making it a practical choice for any household.
One of the main benefits of a top mount kitchen sink is its functionality. The design of this sink allows for easy installation and replacement, making it a cost-effective option. Additionally, the raised edges of the sink help contain water and prevent spills onto the countertop, making it ideal for busy kitchens.
A top mount kitchen sink, also known as a drop-in sink, is a popular choice for many homeowners. It is a sink that is installed from the top of the countertop, with the edges of the sink resting on top of the counter. This type of sink is versatile and can fit into any kitchen design, making it a practical choice for any household.
One of the main benefits of a top mount kitchen sink is its functionality. The design of this sink allows for easy installation and replacement, making it a cost-effective option. Additionally, the raised edges of the sink help contain water and prevent spills onto the countertop, making it ideal for busy kitchens.
Design
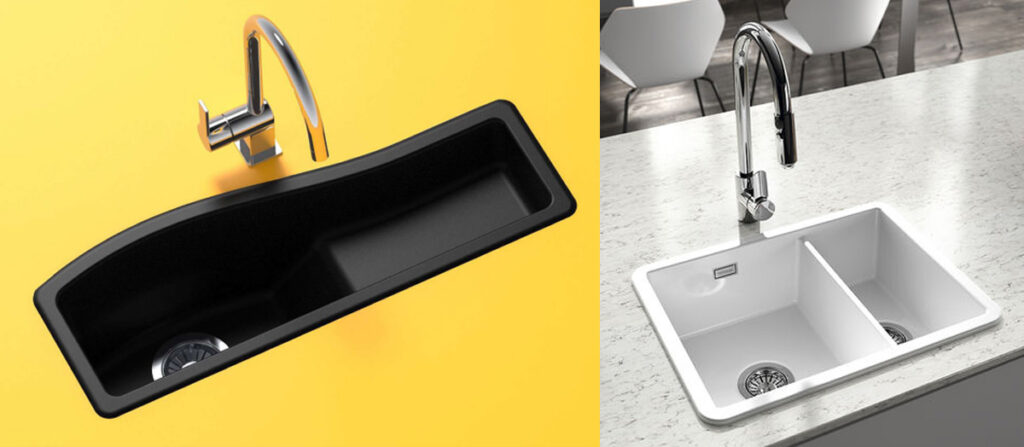
 Apart from its functionality, a top mount kitchen sink also offers a variety of design options. These sinks come in a range of materials, including stainless steel, granite, and ceramic, allowing homeowners to choose the one that best fits their kitchen design. The edges of the sink can also be customized to match the overall look of the kitchen, giving it a seamless and cohesive appearance.
Moreover, top mount kitchen sinks come in different shapes and sizes, providing homeowners with more flexibility in their kitchen layout. They can opt for a single basin or double basin sink, depending on their needs and preferences. This versatility in design makes a top mount kitchen sink a popular choice among homeowners and interior designers alike.
Apart from its functionality, a top mount kitchen sink also offers a variety of design options. These sinks come in a range of materials, including stainless steel, granite, and ceramic, allowing homeowners to choose the one that best fits their kitchen design. The edges of the sink can also be customized to match the overall look of the kitchen, giving it a seamless and cohesive appearance.
Moreover, top mount kitchen sinks come in different shapes and sizes, providing homeowners with more flexibility in their kitchen layout. They can opt for a single basin or double basin sink, depending on their needs and preferences. This versatility in design makes a top mount kitchen sink a popular choice among homeowners and interior designers alike.
Easy Maintenance
 Maintaining a top mount kitchen sink is relatively easy compared to other sink types. The edges of the sink can be easily wiped clean, and any debris or food particles can be swept straight into the sink. This makes it a hygienic option for households, as it prevents the accumulation of dirt and bacteria on the countertop.
Additionally, top mount kitchen sinks are less prone to chipping or cracking, making them a durable choice for busy kitchens. They are also less likely to get damaged during installation or replacement, unlike undermount sinks, which require more precision and care.
In conclusion, a top mount kitchen sink is a practical and stylish addition to any kitchen. Its functionality, design options, and easy maintenance make it a popular choice among homeowners. Whether you are renovating your kitchen or building a new house, consider installing a top mount kitchen sink for a sleek and functional upgrade.
Maintaining a top mount kitchen sink is relatively easy compared to other sink types. The edges of the sink can be easily wiped clean, and any debris or food particles can be swept straight into the sink. This makes it a hygienic option for households, as it prevents the accumulation of dirt and bacteria on the countertop.
Additionally, top mount kitchen sinks are less prone to chipping or cracking, making them a durable choice for busy kitchens. They are also less likely to get damaged during installation or replacement, unlike undermount sinks, which require more precision and care.
In conclusion, a top mount kitchen sink is a practical and stylish addition to any kitchen. Its functionality, design options, and easy maintenance make it a popular choice among homeowners. Whether you are renovating your kitchen or building a new house, consider installing a top mount kitchen sink for a sleek and functional upgrade.