If you're planning on renovating your kitchen or simply looking to improve its functionality, installing a Studor vent under your kitchen sink is a great addition. Not only does it save space and eliminate the need for traditional vent pipes, but it also helps to prevent unpleasant odors and harmful gases from entering your home.1. How to Install a Studor Vent Under a Kitchen Sink


1. How to Install a Studor Vent Under a Kitchen Sink


/sink-vent-installing-an-auto-vent-2718828-05-ca0dcb2915be457b9693ccd2655e6c21.jpg)


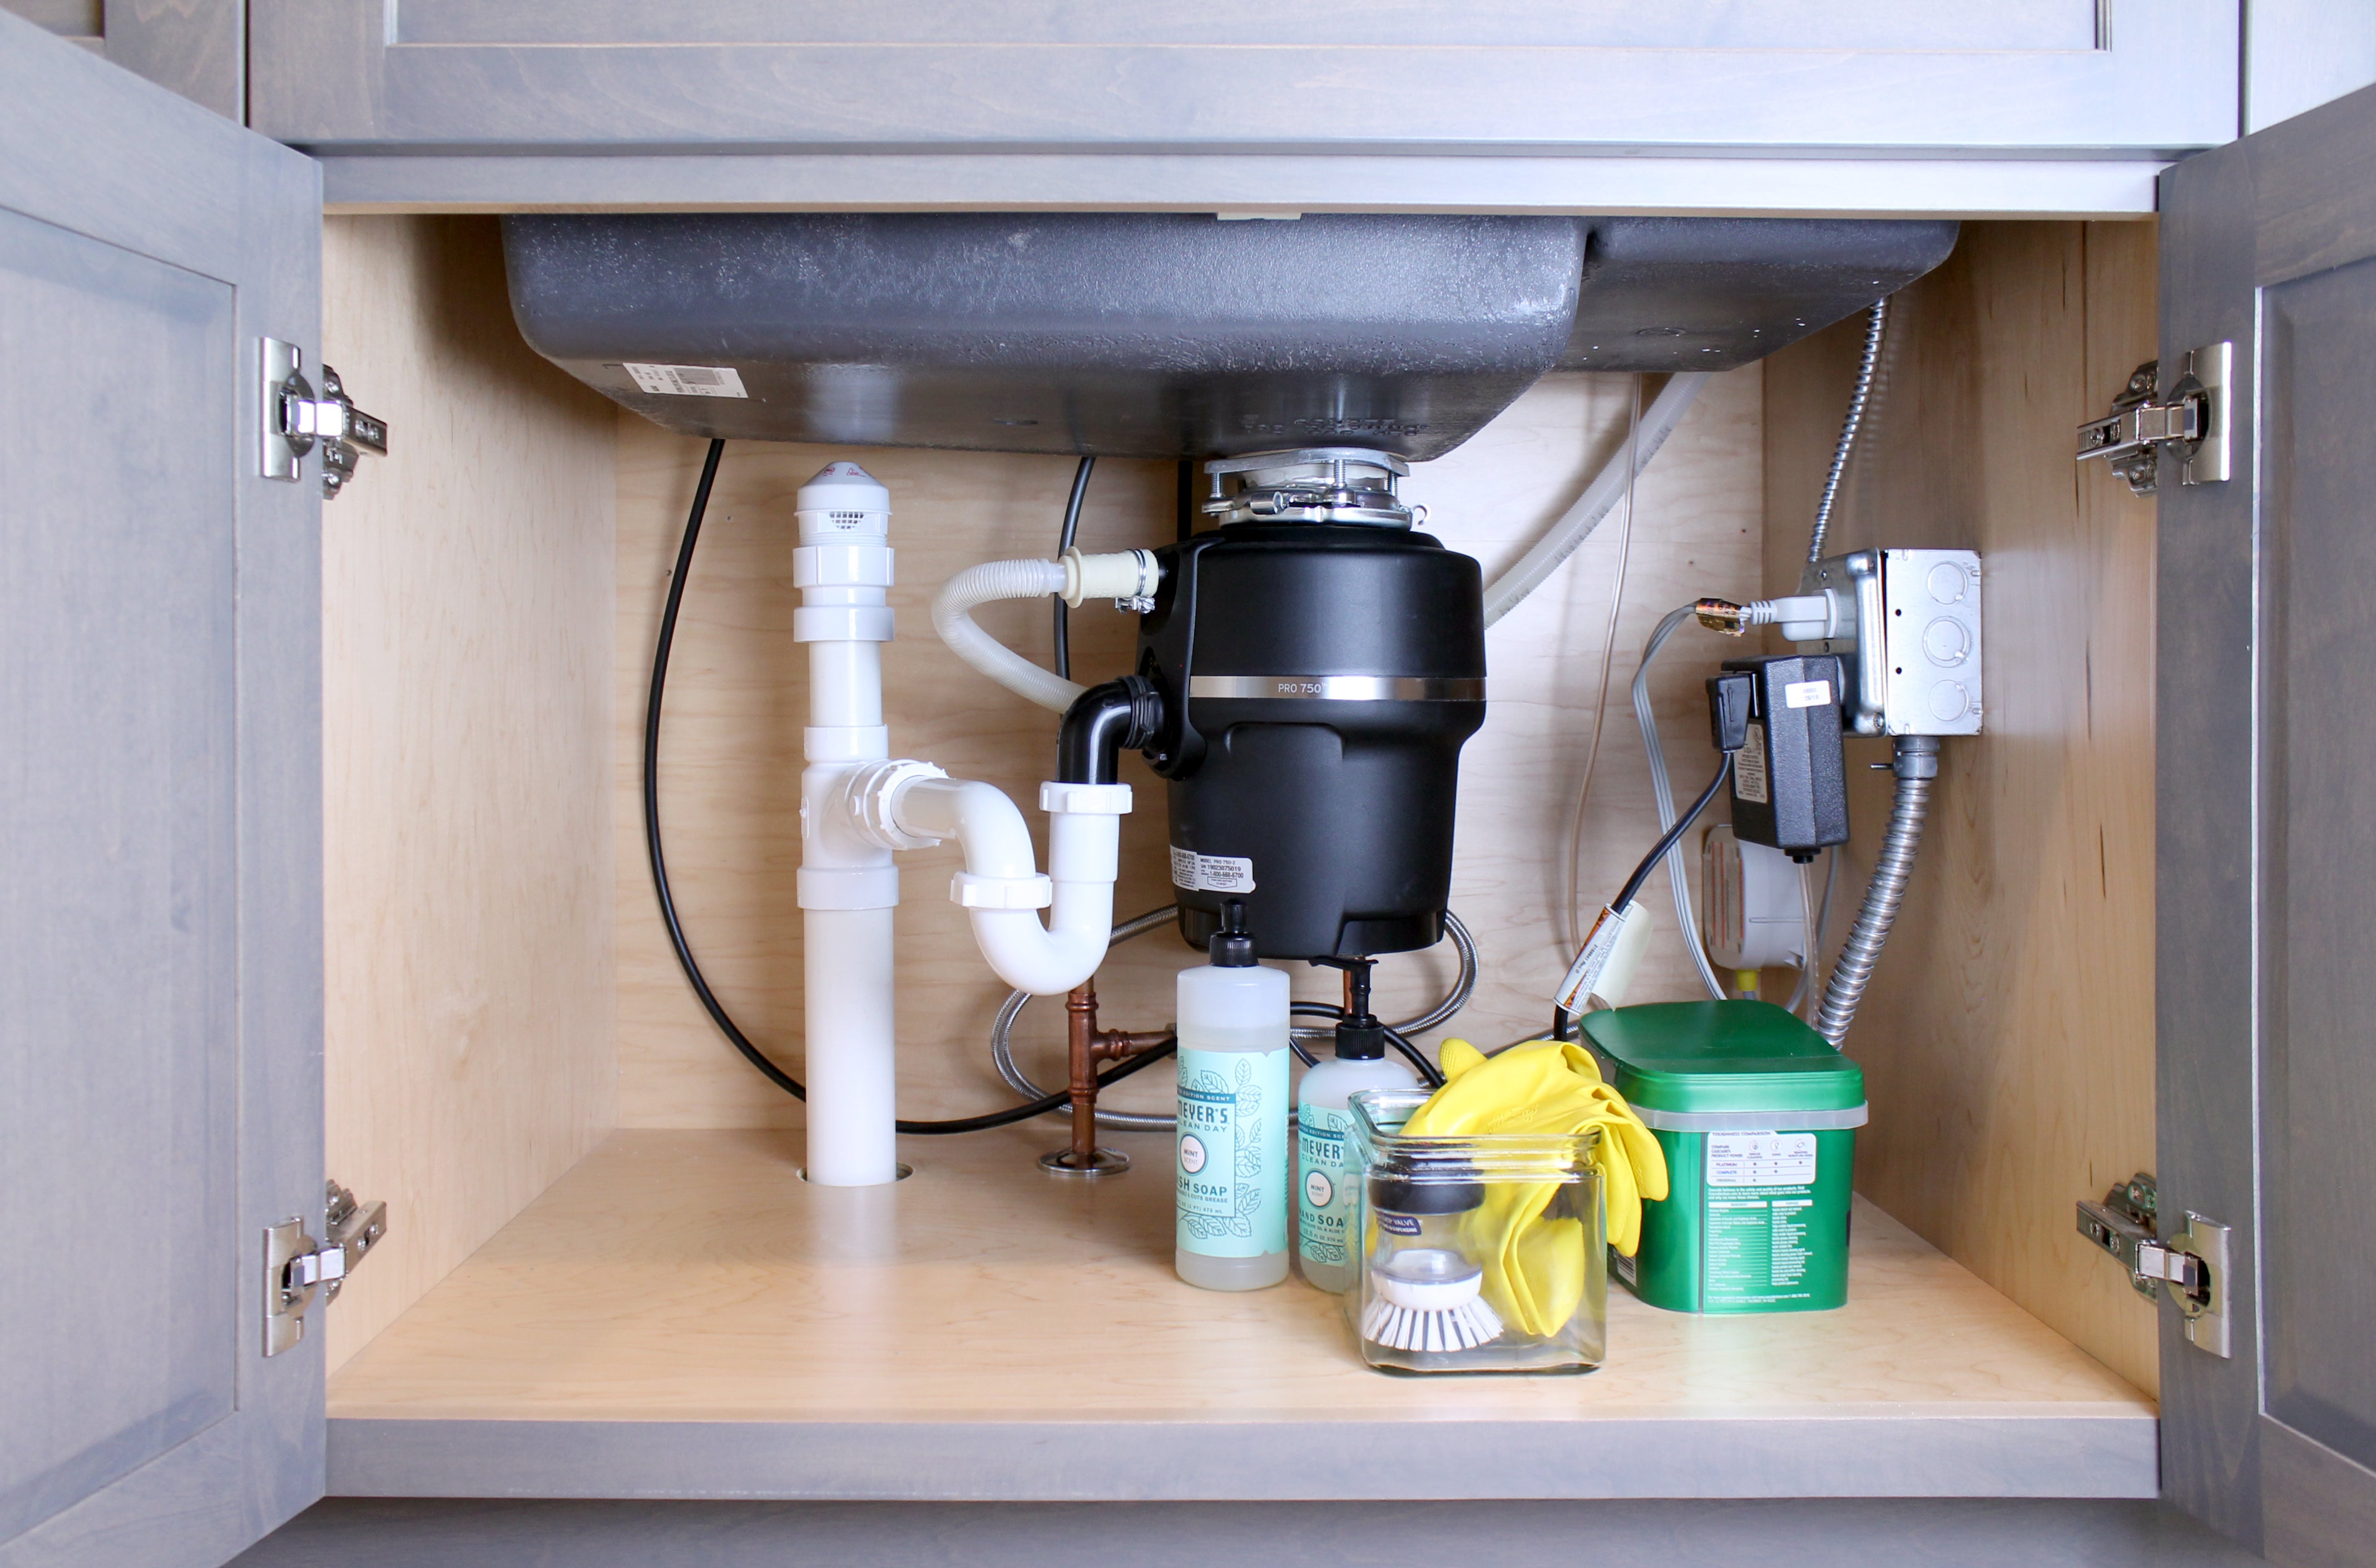
Installing a Studor vent may seem like a daunting task, but with the right tools and instructions, it can easily be done as a DIY project. Follow these simple steps to install a Studor vent under your kitchen sink: Step 1: Turn off the water supply to your kitchen sink and drain any remaining water from the pipes. Step 2: Measure and mark the location where you want to install the Studor vent. It is usually placed at the top of the drain pipe, near the sink. Step 3: Using a drill, create a hole at the marked location for the vent to fit through. Step 4: Fit the Studor vent into the hole and secure it with screws or adhesive, depending on the type of vent you have. Step 5: Connect the vent to the main drain line using a pipe or a flexible rubber coupling. Step 6: Turn the water supply back on and test the vent by running water down the sink drain.2. Step-by-Step Guide for Installing a Studor Vent Under a Kitchen Sink


2. Step-by-Step Guide for Installing a Studor Vent Under a Kitchen Sink


Installing a Studor vent is a simple and cost-effective DIY project that can be done by anyone with basic plumbing knowledge. By following the above steps and using the right tools, you can easily install a Studor vent under your kitchen sink without the need for professional help.3. DIY: Installing a Studor Vent Under a Kitchen Sink


3. DIY: Installing a Studor Vent Under a Kitchen Sink


While it may seem like an insignificant addition, installing a Studor vent under your kitchen sink is crucial for maintaining the proper functioning of your plumbing system. It helps to equalize the pressure in the pipes, prevent clogs, and eliminate the risk of harmful gases entering your home.4. The Importance of Installing a Studor Vent Under a Kitchen Sink
4. The Importance of Installing a Studor Vent Under a Kitchen Sink

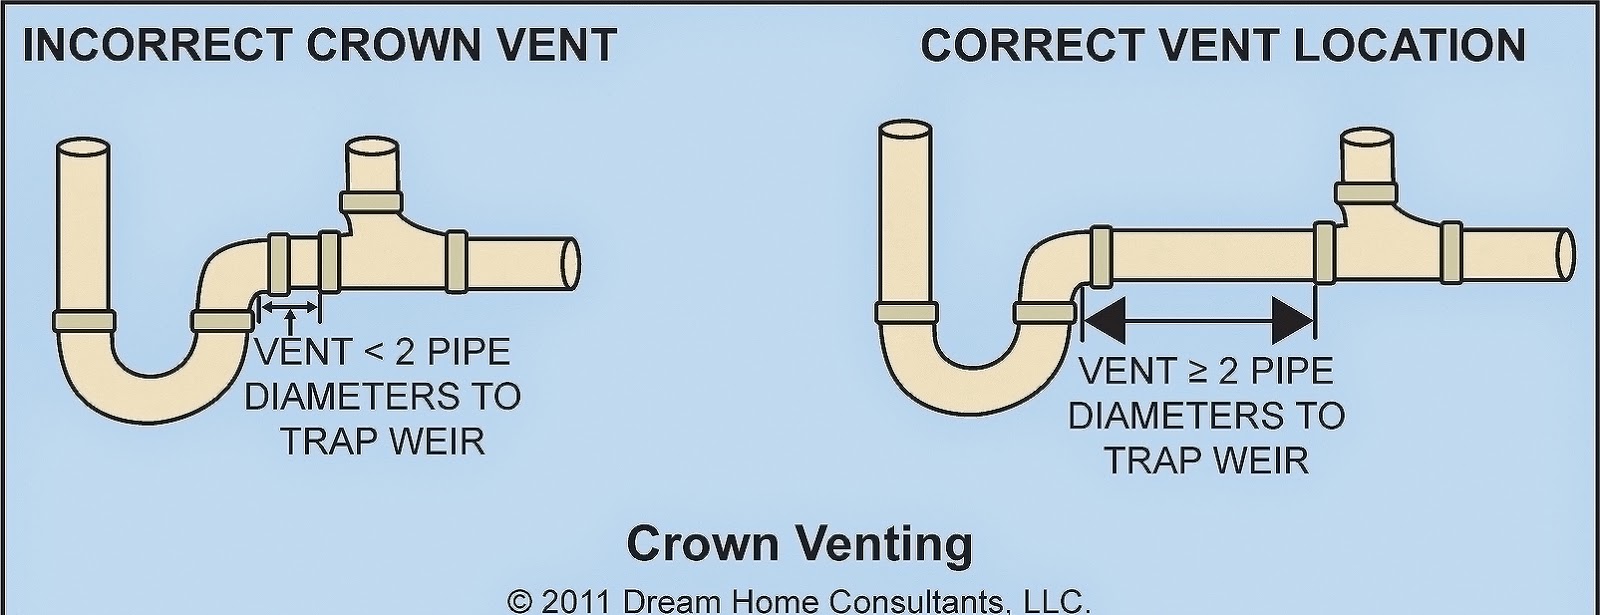
While installing a Studor vent is a relatively simple task, there are some common mistakes that people make which can cause issues in the future. These include using the wrong size vent, not securing the vent properly, or installing the vent too close to the sink. To ensure a successful installation, make sure to use the correct vent size and follow the instructions carefully.5. Common Mistakes to Avoid When Installing a Studor Vent Under a Kitchen Sink
5. Common Mistakes to Avoid When Installing a Studor Vent Under a Kitchen Sink


To install a Studor vent under your kitchen sink, you will need the following tools and materials: Tools: Drill, screws, screwdriver, pipe cutter or hacksaw, pliers, adjustable wrench, and a level. Materials: Studor vent, adhesive or screws, pipe or flexible rubber coupling, and plumber's tape.6. Tools and Materials Needed for Installing a Studor Vent Under a Kitchen Sink


6. Tools and Materials Needed for Installing a Studor Vent Under a Kitchen Sink

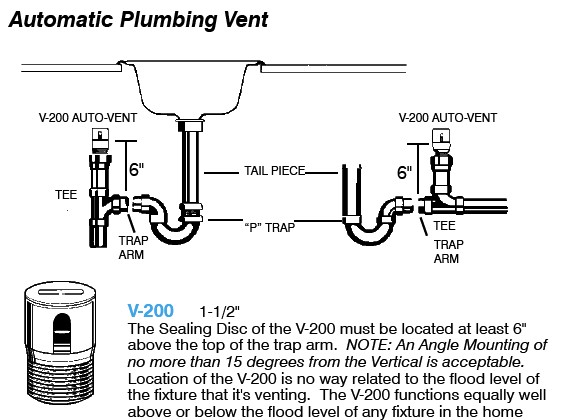
Here are some additional tips to keep in mind while installing a Studor vent under your kitchen sink: Tip 1: Make sure the vent is installed at least 4 inches above the sink drain to allow for proper ventilation. Tip 2: Use plumber's tape to ensure a tight and secure connection between the vent and the drain line. Tip 3: Double-check the vent size and make sure it is compatible with your plumbing system.7. Tips for Properly Installing a Studor Vent Under a Kitchen Sink


7. Tips for Properly Installing a Studor Vent Under a Kitchen Sink

If you encounter any problems during or after the installation of a Studor vent, here are some common issues and possible solutions: Issue: The vent is not working properly. Solution: Check if the vent is installed at the correct height and if it is properly connected to the drain line. If the issue persists, you may need to replace the vent with a larger size. Issue: The sink is draining slowly. Solution: This could be a sign of a clogged vent. Use a plunger or a drain snake to clear any obstructions in the vent. Issue: You notice a foul odor coming from the sink. Solution: This could be a sign of a damaged or improperly installed vent. Check for any leaks or cracks and make sure the vent is installed at the correct height.8. Troubleshooting Common Issues When Installing a Studor Vent Under a Kitchen Sink
8. Troubleshooting Common Issues When Installing a Studor Vent Under a Kitchen Sink

There are various benefits to installing a Studor vent under your kitchen sink, including: Space-saving: Studor vents eliminate the need for traditional vent pipes, saving valuable space under the sink. Cost-effective: Studor vents are relatively inexpensive and can be easily installed without the need for professional help. Prevents odors: By equalizing the pressure in the pipes, Studor vents prevent unpleasant odors from entering your home.9. Benefits of Installing a Studor Vent Under a Kitchen Sink

9. Benefits of Installing a Studor Vent Under a Kitchen Sink
While it is possible to install a Studor vent as a DIY project, it may be best to seek professional help if you are inexperienced or unsure about the installation process. Hiring a plumber ensures that the vent is installed correctly and can help avoid any future issues. In conclusion, installing a Studor vent under your kitchen sink is a simple and beneficial addition that can improve the functionality and cleanliness of your kitchen. With the right tools and knowledge, it can easily be done as a DIY project, but it is always best to seek professional help if you are unsure. Follow the above guide and enjoy a well-ventilated and odor-free kitchen sink. 10. Professional vs. DIY: Which is the Best Option for Installing a Studor Vent Under a Kitchen Sink?


10. Professional vs. DIY: Which is the Best Option for Installing a Studor Vent Under a Kitchen Sink?
/sink-vent-installing-an-auto-vent-2718828-hero-c276117e78dc4a5988e55f07b7c6e129.jpg)

The Importance of Proper Ventilation in Your Kitchen Design

Why Ventilation Matters
 Proper ventilation is a crucial aspect of any
kitchen design
. Without it, your kitchen can become a hot, humid, and unpleasant space to work in. Not to mention, it can also lead to a buildup of harmful pollutants and moisture, which can damage your cabinets, paint, and overall indoor air quality. That's where a
Studor vent
comes in.
Proper ventilation is a crucial aspect of any
kitchen design
. Without it, your kitchen can become a hot, humid, and unpleasant space to work in. Not to mention, it can also lead to a buildup of harmful pollutants and moisture, which can damage your cabinets, paint, and overall indoor air quality. That's where a
Studor vent
comes in.
What is a Studor Vent?
 A
Studor vent
is a type of
air admittance valve
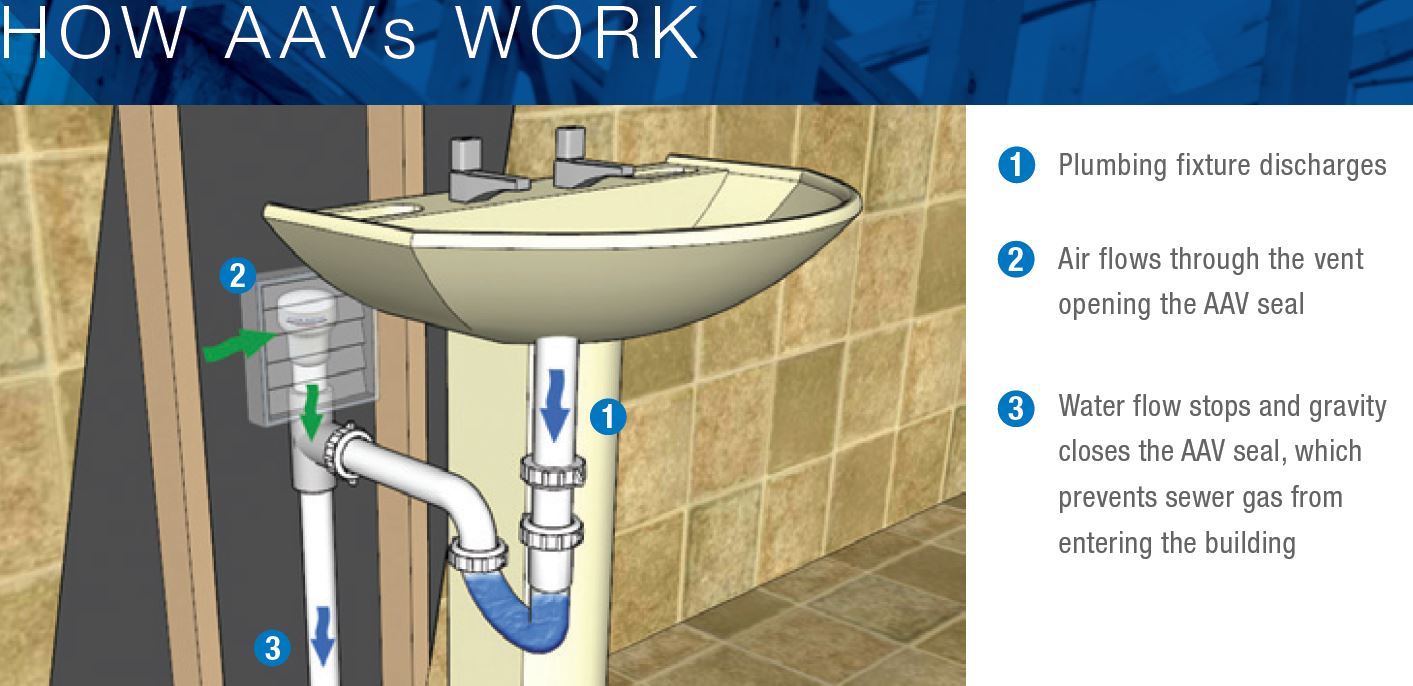
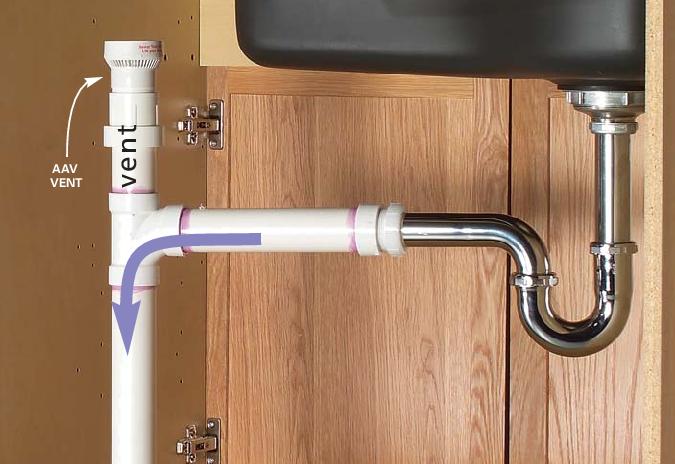
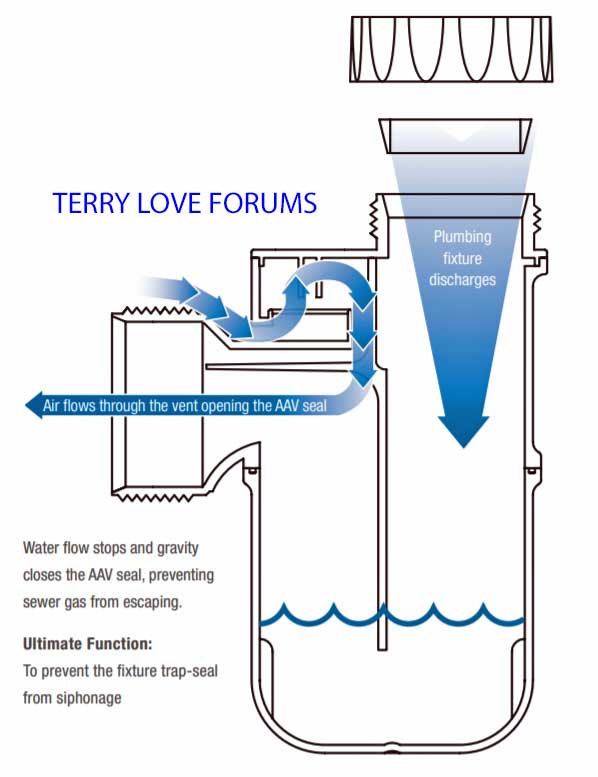
that helps regulate air pressure in your plumbing system. It is a small, one-way valve that allows air to enter the plumbing system, balancing out the pressure created by draining water. This prevents negative pressure, which can cause water to back up and siphon out of traps, releasing sewer gas and unpleasant odors into your home.
A
Studor vent
is a type of
air admittance valve
that helps regulate air pressure in your plumbing system. It is a small, one-way valve that allows air to enter the plumbing system, balancing out the pressure created by draining water. This prevents negative pressure, which can cause water to back up and siphon out of traps, releasing sewer gas and unpleasant odors into your home.
Why Install a Studor Vent Under Your Kitchen Sink?
 When it comes to
kitchen design
, the sink area is one of the most important and frequently used spaces. With all the water and food scraps that go down the drain, it's crucial to have proper ventilation to prevent clogs and odors. Installing a
Studor vent
under your kitchen sink can help alleviate these issues and keep your kitchen running smoothly.
When it comes to
kitchen design
, the sink area is one of the most important and frequently used spaces. With all the water and food scraps that go down the drain, it's crucial to have proper ventilation to prevent clogs and odors. Installing a
Studor vent
under your kitchen sink can help alleviate these issues and keep your kitchen running smoothly.
How to Install a Studor Vent
 Installing a
Studor vent
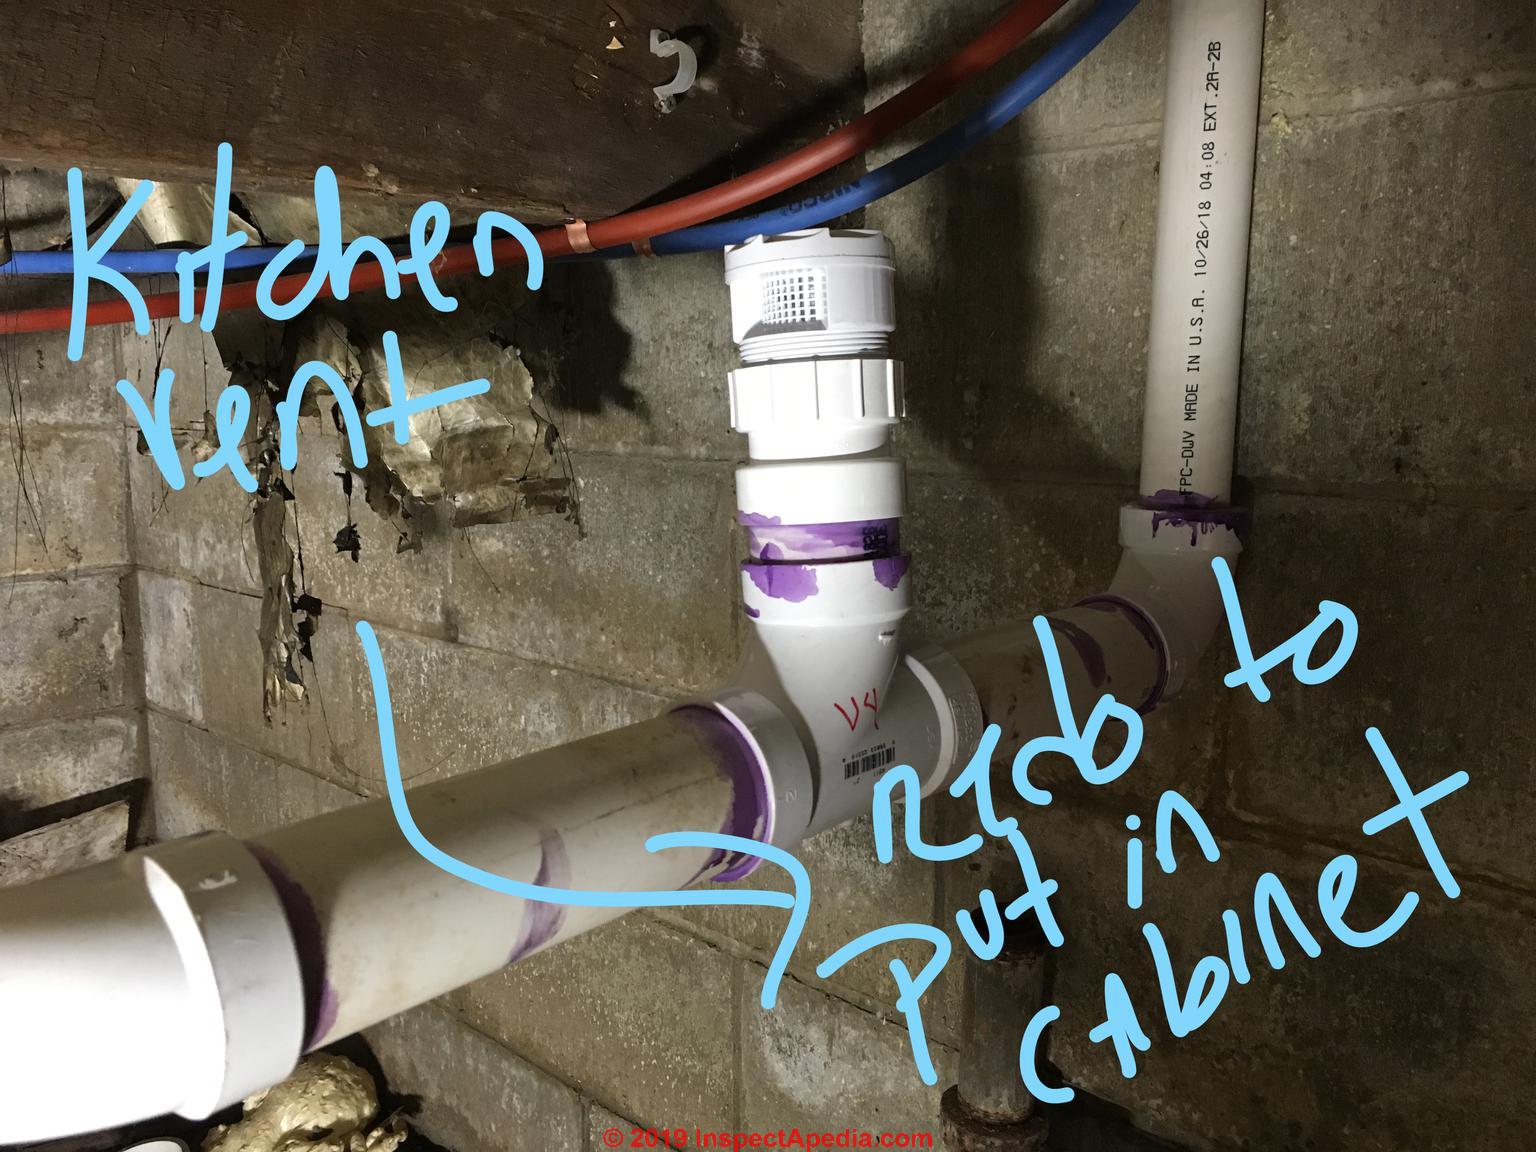
under your kitchen sink is a relatively simple process that can be done in a few easy steps. First, turn off the water supply to your sink and remove the drain pipe. Next, measure and cut a section of pipe to fit the Studor vent. Then, insert the vent into the pipe and secure it with a clamp. Finally, reattach the drain pipe and turn the water supply back on. It's important to follow the manufacturer's instructions and local plumbing codes when installing a Studor vent.
Installing a
Studor vent
under your kitchen sink is a relatively simple process that can be done in a few easy steps. First, turn off the water supply to your sink and remove the drain pipe. Next, measure and cut a section of pipe to fit the Studor vent. Then, insert the vent into the pipe and secure it with a clamp. Finally, reattach the drain pipe and turn the water supply back on. It's important to follow the manufacturer's instructions and local plumbing codes when installing a Studor vent.
Final Thoughts
 A
Studor vent
may seem like a small addition, but it plays a crucial role in maintaining a healthy and functional kitchen. With proper ventilation, you can prevent unpleasant odors, clogs, and damage to your kitchen. So, when planning your
kitchen design
, don't overlook the importance of installing a Studor vent under your sink. Your nose and your plumbing system will thank you.
A
Studor vent
may seem like a small addition, but it plays a crucial role in maintaining a healthy and functional kitchen. With proper ventilation, you can prevent unpleasant odors, clogs, and damage to your kitchen. So, when planning your
kitchen design
, don't overlook the importance of installing a Studor vent under your sink. Your nose and your plumbing system will thank you.