If you're experiencing low water pressure in your kitchen sink or your sprayer attachment isn't working properly, it may be time to remove your kitchen sink diverter valve. This small but important piece of your sink's plumbing can become clogged or worn over time, affecting the flow of water. Removing the diverter valve is a relatively simple process that can be done with just a few tools and some basic knowledge. In this guide, we'll discuss the steps to properly remove your kitchen sink diverter valve and get your sink functioning at its best again.How to Remove a Kitchen Sink Diverter Valve


How to Remove a Kitchen Sink Diverter Valve


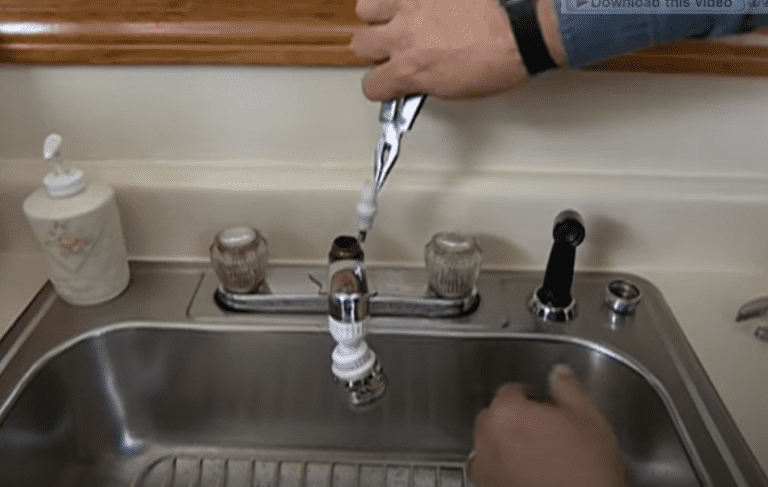


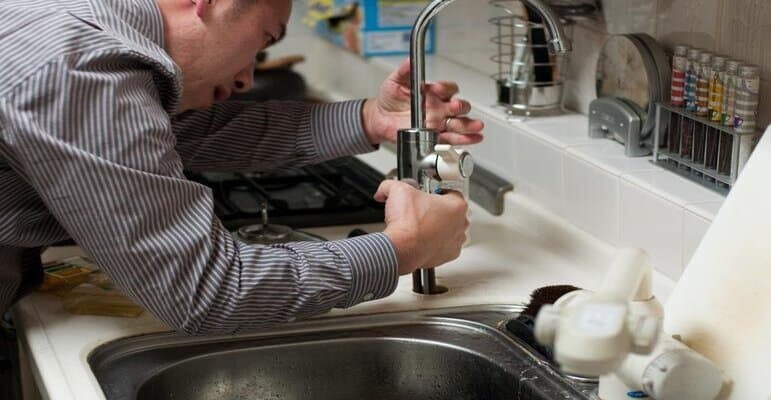

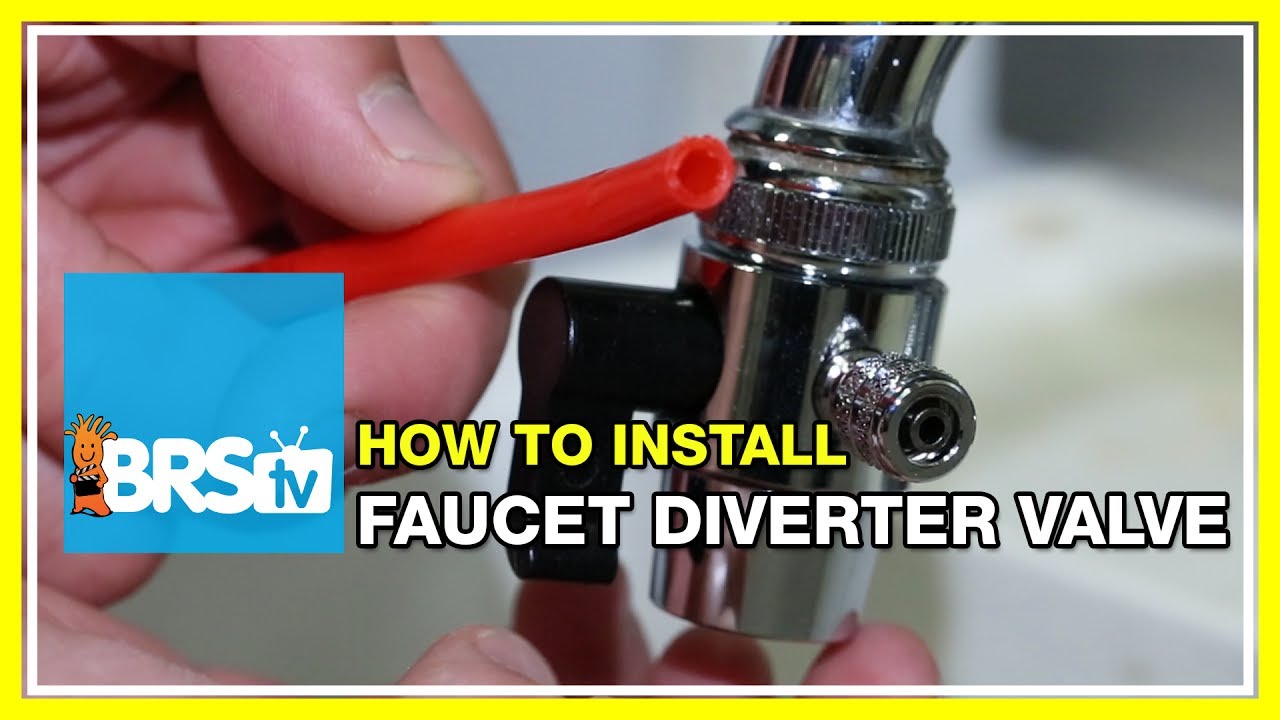
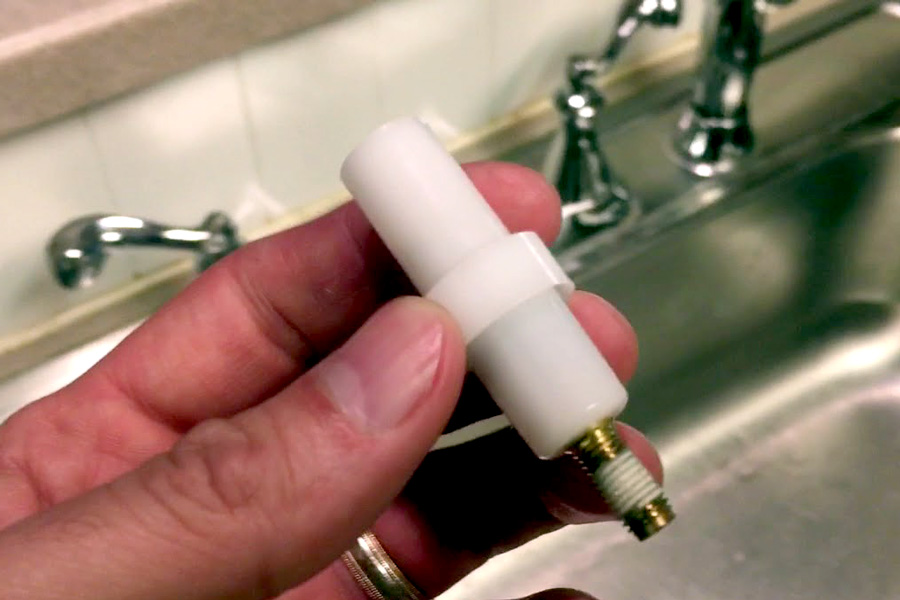
Before you begin, make sure to gather the necessary tools and materials. You will need a pair of pliers, an adjustable wrench, and a flathead screwdriver. It's also helpful to have a towel or bucket on hand to catch any excess water that may come out during the removal process. Step 1: Locate the Diverter Valve The diverter valve is typically located underneath the sink, near the base of the faucet. You may need to remove any items stored in your cabinet to access it. Once you have located the valve, turn off the water supply to your sink. Step 2: Remove the Sprayer Attachment If you have a sprayer attachment on your sink, you will need to remove it before you can access the diverter valve. Use your pliers to loosen the connection between the sprayer and the hose, and then unscrew the sprayer from the hose. Set the sprayer aside. Step 3: Disconnect the Diverter Valve Using your adjustable wrench, loosen the nut that connects the hose to the base of the faucet. Once the nut is loose, you should be able to pull the hose away from the base of the faucet, exposing the diverter valve. Use your pliers to gently pull the diverter valve out of its housing. Step 4: Inspect the Diverter Valve Now that the diverter valve is removed, take a close look at it to see if it is clogged or damaged. If it is clogged, you can clean it by soaking it in a mixture of vinegar and water for about an hour. If it is damaged, you will need to replace the valve entirely. Step 5: Reassemble the Faucet If you only needed to clean the diverter valve, you can now reinsert it into its housing and reattach the hose and sprayer attachment. Make sure to tighten all connections securely.Removing a Kitchen Sink Diverter Valve: Step-by-Step Guide


Removing a Kitchen Sink Diverter Valve: Step-by-Step Guide


If you prefer to do things yourself, removing a kitchen sink diverter valve is a relatively simple task. With the right tools and some basic knowledge, you can easily remove the valve and get your sink functioning properly again. Step 1: Gather Your Tools Before you begin, make sure you have the necessary tools on hand. This includes pliers, an adjustable wrench, and a flathead screwdriver. It's also a good idea to have a towel or bucket nearby to catch any excess water that may come out during the removal process. Step 2: Turn Off the Water Supply The first step in any plumbing project is to turn off the water supply. This will prevent any water from coming out while you are working on the sink. You can usually find the water supply valve under the sink or near the main water supply for your home. Step 3: Remove the Sprayer Attachment If your sink has a sprayer attachment, you will need to remove it before you can access the diverter valve. Use your pliers to loosen the connection between the sprayer and the hose, and then unscrew the sprayer from the hose. Set the sprayer aside. Step 4: Disconnect the Diverter Valve Using your adjustable wrench, loosen the nut that connects the hose to the base of the faucet. Once the nut is loose, you should be able to pull the hose away from the base of the faucet, exposing the diverter valve. Use your pliers to gently pull the diverter valve out of its housing. Step 5: Inspect and Clean the Diverter Valve Take a close look at the diverter valve to see if it is clogged or damaged. If it is clogged, you can clean it by soaking it in a mixture of vinegar and water for about an hour. If it is damaged, you will need to replace the valve entirely. Step 6: Reassemble the Faucet If you only needed to clean the diverter valve, you can now reinsert it into its housing and reattach the hose and sprayer attachment. Make sure to tighten all connections securely.DIY: How to Remove a Kitchen Sink Diverter Valve


DIY: How to Remove a Kitchen Sink Diverter Valve


Removing a kitchen sink diverter valve can seem like a daunting task, but with the right knowledge and tools, it can be done easily. Here, we'll provide a comprehensive guide to removing a diverter valve from your kitchen sink. Step 1: Turn Off the Water Supply Before you begin, make sure to turn off the water supply to your sink. This will prevent any water from coming out while you are working on the valve. Step 2: Gather Your Tools Make sure you have all the necessary tools on hand, including pliers, an adjustable wrench, and a flathead screwdriver. It's also helpful to have a towel or bucket nearby to catch any excess water that may come out during the removal process. Step 3: Remove the Sprayer Attachment If your sink has a sprayer attachment, you will need to remove it before you can access the diverter valve. Use your pliers to loosen the connection between the sprayer and the hose, and then unscrew the sprayer from the hose. Set the sprayer aside. Step 4: Disconnect the Diverter Valve Using your adjustable wrench, loosen the nut that connects the hose to the base of the faucet. Once the nut is loose, you should be able to pull the hose away from the base of the faucet, exposing the diverter valve. Use your pliers to gently pull the diverter valve out of its housing. Step 5: Inspect and Clean the Diverter Valve Take a close look at the diverter valve to see if it is clogged or damaged. If it is clogged, you can clean it by soaking it in a mixture of vinegar and water for about an hour. If it is damaged, you will need to replace the valve entirely. Step 6: Reassemble the Faucet If you only needed to clean the diverter valve, you can now reinsert it into its housing and reattach the hose and sprayer attachment. Make sure to tighten all connections securely.Removing a Diverter Valve from Your Kitchen Sink: A Comprehensive Guide


Removing a Diverter Valve from Your Kitchen Sink: A Comprehensive Guide


Removing a kitchen sink diverter valve can seem like a daunting task, but with the right tools and knowledge, it can be done easily. Here, we'll provide step-by-step instructions to guide you through the process. Step 1: Turn Off the Water Supply Before you begin, make sure to turn off the water supply to your sink. This will prevent any water from coming out while you are working on the valve. Step 2: Gather Your Tools Make sure you have all the necessary tools on hand, including pliers, an adjustable wrench, and a flathead screwdriver. It's also helpful to have a towel or bucket nearby to catch any excess water that may come out during the removal process. Step 3: Remove the Sprayer Attachment If your sink has a sprayer attachment, you will need to remove it before you can access the diverter valve. Use your pliers to loosen the connection between the sprayer and the hose, and then unscrew the sprayer from the hose. Set the sprayer aside. Step 4: Disconnect the Diverter Valve Using your adjustable wrench, loosen the nut that connects the hose to the base of the faucet. Once the nut is loose, you should be able to pull the hose away from the base of the faucet, exposing the diverter valve. Use your pliers to gently pull the diverter valve out of its housing. Step 5: Inspect and Clean the Diverter Valve Take a close look at the diverter valve to see if it is clogged or damaged. If it is clogged, you can clean it by soaking it in a mixture of vinegar and water for about an hour. If it is damaged, you will need to replace the valve entirely. Step 6: Reassemble the Faucet If you only needed to clean the diverter valve, you can now reinsert it into its housing and reattach the hose and sprayer attachment. Make sure to tighten all connections securely.Step-by-Step Instructions for Removing a Kitchen Sink Diverter Valve
Step-by-Step Instructions for Removing a Kitchen Sink Diverter Valve


While removing a kitchen sink diverter valve is a relatively simple process, there are a few tips and tricks that can make the job even easier. Tip 1: Use Plumber's Tape Before reassembling the faucet, use plumber's tape on the connections to ensure a tight seal and prevent any leaks. Tip 2: Clean the Valve Regularly To prevent buildup and clogs, make sure to clean the diverter valve regularly. This can help prolong its lifespan and keep your sink functioning at its best. Tip 3: Consider Replacing the Valve If your diverter valve is damaged or frequently clogs, it may be time to replace it entirely. This will ensure optimal functionality and water flow in your sink.Removing a Kitchen Sink Diverter Valve: Tips and Tricks


Removing a Kitchen Sink Diverter Valve: Tips and Tricks

Removing a kitchen sink diverter valve can be done in just a few simple steps. Here's a quick guide to removing the valve in 5 easy steps. Step 1: Turn Off the Water Supply Before you begin, make sure to turn off the water supply to your sink. This will prevent any water from coming out while you are working on the valve. Step 2: Gather Your Tools Make sure you have all the necessary tools on hand, including pliers, an adjustable wrench, and a flathead screwdriver. It's also helpful to have a towel or bucket nearby to catch any excess water that may come out during the removal process. Step 3: Remove the Sprayer Attachment If your sink has a sprayer attachment, you will need to remove it before you can access the diverter valve. Use your pliers to loosen the connection between the sprayer and the hose, and then unscrew the sprayer from the hose. Set the sprayer aside. Step 4: Disconnect the Diverter Valve Using your adjustable wrench, loosen the nut that connects the hose to the base of the faucet. Once the nut is loose, you should be able to pull the hose away from the base of the faucet, exposing the diverter valve. Use your pliers to gently pull the diverter valve out of its housing. Step 5: Inspect and Clean the Diverter Valve Take a close look at the diverter valve to see if it is clogged or damaged. If it is clogged, you can clean it by soaking it in a mixture of vinegar and water for about an hour. If it is damaged, you will need to replace the valve entirely.How to Remove a Diverter Valve from Your Kitchen Sink in 5 Easy Steps


How to Remove a Diverter Valve from Your Kitchen Sink in 5 Easy Steps


While removing a kitchen sink diverter valve is a relatively straightforward process, there are a few common mistakes that can be easily avoided. Mistake 1: Forgetting to Turn Off the Water Supply Before beginning, make sure to turn off the water supply to your sink. This will prevent any water from coming out while you are working on the valve. Mistake 2: Not Preparing the Area Make sure to clear out the area under your sink and have a towel or bucket on hand to catch any excess water. This will prevent any mess or damage to your belongings. Mistake 3: Not Tightening Connections Properly To prevent leaks, make sure to securely tighten all connections after reassembling the faucet. Using plumber's tape can also help ensure a tight seal.Removing a Kitchen Sink Diverter Valve: Common Mistakes to Avoid

Removing a Kitchen Sink Diverter Valve: Common Mistakes to Avoid

Why Removing the Kitchen Sink Diverter Valve is Important for Your House Design

The Purpose of a Kitchen Sink Diverter Valve
 The kitchen sink diverter valve is a crucial component of your kitchen sink. It controls the flow of water between the main faucet and the sprayer. It allows you to switch between a steady stream of water and a high-pressure spray for cleaning dishes and other tasks. However, over time, this valve can become worn out or clogged, leading to decreased water pressure and a malfunctioning sprayer. That's why it's important to know how to remove and replace the kitchen sink diverter valve.
Step-by-Step Guide to Removing the Kitchen Sink Diverter Valve
 Step 1: Gather Your Tools
Before you begin, make sure you have all the necessary tools on hand. You will need an adjustable wrench, pliers, and a screwdriver. It's also a good idea to have a towel or bucket to catch any water that may spill out during the process.
Step 2: Shut Off the Water Supply
Before you start working on the valve, you must turn off the water supply to your kitchen sink. Look under the sink for the hot and cold water supply lines and turn the shut-off valves clockwise to shut off the water.
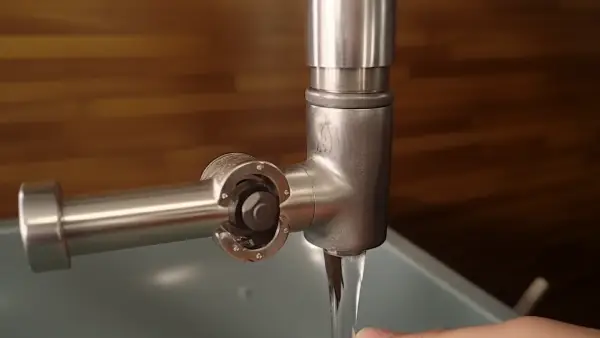
Step 3: Remove the Diverter Valve
Using your pliers, carefully unscrew the nut that holds the sprayer hose to the diverter valve. Then, use your wrench to loosen and remove the diverter valve from the valve housing. If the valve is stuck, you can use a flathead screwdriver to gently pry it out.
Step 4: Clean and Replace the Diverter Valve
Once you have removed the old diverter valve, clean the valve housing thoroughly. This will ensure that the new valve fits properly and functions correctly. Then, insert the new diverter valve into the housing and tighten it with your wrench.
Step 5: Reattach the Sprayer Hose
Using your adjustable wrench, reattach the sprayer hose to the new diverter valve. Make sure it is securely tightened to avoid any leaks.
Step 6: Turn the Water Supply Back On
Once you have completed all the steps, turn the water supply back on and test the sprayer to make sure it is functioning correctly. If you notice any leaks, tighten the connections with your wrench.
Step 1: Gather Your Tools
Before you begin, make sure you have all the necessary tools on hand. You will need an adjustable wrench, pliers, and a screwdriver. It's also a good idea to have a towel or bucket to catch any water that may spill out during the process.
Step 2: Shut Off the Water Supply
Before you start working on the valve, you must turn off the water supply to your kitchen sink. Look under the sink for the hot and cold water supply lines and turn the shut-off valves clockwise to shut off the water.
Step 3: Remove the Diverter Valve
Using your pliers, carefully unscrew the nut that holds the sprayer hose to the diverter valve. Then, use your wrench to loosen and remove the diverter valve from the valve housing. If the valve is stuck, you can use a flathead screwdriver to gently pry it out.
Step 4: Clean and Replace the Diverter Valve
Once you have removed the old diverter valve, clean the valve housing thoroughly. This will ensure that the new valve fits properly and functions correctly. Then, insert the new diverter valve into the housing and tighten it with your wrench.
Step 5: Reattach the Sprayer Hose
Using your adjustable wrench, reattach the sprayer hose to the new diverter valve. Make sure it is securely tightened to avoid any leaks.
Step 6: Turn the Water Supply Back On
Once you have completed all the steps, turn the water supply back on and test the sprayer to make sure it is functioning correctly. If you notice any leaks, tighten the connections with your wrench.
The Benefits of Removing and Replacing the Kitchen Sink Diverter Valve
 Removing and replacing the kitchen sink diverter valve can improve the overall functionality and design of your kitchen. It will restore proper water pressure to your sprayer, making it easier to clean dishes and other kitchen tasks. It also prevents any potential water damage that may occur from a malfunctioning valve.
In addition, this simple fix can also enhance the aesthetics of your kitchen. A worn-out diverter valve can make your sink look old and outdated. By replacing it, you can give your sink a fresh and modern look.
Removing and replacing the kitchen sink diverter valve can improve the overall functionality and design of your kitchen. It will restore proper water pressure to your sprayer, making it easier to clean dishes and other kitchen tasks. It also prevents any potential water damage that may occur from a malfunctioning valve.
In addition, this simple fix can also enhance the aesthetics of your kitchen. A worn-out diverter valve can make your sink look old and outdated. By replacing it, you can give your sink a fresh and modern look.
Conclusion
 In conclusion, the kitchen sink diverter valve is a crucial component of your kitchen sink. It controls the flow of water and can greatly affect the functionality and design of your kitchen. By following these simple steps to remove and replace the valve, you can improve the water pressure, prevent potential damage, and enhance the overall look of your kitchen. So, don't hesitate to tackle this DIY project and enjoy a more efficient and stylish kitchen.