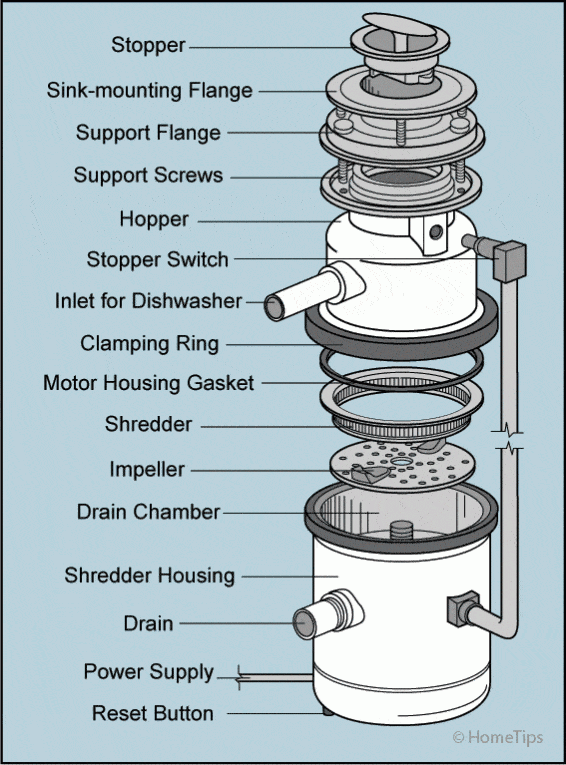
Installing a garbage disposal under your kitchen sink can make your clean-up routine much easier and more efficient. Not only will it help to reduce kitchen waste and odors, but it can also save you time and effort when doing dishes. Here's a step-by-step guide on how to install a garbage disposal. Step 1: Gather the necessary tools and materials. Before you begin, make sure you have all the tools and materials you need. This includes a garbage disposal unit, a screwdriver, pliers, a wrench, plumber's putty, and a hacksaw or pipe cutter. Step 2: Turn off the power. Before you start working, make sure to turn off the power to your kitchen sink. You can do this by locating the circuit breaker and flipping the switch for the kitchen. This will ensure your safety while working with electrical components. Step 3: Remove the old drain assembly. If you have an old garbage disposal or a regular drain, you will need to remove it before installing the new unit. Use a screwdriver to loosen and remove the mounting screws, then disconnect the drain pipes using pliers or a wrench. Step 4: Install the mounting assembly. Place the mounting assembly onto the bottom of the sink and secure it with the mounting screws. Make sure it is centered and level before tightening the screws. This will hold the disposal unit in place. Step 5: Connect the disposal unit. Next, you will need to connect the disposal unit to the mounting assembly. This is usually done by twisting the unit onto the mounting ring until it is secure. Refer to the manufacturer's instructions for specific details. Step 6: Install the drain pipes. Using plumber's putty, create a seal around the drain opening on the sink. Then, attach the drain pipes to the disposal unit and the sink drain. Use a wrench to tighten the connections and make sure there are no leaks. Step 7: Connect the dishwasher. If you have a dishwasher, you will need to install a dishwasher connector kit to connect it to the disposal unit. This will allow food waste from the dishwasher to be disposed of through the garbage disposal. Again, refer to the manufacturer's instructions for specific details. Step 8: Test the garbage disposal. Once everything is connected, turn the power back on and test the garbage disposal. Run water through the sink and turn on the disposal to make sure it is working properly. If there are any issues, refer to the troubleshooting guide in the manufacturer's instructions. Step 9: Clean up and enjoy your new garbage disposal. Lastly, clean up any debris or tools and enjoy your newly installed garbage disposal. With proper maintenance and usage, it should serve you well for many years to come.How to Install a Garbage Disposal

How to Install a Garbage Disposal


:max_bytes(150000):strip_icc()/garbage-disposal-installation-1824830-hero-1dcd7b5b05d44a2cb367e31692500c8c.jpg)

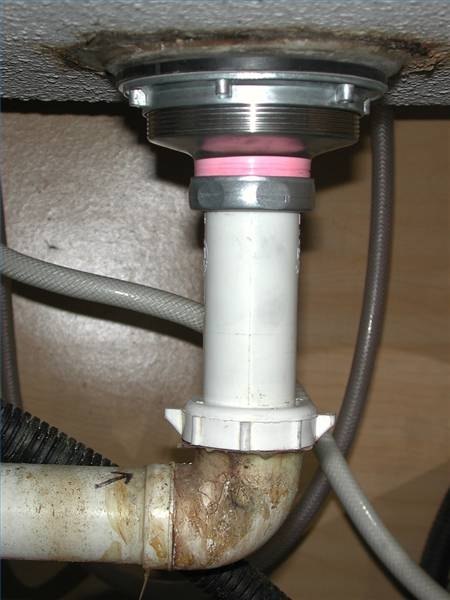
If your kitchen sink does not have a garbage disposal, you will need to install a regular drain assembly. Here's how to do it: Step 1: Gather the necessary tools and materials. Before you begin, make sure you have all the tools and materials you need. This includes a sink drain assembly, a screwdriver, pliers, a wrench, plumber's putty, and a hacksaw or pipe cutter. Step 2: Remove the old drain assembly. If you have an old drain assembly, you will need to remove it before installing the new one. Use a screwdriver to loosen and remove the mounting screws, then disconnect the drain pipes using pliers or a wrench. Step 3: Install the drain assembly. Place the rubber gasket onto the sink drain hole, then insert the drain assembly and secure it with the mounting screws. Make sure it is centered and level before tightening the screws. Step 4: Install the drain pipes. Using plumber's putty, create a seal around the drain opening on the sink. Then, attach the drain pipes to the sink drain and the main drain line. Use a wrench to tighten the connections and make sure there are no leaks. Step 5: Test the sink drain. Once everything is connected, run water through the sink to test the drain. Make sure there are no leaks and that the water is draining properly. If there are any issues, refer to the troubleshooting guide in the manufacturer's instructions.How to Install a Kitchen Sink Drain


How to Install a Kitchen Sink Drain

/how-to-install-a-sink-drain-2718789-hero-b5b99f72b5a24bb2ae8364e60539cece.jpg)

:max_bytes(150000):strip_icc()/how-to-install-a-sink-drain-2718789-hero-24e898006ed94c9593a2a268b57989a3.jpg)


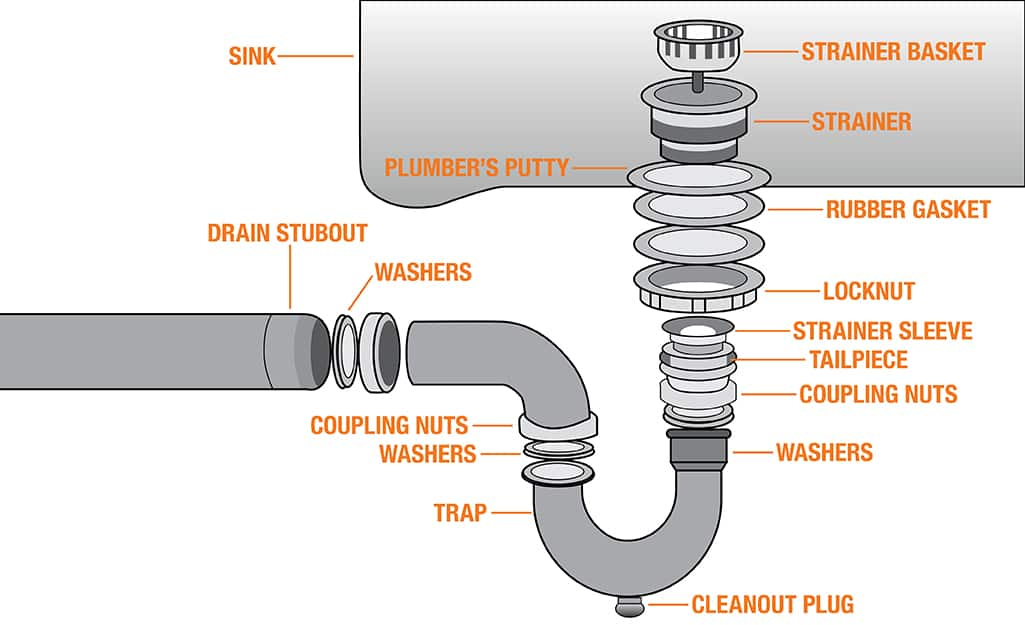
A kitchen sink basket strainer is an essential component of your sink drain system. It helps to filter out large food particles and prevent clogs. Here's how to install one: Step 1: Gather the necessary tools and materials. Before you begin, make sure you have all the tools and materials you need. This includes a sink basket strainer, a screwdriver, pliers, a wrench, plumber's putty, and a hacksaw or pipe cutter. Step 2: Remove the old basket strainer (if applicable). If you have an old basket strainer, you will need to remove it before installing the new one. Use a screwdriver to loosen and remove the mounting screws, then disconnect the strainer from the sink. Step 3: Install the new basket strainer. Place the rubber gasket onto the sink drain hole, then insert the basket strainer and secure it with the mounting screws. Make sure it is centered and level before tightening the screws. Step 4: Apply plumber's putty. Using plumber's putty, create a seal around the strainer on both sides of the sink. This will help to prevent any leaks. Step 5: Test the strainer. Run water through the sink to test the strainer. Make sure there are no leaks and that it is effectively filtering out food particles. If there are any issues, refer to the troubleshooting guide in the manufacturer's instructions.How to Install a Kitchen Sink Basket Strainer

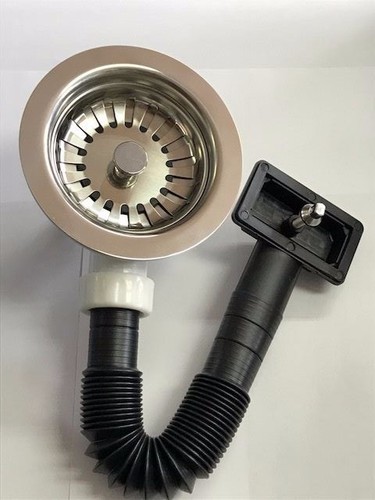

How to Install a Kitchen Sink Basket Strainer


The P-trap is an important part of your kitchen sink plumbing system. It prevents sewer gas from coming up through the drain and into your home. Here's how to install one: Step 1: Gather the necessary tools and materials. Before you begin, make sure you have all the tools and materials you need. This includes a P-trap, a screwdriver, pliers, a wrench, and plumber's tape. Step 2: Remove the old P-trap (if applicable). If you have an old P-trap, you will need to remove it before installing the new one. Use a wrench to loosen and remove the connections at both ends of the trap. Step 3: Install the new P-trap. Place the new P-trap in position and use plumber's tape to secure the connections. Make sure the trap is angled downward and that the connections are tight to prevent any leaks. Step 4: Test the P-trap. Run water through the sink to test the P-trap. Make sure there are no leaks and that the trap is effectively preventing sewer gas from coming up through the drain.How to Install a Kitchen Sink P-Trap


How to Install a Kitchen Sink P-Trap


The tailpiece is the vertical piece of piping that connects the sink drain to the P-trap. Here's how to install one: Step 1: Gather the necessary tools and materials. Before you begin, make sure you have all the tools and materials you need. This includes a tailpiece, a screwdriver, pliers, a wrench, and plumber's tape. Step 2: Remove the old tailpiece (if applicable). If you have an old tailpiece, you will need to remove it before installing the new one. Use a wrench to loosen and remove the connections at both ends of the tailpiece. Step 3: Install the new tailpiece. Place the new tailpiece in position and use plumber's tape to secure the connections. Make sure the connections are tight to prevent any leaks. Step 4: Test the tailpiece. Run water through the sink to test the tailpiece. Make sure there are no leaks and that the water is draining properly.How to Install a Kitchen Sink Tailpiece

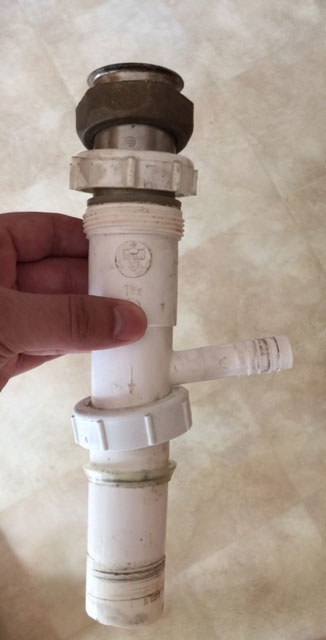

How to Install a Kitchen Sink Tailpiece
:max_bytes(150000):strip_icc()/how-to-install-a-sink-drain-2718789-04-5715d67f5b7d41429d42bf705bb70e2c.jpg)


The drain pipe connects the P-trap to the main drain line. Here's how to install one: Step 1: Gather the necessary tools and materials. Before you begin, make sure you have all the tools and materials you need. This includes a drain pipe, a screwdriver, pliers, a wrench, and plumber's tape. Step 2: Remove the old drain pipe (if applicable). If you have an old drain pipe, you will need to remove it before installing the new one. Use a wrench to loosen and remove the connections at both ends of the pipe. Step 3: Install the new drain pipe. Place the new drain pipe in position and use plumber's tape to secure the connections. Make sure the connections are tight to prevent any leaks. Step 4: Test the drain pipe. Run water through the sink to test the drain pipe. Make sure there are no leaks and that the water is draining properly.How to Install a Kitchen Sink Drain Pipe


How to Install a Kitchen Sink Drain Pipe


The drain assembly includes all the components necessary for your kitchen sink drain, including the strainer, the P-trap, and the drain pipe. Here's how to install one: Step 1: Gather the necessary tools and materials. Before you begin, make sure you have all the tools and materials you need. This includes a drain assembly kit, a screwdriver, pliers, a wrench, and plumber's tape. Step 2: Remove the old drain assembly (if applicable). If you have an old drain assembly, you will need to remove it before installing the new one. Use a wrench to loosen and remove the connections at both ends of the P-trap and the drain pipe. Step 3: Install the new drain assembly. Place the new drain assembly in position and use plumber's tape to secure the connections. Make sure the connections are tight to prevent any leaks. Step 4: Test the drain assembly. Run water through the sink to test the drain assembly. Make sure there are no leaks and that the water is draining properly.How to Install a Kitchen Sink Drain Assembly


How to Install a Kitchen Sink Drain Assembly


If you have a dishwasher, you will need to install a special drain assembly that allows food waste from the dishwasher to be disposed of through the sink drain. Here's how to do it: Step 1: Gather the necessary tools and materials. Before you begin, make sure you have all the tools and materials you need. This includes a dishwasher drain assembly, a screwdriver, pliers, a wrench, and plumber's putty. Step 2: Remove the old drain assembly (if applicable). If you have an old drain assembly, you will need to remove it before installing the new one. Use a wrench to loosen and remove the connections at both ends of the P-trap and the drain pipe. Step 3: Install the dishwasher drain assembly. Place the dishwasher drain assembly in position and use plumber's putty to create a seal around the drain opening on the sink. Then, attach the drain pipes to the dishwasher drain and the main drain line. Use a wrench to tighten the connections and make sure there are no leaks. Step 4: Test the dishwasher drain assembly. Once everything is connected, run water through the sink and the dishwasher to test the drain assembly. Make sure there are no leaks and that the water is draining properly.How to Install a Kitchen Sink Drain with Dishwasher


How to Install a Kitchen Sink Drain with Dishwasher

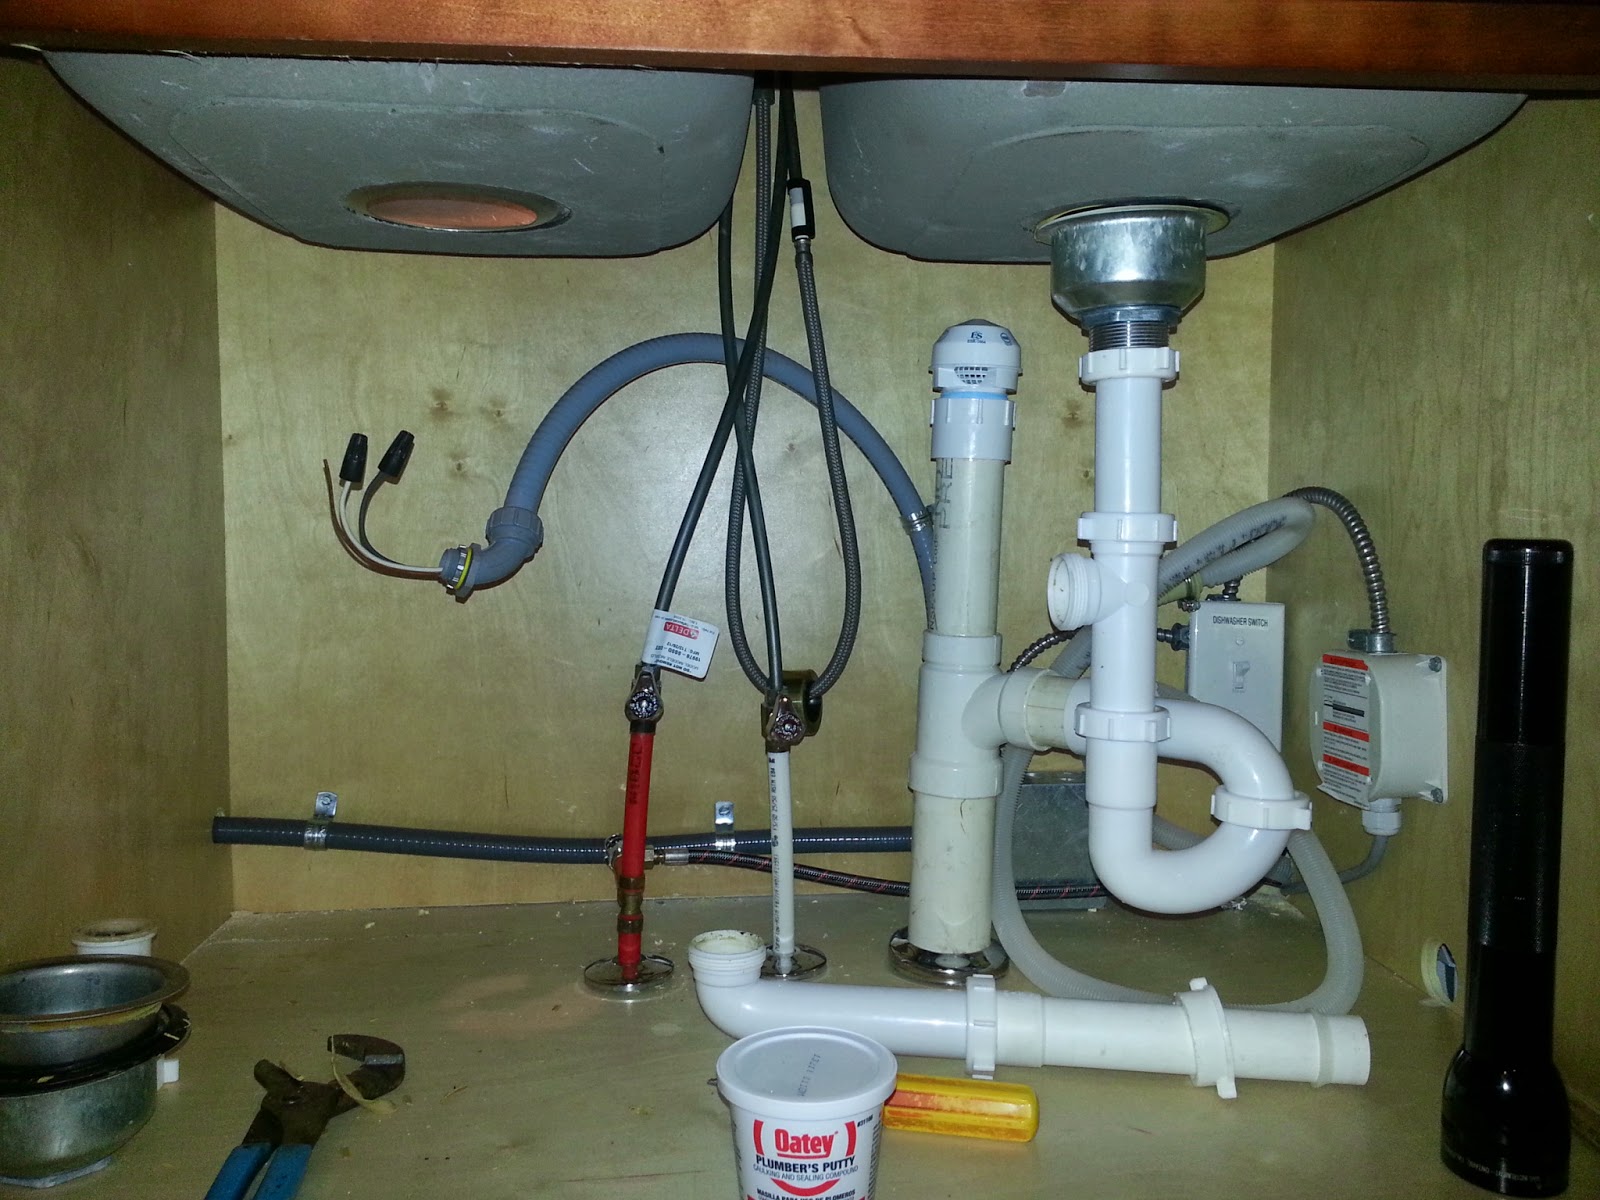

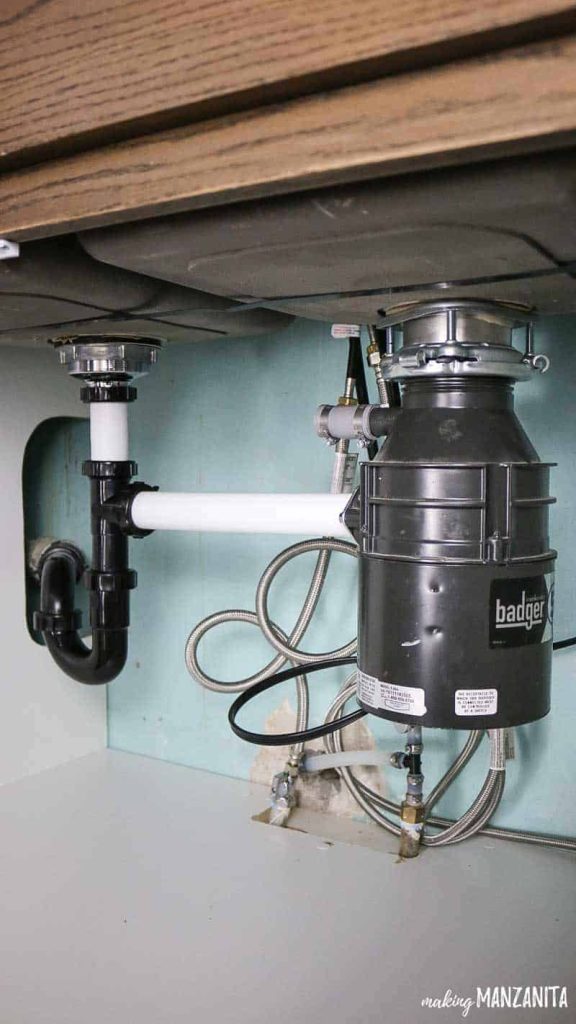
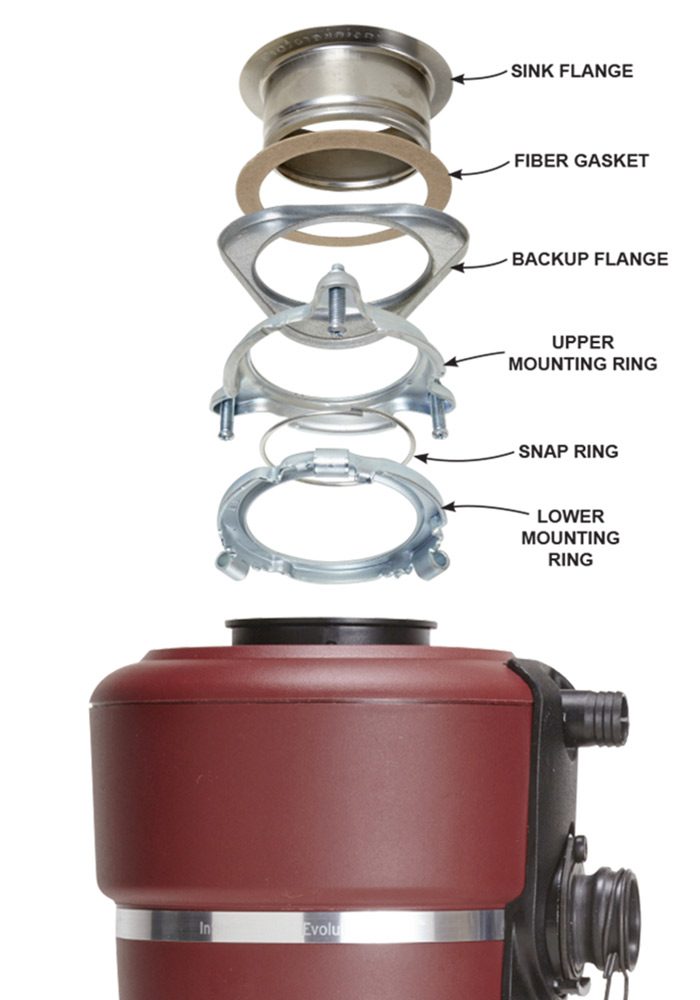
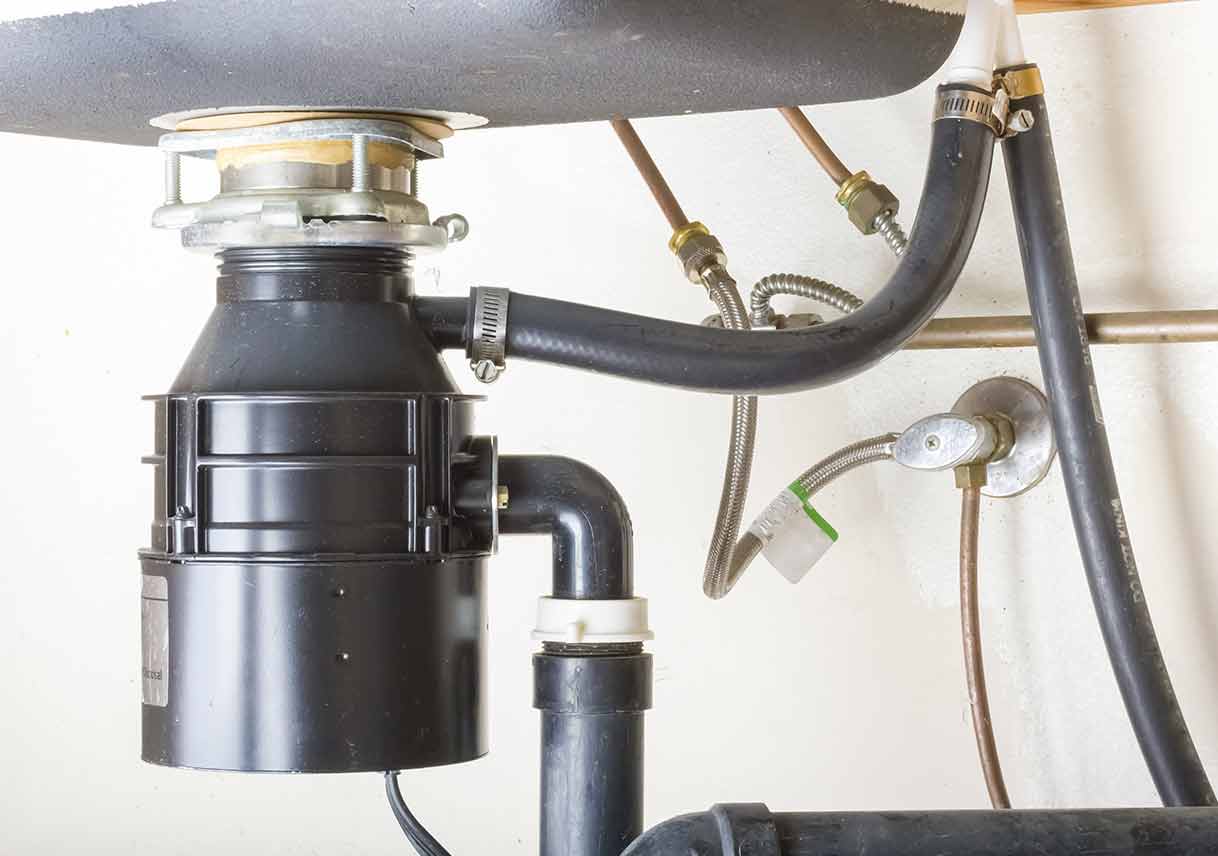
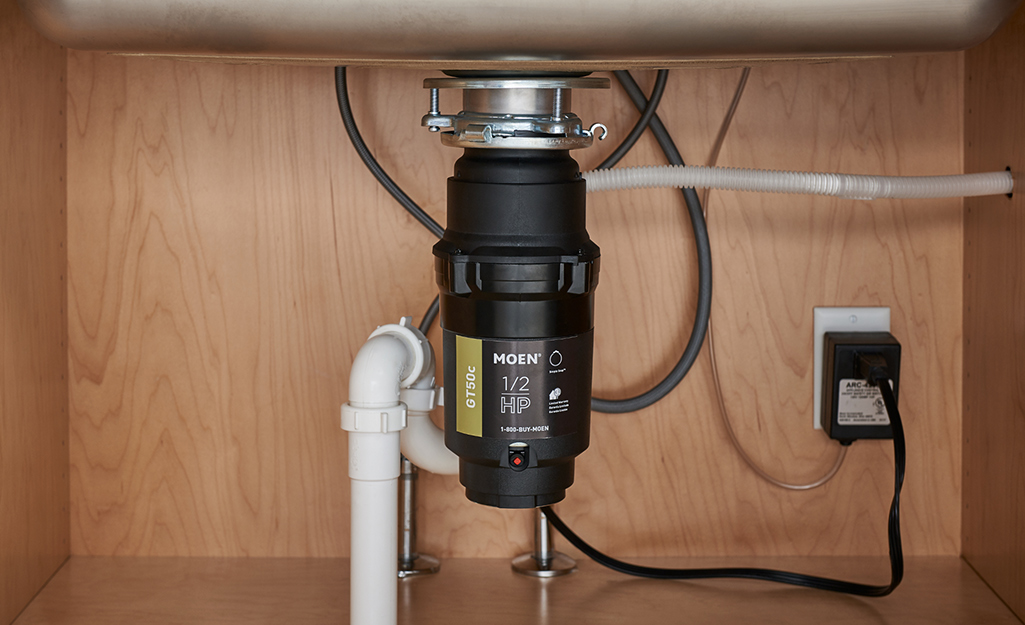
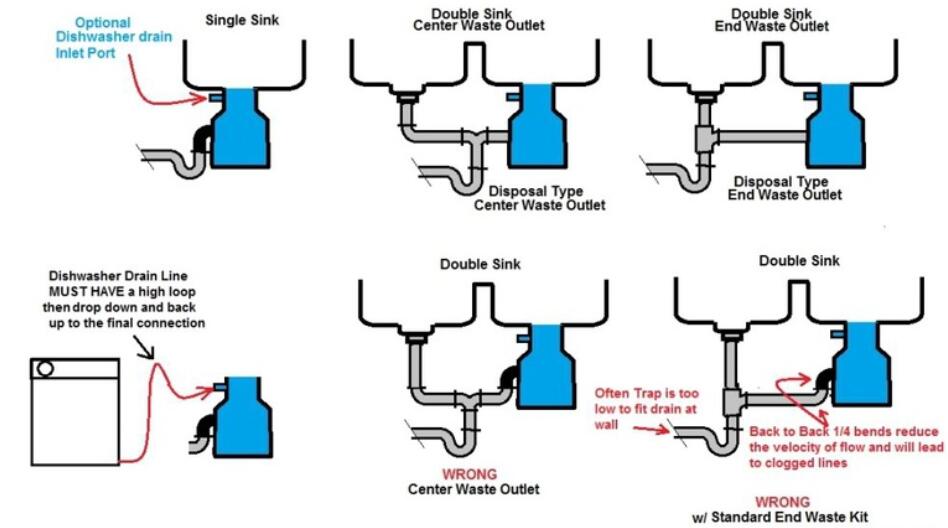
If you have a garbage disposal, you will need to install a special drain assembly that allows food waste to be disposed of through the disposal unit. Here's how to do it: Step 1: Gather the necessary tools and materials. Before you begin, make sure you have all the tools and materials you need. This includes a garbage disposal drain assembly, a screwdriver, pliers, a wrench, and plumber's putty. Step 2: Remove the old drain assembly (if applicable). If you have an old drain assembly, you will need to remove it before installing the new one. Use a wrench to loosen and remove the connections at both ends of the P-trap and the drain pipe. Step 3: Install the garbage disposal drain assembly. Place the garbage disposal drain assembly in position and use plumber's putty to create a seal around the drain opening on the sink. Then, attach the drain pipes to the garbage disposal and the main drain line. Use a wrench to tighten the connections and make sure there are no leaks. Step 4: Test the garbage disposal drain assembly. Once everything is connected, run water through the sink and turn on the disposal to test the drain assembly. Make sure there are no leaks and that the disposal is working properly.How to Install a Kitchen Sink Drain with Garbage Disposal


How to Install a Kitchen Sink Drain with Garbage Disposal


The Importance of Proper Plumbing Under Kitchen Sink with Garbage Disposal
/how-to-install-a-sink-drain-2718789-hero-24e898006ed94c9593a2a268b57989a3.jpg)
Why is Proper Plumbing Important?
 Proper plumbing is an essential element of any house design, especially when it comes to the kitchen. The kitchen is often the heart of the home, and it sees a lot of daily activity. Having functional and efficient plumbing under the kitchen sink, particularly if you have a garbage disposal, is crucial for maintaining a hygienic and well-functioning kitchen.
The Role of Plumbing in a Kitchen
 Plumbing plays a significant role in the functionality and design of a kitchen. It involves the installation and maintenance of water supply lines, drainage systems, and fixtures such as sinks, faucets, and garbage disposals. A well-plumbed kitchen ensures that you have access to clean water for cooking and cleaning, as well as a proper way to dispose of food waste.
The Importance of Proper Plumbing for Garbage Disposal
 Having a garbage disposal in your kitchen can make cleaning up after meals more convenient and efficient. It grinds up food waste and allows it to flow through the drain instead of clogging it. However, without proper plumbing, your garbage disposal can quickly become a source of frustration and even lead to costly repairs. That's why it's essential to have a professional plumber install and maintain the plumbing under your kitchen sink, particularly if you have a garbage disposal.
Problems that Arise from Improper Plumbing Under Kitchen Sink with Garbage Disposal
 Improper plumbing under the kitchen sink with a garbage disposal can result in various issues that can disrupt your daily routine and cause inconvenience. These include clogged drains, leaks, and foul odors. Clogged drains can prevent your garbage disposal from functioning correctly and can even lead to sewage backups. Leaks can cause damage to your cabinets and flooring, and foul odors can make your kitchen an unpleasant place to be.
Benefits of Professional Plumbing for Kitchen Sink with Garbage Disposal
 Hiring a professional plumber to install and maintain the plumbing under your kitchen sink with a garbage disposal can provide numerous benefits. They have the expertise and experience to ensure that your plumbing is installed correctly and functions efficiently. They can also identify and fix any potential problems before they become major issues. Additionally, professional plumbers use high-quality materials and tools, ensuring the longevity of your plumbing system.
In conclusion, proper plumbing under the kitchen sink, especially with a garbage disposal, is crucial for maintaining a functional and hygienic kitchen. Hiring a professional plumber to install and maintain your plumbing can prevent common issues and provide peace of mind. Don't overlook the importance of proper plumbing in your kitchen design, and make sure to prioritize it in your home improvement plans.
Hiring a professional plumber to install and maintain the plumbing under your kitchen sink with a garbage disposal can provide numerous benefits. They have the expertise and experience to ensure that your plumbing is installed correctly and functions efficiently. They can also identify and fix any potential problems before they become major issues. Additionally, professional plumbers use high-quality materials and tools, ensuring the longevity of your plumbing system.
In conclusion, proper plumbing under the kitchen sink, especially with a garbage disposal, is crucial for maintaining a functional and hygienic kitchen. Hiring a professional plumber to install and maintain your plumbing can prevent common issues and provide peace of mind. Don't overlook the importance of proper plumbing in your kitchen design, and make sure to prioritize it in your home improvement plans.