Installing a new kitchen sink may seem like a daunting task, but with the right tools and instructions, it can be a relatively simple and rewarding DIY project. Whether you're replacing an old sink or installing a brand new one, the process is similar. Here's a step-by-step guide on how to install a kitchen sink in your home.1. How to Install a Kitchen Sink


1. How to Install a Kitchen Sink


Installing a kitchen sink yourself can save you a significant amount of money compared to hiring a professional. However, it's important to have some basic DIY skills and knowledge, as well as the right tools and materials, to ensure a successful installation. With a bit of research and preparation, you can successfully tackle this project on your own.2. DIY Kitchen Sink Installation


2. DIY Kitchen Sink Installation
/how-to-install-a-sink-drain-2718789-hero-24e898006ed94c9593a2a268b57989a3.jpg)


Before you begin the installation process, make sure you have all the necessary tools and materials, including a new sink, faucet, drain, P-trap, plumber's putty, and silicone caulk. Then, follow these steps: Step 1: Remove the old sink and disconnect the plumbing. Step 2: Measure and cut the countertop to fit the new sink. Step 3: Install the faucet on the sink. Step 4: Apply plumber's putty around the edges of the sink. Step 5: Carefully lower the sink into the countertop opening. Step 6: Connect the plumbing and secure the sink with clips. Step 7: Apply silicone caulk around the edges of the sink to create a watertight seal. Step 8: Install the new drain and connect it to the plumbing. Step 9: Turn on the water and check for any leaks. Step 10: Enjoy your newly installed kitchen sink!3. Step-by-Step Guide for Installing a Kitchen Sink


3. Step-by-Step Guide for Installing a Kitchen Sink

:no_upscale()/cdn.vox-cdn.com/uploads/chorus_asset/file/19495086/drain_0.jpg)


To ensure a smooth and successful kitchen sink installation, here are a few helpful tips: Tip 1: Take accurate measurements before purchasing a new sink to ensure it will fit properly. Tip 2: Choose a sink with a similar layout to your old one to make the installation process easier. Tip 3: Follow the manufacturer's instructions for the specific sink and faucet you have chosen. Tip 4: Use a level to ensure your sink is installed evenly. Tip 5: Have a friend or family member help you with the installation for added support and ease. 4. Tips for a Successful Kitchen Sink Installation


4. Tips for a Successful Kitchen Sink Installation


While installing a kitchen sink may seem straightforward, there are some common mistakes that can lead to issues down the road. Here are a few to avoid: Mistake 1: Not disconnecting the plumbing before removing the old sink. Mistake 2: Not using enough plumber's putty or silicone caulk, leading to leaks. Mistake 3: Not securing the sink with clips, causing it to shift or fall. Mistake 4: Forgetting to turn off the water before installing the new drain, resulting in a flood. Mistake 5: Rushing through the installation process, leading to mistakes and potential issues in the future. 5. Common Mistakes to Avoid When Installing a Kitchen Sink


5. Common Mistakes to Avoid When Installing a Kitchen Sink


Before you begin your kitchen sink installation, make sure you have the following tools and materials: Tools: Adjustable wrench, screwdriver, putty knife, pliers, hacksaw, level, and a drill with various bits. Materials: New sink, faucet, drain, P-trap, plumber's putty, silicone caulk, and clips for securing the sink.6. Tools and Materials Needed for Installing a Kitchen Sink


6. Tools and Materials Needed for Installing a Kitchen Sink


When it comes to installing a kitchen sink, you may be wondering if it's better to hire a professional or do it yourself. While hiring a professional can save you time and ensure a perfect installation, it can also be costly. On the other hand, a DIY installation can save you money, but it requires some time, effort, and basic DIY skills. Ultimately, the decision is up to you and your budget.7. Professional vs. DIY Kitchen Sink Installation: Which is Better?


7. Professional vs. DIY Kitchen Sink Installation: Which is Better?


Proper measurements are crucial for a successful kitchen sink installation. Here's how to measure for a new sink: Step 1: Measure the width and depth of the sink opening in your countertop. Step 2: Measure the width and depth of your new sink. Step 3: Compare the measurements and make sure the new sink will fit properly. Step 4: If necessary, use a jigsaw or other cutting tool to adjust the size of the countertop opening. 8. How to Measure for a New Kitchen Sink Installation


8. How to Measure for a New Kitchen Sink Installation

Even with careful planning and execution, issues can arise during a kitchen sink installation. Here are some common problems and how to troubleshoot them: Issue 1: The sink is not level. Issue 2: The sink is leaking. Issue 3: The new sink doesn't fit properly in the countertop opening. 9. Troubleshooting Common Issues During Kitchen Sink Installation
Solution: Use a level and adjust the clips or add shims as needed to ensure the sink is level.
Solution: Check that the sink is properly secured with clips and that the plumbing connections are tight. If necessary, reapply plumber's putty or silicone caulk to create a watertight seal.
Solution: Double check your measurements and adjust the opening as needed. If the sink is too large, you may need to purchase a different one.


9. Troubleshooting Common Issues During Kitchen Sink Installation


The cost of installing a kitchen sink can vary depending on the type of sink, faucet, and other materials you choose, as well as your location. On average, hiring a professional can cost anywhere from $200 to $500 or more. DIY installation, on the other hand, can cost as little as $50 for basic tools and materials. However, keep in mind that if any issues arise during the DIY process, it can end up being more costly in the long run. Installing a new kitchen sink can be a great way to update and improve the functionality of your kitchen. With the right tools, materials, and instructions, you can successfully tackle this DIY project and enjoy your new sink in no time. Remember to take your time, follow the steps carefully, and troubleshoot any issues that may arise. Happy installing!10. Cost Comparison: Hiring a Professional vs. DIY Kitchen Sink Installation


10. Cost Comparison: Hiring a Professional vs. DIY Kitchen Sink Installation


Installing a Kitchen Sink: A Crucial Step in House Design

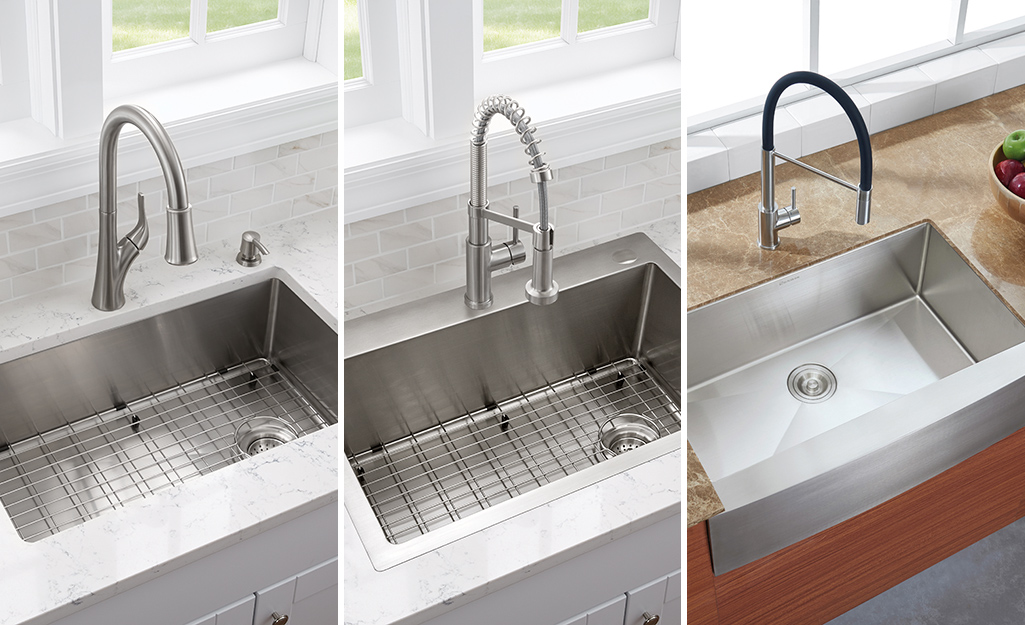
Choosing the Right Kitchen Sink
 When it comes to designing your dream kitchen,
installing a kitchen sink is one of the most important decisions you will make
. Not only does it serve as a functional element, but it also contributes to the overall aesthetics of your kitchen. With a wide range of options available in the market, it can be overwhelming to choose the perfect kitchen sink for your home.
But with the right knowledge and guidance, you can make this process easier and more enjoyable.
When it comes to designing your dream kitchen,
installing a kitchen sink is one of the most important decisions you will make
. Not only does it serve as a functional element, but it also contributes to the overall aesthetics of your kitchen. With a wide range of options available in the market, it can be overwhelming to choose the perfect kitchen sink for your home.
But with the right knowledge and guidance, you can make this process easier and more enjoyable.
The Importance of Proper Installation
 Once you have selected your desired kitchen sink, the next step is to ensure that it is installed correctly.
A poorly installed kitchen sink can cause a lot of problems in the long run, such as leaks, clogs, and damage to the surrounding countertops and cabinets.
It is crucial to have a professional handle the installation to avoid any future headaches and expenses.
Once you have selected your desired kitchen sink, the next step is to ensure that it is installed correctly.
A poorly installed kitchen sink can cause a lot of problems in the long run, such as leaks, clogs, and damage to the surrounding countertops and cabinets.
It is crucial to have a professional handle the installation to avoid any future headaches and expenses.
The Installation Process
 The installation process for a kitchen sink may vary depending on the type and style you have chosen. However, there are some basic steps that are applicable to all sink installations.
The first step is to cut a hole in the countertop according to the measurements of your sink.
Next, the sink is placed into the hole and secured with mounting clips or brackets. Then, the plumbing connections are made, and the sink is sealed to the countertop using caulk or adhesive.
The installation process for a kitchen sink may vary depending on the type and style you have chosen. However, there are some basic steps that are applicable to all sink installations.
The first step is to cut a hole in the countertop according to the measurements of your sink.
Next, the sink is placed into the hole and secured with mounting clips or brackets. Then, the plumbing connections are made, and the sink is sealed to the countertop using caulk or adhesive.
DIY vs Professional Installation
 While some may opt for a DIY approach to save money, it is highly recommended to hire a professional for kitchen sink installation.
A professional will have the necessary tools, knowledge, and experience to ensure that the sink is installed correctly and efficiently. They can also provide valuable advice on maintenance and care to prolong the lifespan of your kitchen sink.
In conclusion,
installing a kitchen sink is a crucial step in house design and should not be taken lightly.
It requires careful consideration and proper installation to ensure its functionality and longevity. So, make sure to choose the right sink and hire a professional for installation to achieve your dream kitchen.
While some may opt for a DIY approach to save money, it is highly recommended to hire a professional for kitchen sink installation.
A professional will have the necessary tools, knowledge, and experience to ensure that the sink is installed correctly and efficiently. They can also provide valuable advice on maintenance and care to prolong the lifespan of your kitchen sink.
In conclusion,
installing a kitchen sink is a crucial step in house design and should not be taken lightly.
It requires careful consideration and proper installation to ensure its functionality and longevity. So, make sure to choose the right sink and hire a professional for installation to achieve your dream kitchen.