If you're looking to upgrade your bathroom or replace a leaky sink, installing a new P-trap is an essential step. The P-trap is a curved pipe that connects the sink drain to the main plumbing line, preventing sewer gases from entering your home. While it may seem like a daunting task, installing a bathroom sink P-trap is actually a simple and straightforward process that you can do on your own with just a few basic tools. In this guide, we'll walk you through the steps of installing a bathroom sink P-trap to help you complete the project with confidence.How to Install a Bathroom Sink P-Trap


How to Install a Bathroom Sink P-Trap


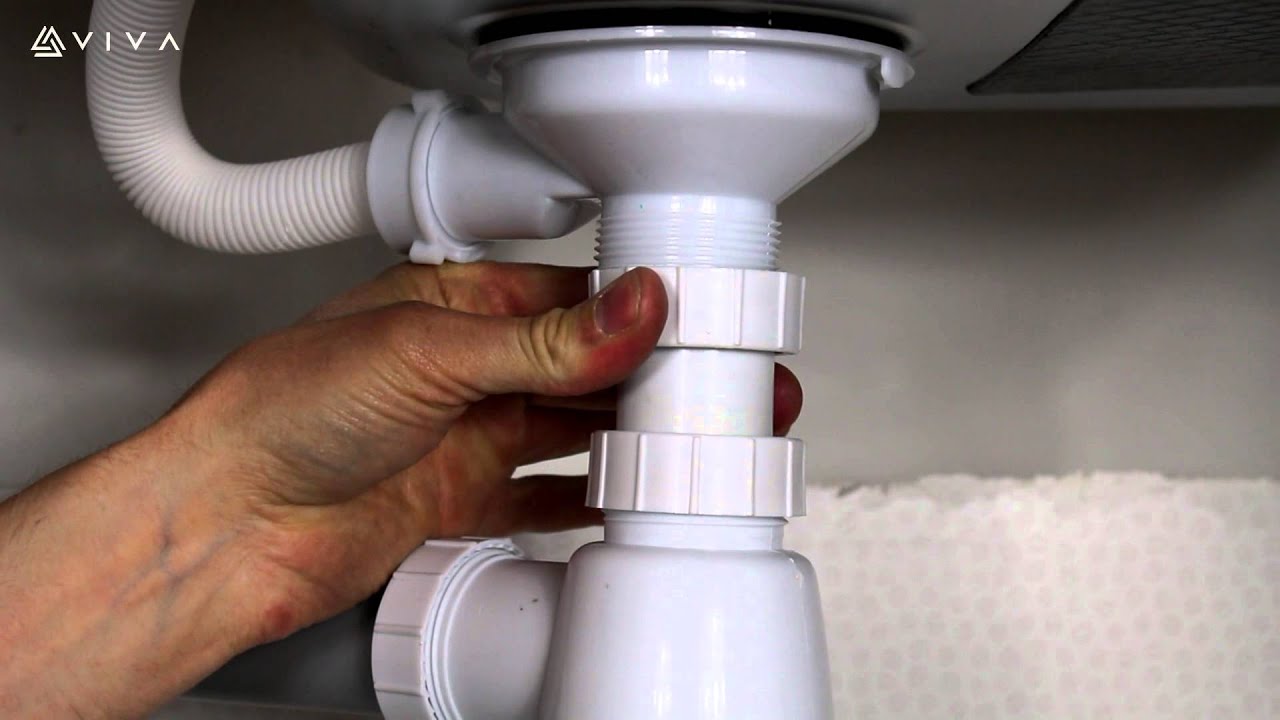
The first step in installing a P-trap is to remove the old one. Start by turning off the water supply to your sink and then place a bucket or bowl under the P-trap to catch any excess water. Use pliers to loosen the nuts on both ends of the P-trap and then remove it from the sink. Next, use a rag to clean any debris or buildup from the drain pipe and sink tailpiece.How to Install a P-Trap Under a Sink


How to Install a P-Trap Under a Sink

:max_bytes(150000):strip_icc()/replacing-a-sink-p-trap-2718773-hero-f3f65fbc400e41438c4d8280de025fc6.jpg)

Now that the old P-trap is removed, it's time to install the new one. Here's a step-by-step guide:Step-by-Step Guide for Installing a P-Trap


Step-by-Step Guide for Installing a P-Trap


Hiring a professional plumber can be expensive, but with the right tools and a little know-how, you can easily install a bathroom sink P-trap yourself. Not only will this save you money, but it will also give you a sense of accomplishment and a better understanding of your home's plumbing system.DIY Bathroom Sink P-Trap Installation


DIY Bathroom Sink P-Trap Installation


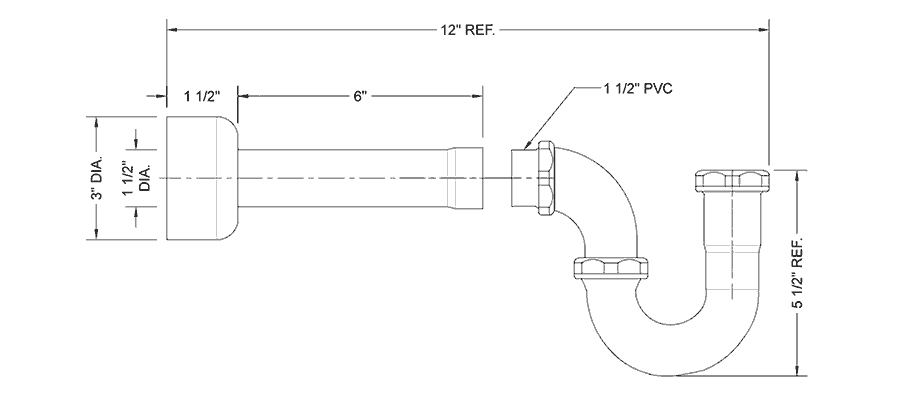
When it comes to P-trap installation for bathroom sinks, the process is the same regardless of the type of sink you have – whether it's a pedestal sink, wall-mounted sink, or vanity sink. However, if you're installing a new sink, make sure to measure the distance between the sink tailpiece and the main drain line accurately to ensure a proper fit for the P-trap.P-Trap Installation for Bathroom Sinks

P-Trap Installation for Bathroom Sinks

Installing a bathroom sink P-trap may seem intimidating, but it's actually a fairly easy process that can be completed in just a few simple steps. As long as you have the right tools and follow the steps outlined in this guide, you'll have your new P-trap installed in no time.Easy Bathroom Sink P-Trap Installation

Easy Bathroom Sink P-Trap Installation


Whether you're replacing an old P-trap or installing a new one for a bathroom remodel, the steps for installation are the same. Make sure to carefully measure and cut the pipes to ensure a proper fit and always test for leaks before using the sink.Installing a P-Trap for Your Bathroom Sink


Installing a P-Trap for Your Bathroom Sink

Here are a few additional tips to keep in mind when installing a P-trap for your bathroom sink:P-Trap Installation Tips for Bathroom Sinks


P-Trap Installation Tips for Bathroom Sinks

By now, you should have all the necessary knowledge to confidently install a P-trap for your bathroom sink. Just remember to take your time, measure accurately, and test for leaks before using the sink. With these tips, you'll have your new P-trap installed and functioning in no time.How to Install a P-Trap for Your Bathroom Sink

How to Install a P-Trap for Your Bathroom Sink

Installing a bathroom sink P-trap may seem like a daunting task, but with this step-by-step guide, it can be a quick and simple process. Remember to follow the instructions carefully, and don't hesitate to seek professional help if needed. With a little effort, you'll have a new P-trap installed and your sink running smoothly in no time.Quick and Simple Bathroom Sink P-Trap Installation

Quick and Simple Bathroom Sink P-Trap Installation
/sink-drain-trap-185105402-5797c5f13df78ceb869154b5.jpg)
Why Proper Installation of the Bathroom Sink P Trap is Important for Your House Design
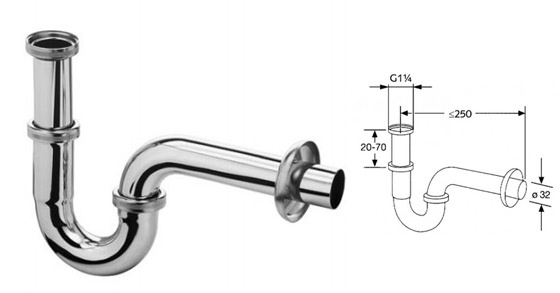
Understanding the Purpose of a P Trap
 Before delving into the installation process, it's important to understand the purpose of a bathroom sink p trap. This vital component of your plumbing system prevents foul odors from entering your home and also helps to prevent clogs and blockages. It works by creating a water seal that blocks sewer gases from entering your bathroom through the sink drain. This not only keeps your bathroom smelling fresh, but also protects your health by keeping harmful gases out of your living space.
The Importance of Professional Installation
 Now that we understand the purpose of a p trap, it's clear that proper installation is crucial for maintaining a functional and hygienic bathroom. While some homeowners may attempt to install a p trap themselves, it's highly recommended to hire a professional plumber for this task. A professional will have the necessary tools and expertise to ensure the p trap is installed correctly, avoiding potential issues such as leaks or improper sealing.
Featured Keywords: bathroom sink p trap installation, proper installation, professional, p trap, bathroom, plumbing system, foul odors, clogs, sewer gases, living space, functional, hygienic, homeowner, professional plumber, tools, expertise, leaks, sealing
Now that we understand the purpose of a p trap, it's clear that proper installation is crucial for maintaining a functional and hygienic bathroom. While some homeowners may attempt to install a p trap themselves, it's highly recommended to hire a professional plumber for this task. A professional will have the necessary tools and expertise to ensure the p trap is installed correctly, avoiding potential issues such as leaks or improper sealing.
Featured Keywords: bathroom sink p trap installation, proper installation, professional, p trap, bathroom, plumbing system, foul odors, clogs, sewer gases, living space, functional, hygienic, homeowner, professional plumber, tools, expertise, leaks, sealing
The Installation Process
 The installation process of a bathroom sink p trap may vary depending on the specific plumbing system and sink design. However, the general steps are as follows:
- Step 1: Gather all necessary tools and materials, including the p trap, adjustable wrench, plumber's putty, and pipe fittings.
- Step 2: Turn off the water supply to the sink and remove the old p trap, if there is one.
- Step 3: Apply plumber's putty to the sink drain and insert the p trap into the opening, ensuring a tight seal.
- Step 4: Connect the p trap to the sink drain and the drain pipe using appropriate fittings. Use an adjustable wrench to tighten the connections.
- Step 5: Turn the water supply back on and check for any leaks. Adjust the connections if necessary.
- Step 6: Dispose of any excess putty and clean up the area around the p trap.
Final Thoughts
 Proper installation of the bathroom sink p trap is essential for maintaining a functional and hygienic bathroom. Hiring a professional plumber is highly recommended to ensure the job is done correctly and to avoid potential issues in the future. Remember to regularly check and maintain your p trap to keep your bathroom smelling fresh and free of any plumbing problems.