Sing plumbers seal is an essential step in installing or repairing a bathroom sink. This process involves creating a watertight seal around the sink to prevent any leaks or damage. It may seem like a daunting task, but with the right tools and techniques, sing plumbers seal on a bathroom sink can be done easily and effectively. In this article, we will discuss the top 10 tips for sing plumbers seal on a bathroom sink to ensure a successful and long-lasting result.Sing Plumbers Seal on a Bathroom Sink


Sing Plumbers Seal on a Bathroom Sink


If you are new to sing plumbers seal on a bathroom sink, it is important to understand the steps involved. First, you will need to clean the area around the sink thoroughly to remove any dirt, grime, or old sealant. Next, you will need to apply the new sealant in a continuous and even bead around the edge of the sink. Finally, you will need to smooth out the sealant with your finger or a caulking tool to create a seamless and watertight seal. Now, let's dive into the top 10 tips for sing plumbers seal on a bathroom sink.How to Sing Plumbers Seal on a Bathroom Sink


How to Sing Plumbers Seal on a Bathroom Sink

Before we get into the tips, it is important to understand the different types of sealants available for bathroom sinks. The most common type of sealant is silicone, which comes in either a clear or white color. Silicone sealant is flexible and waterproof, making it perfect for sing plumbers seal on a bathroom sink. Other options include caulk, plumber's putty, or adhesive strips. Choose the sealant that works best for your sink and personal preference.Plumbers Seal for Bathroom Sink
Plumbers Seal for Bathroom Sink


Now, let's get into the top 10 tips for sing plumbers seal on a bathroom sink.Bathroom Sink Plumbers Seal


Bathroom Sink Plumbers Seal


Tip #1: Use a high-quality sealant. Investing in a good quality sealant will ensure a strong and long-lasting seal on your bathroom sink. Cheap sealants may not hold up over time and could result in leaks or damage. Tip #2: Clean the area thoroughly. As mentioned earlier, cleaning the area around the sink is crucial for a successful sing plumbers seal. Use a mild cleaner and a scrub brush to remove any dirt or grime. Tip #3: Use a backer rod. If you are working with a larger gap between the sink and the countertop, use a backer rod before applying the sealant. This will prevent the sealant from sinking into the gap and not creating a proper seal. Tip #4: Cut the tip of the sealant tube at a 45-degree angle. This will make it easier to apply the sealant in a smooth and even bead. Tip #5: Apply the sealant in one continuous motion. This will ensure a consistent and seamless seal around the sink. Tip #6: Use a caulking tool or your finger to smooth out the sealant. This will ensure that the sealant is properly adhered to the sink and countertop. Tip #7: Wipe away any excess sealant immediately. Once you have smoothed out the sealant, use a damp cloth to remove any excess before it dries. Tip #8: Let the sealant dry completely. Most sealants will take 24 hours to dry completely, so be sure to avoid using the sink during this time. Tip #9: Use a grout sealer for added protection. If you want to ensure extra protection against water and stains, consider using a grout sealer on top of the sealant. Tip #10: Regularly check and maintain the sealant. Inspect the sealant every few months to ensure there are no cracks or gaps. If you notice any issues, remove the old sealant and reapply a new one.Singing Plumbers Seal on a Bathroom Sink


Singing Plumbers Seal on a Bathroom Sink


Now that you know the top 10 tips for sing plumbers seal on a bathroom sink, let's go through the installation process. After cleaning the area and applying the sealant, gently lower the sink onto the countertop and press down to create a strong bond. Then, use a wet cloth to wipe away any excess sealant. Finally, let the sealant dry completely before using the sink.Plumbers Seal for Bathroom Sink Installation

Plumbers Seal for Bathroom Sink Installation


If you are repairing an existing seal on your bathroom sink, the process is similar to installation. After removing the old sealant, clean the area and apply the new sealant in a continuous and even bead. Smooth out the sealant and let it dry completely before using the sink.How to Apply Plumbers Seal on a Bathroom Sink

How to Apply Plumbers Seal on a Bathroom Sink


If you notice any leaks or damage around your bathroom sink, it is important to repair the sealant as soon as possible. Ignoring the issue could lead to further damage and costly repairs. Follow the steps mentioned above to properly repair the sealant and prevent any future issues.Plumbers Seal for Bathroom Sink Repair

Plumbers Seal for Bathroom Sink Repair


In conclusion, sing plumbers seal on a bathroom sink is an important step in proper installation and maintenance. With the right tools and techniques, you can easily create a watertight seal that will last for years to come. Remember to regularly check and maintain the sealant to prevent any leaks or damage. Now, go forth and confidently install or repair your bathroom sink with these top 10 tips for sing plumbers seal.Singing Plumbers Seal for Bathroom Sink

Singing Plumbers Seal for Bathroom Sink
Why Using Plumber's Seal Is Essential for Your Bathroom Sink

The Importance of Properly Sealing Your Bathroom Sink
 When it comes to designing your dream bathroom, every little detail matters. From the color of the tiles to the style of the faucet, each choice contributes to creating a functional and aesthetically pleasing space. However, one important aspect that often gets overlooked is the use of plumber's seal on your bathroom sink. This simple yet crucial step can make all the difference in ensuring your sink is properly installed and functioning for years to come.
The Purpose of Plumber's Seal
 Before diving into the benefits of using plumber's seal, let's first understand what it is and why it is necessary. Also known as plumber's putty, this sticky substance is used to create a watertight seal between the sink and the countertop. It is made from a combination of linseed oil, powdered clay, and other additives, making it pliable and easy to work with. The main purpose of plumber's seal is to prevent any water from leaking out of the sink and causing damage to your bathroom cabinets and floors.
Pro Tip:
When applying plumber's seal, make sure to wear gloves to protect your hands from the sticky substance.
Before diving into the benefits of using plumber's seal, let's first understand what it is and why it is necessary. Also known as plumber's putty, this sticky substance is used to create a watertight seal between the sink and the countertop. It is made from a combination of linseed oil, powdered clay, and other additives, making it pliable and easy to work with. The main purpose of plumber's seal is to prevent any water from leaking out of the sink and causing damage to your bathroom cabinets and floors.
Pro Tip:
When applying plumber's seal, make sure to wear gloves to protect your hands from the sticky substance.
Benefits of Using Plumber's Seal
:max_bytes(150000):strip_icc()/what-is-under-the-bathroom-sink-3973574-01-ffc70a038c2f44a6ad3e490882a394a0.jpg) Now that we understand the purpose of plumber's seal, let's explore the benefits of using it on your bathroom sink.
1. Prevents Leaks:
As mentioned before, the primary function of plumber's seal is to create a watertight seal, preventing any water from seeping out. This is especially important for undermount sinks which are mounted underneath the countertop, leaving no space for a traditional rubber gasket.
2. Easy to Remove:
Unlike other sealing methods, plumber's seal is easy to remove if needed. This makes it ideal for future repairs or replacements of your sink or faucet.
3. Durable and Long-Lasting:
Plumber's seal is made to withstand the constant exposure to water and other chemicals found in household cleaners. This makes it a durable and long-lasting option for sealing your bathroom sink.
Now that we understand the purpose of plumber's seal, let's explore the benefits of using it on your bathroom sink.
1. Prevents Leaks:
As mentioned before, the primary function of plumber's seal is to create a watertight seal, preventing any water from seeping out. This is especially important for undermount sinks which are mounted underneath the countertop, leaving no space for a traditional rubber gasket.
2. Easy to Remove:
Unlike other sealing methods, plumber's seal is easy to remove if needed. This makes it ideal for future repairs or replacements of your sink or faucet.
3. Durable and Long-Lasting:
Plumber's seal is made to withstand the constant exposure to water and other chemicals found in household cleaners. This makes it a durable and long-lasting option for sealing your bathroom sink.
How to Apply Plumber's Seal
 Now that you understand the importance and benefits of using plumber's seal, here's a step-by-step guide on how to apply it to your bathroom sink:
Step 1:
Clean the area where the seal will be applied. Use a mild cleaner to remove any dirt or debris.
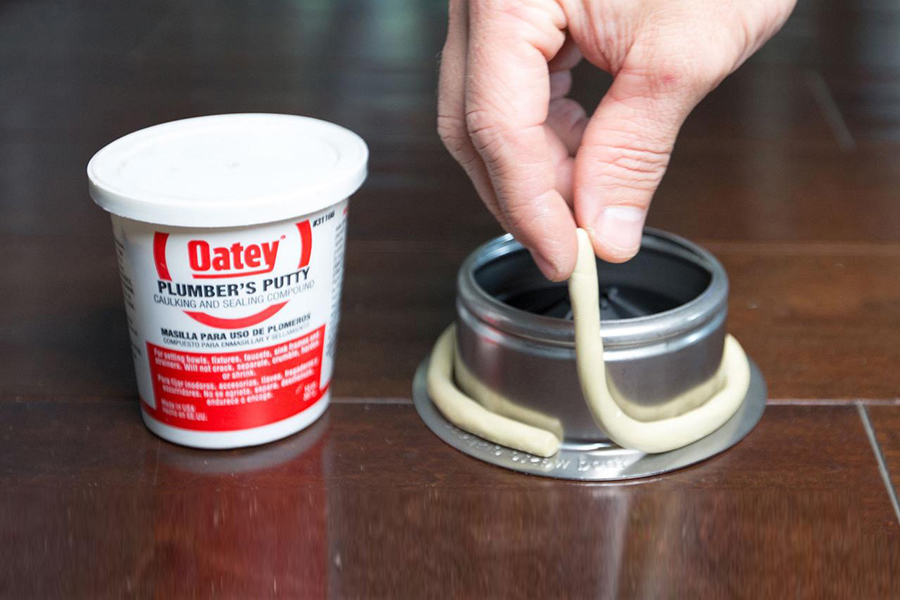
Step 2:
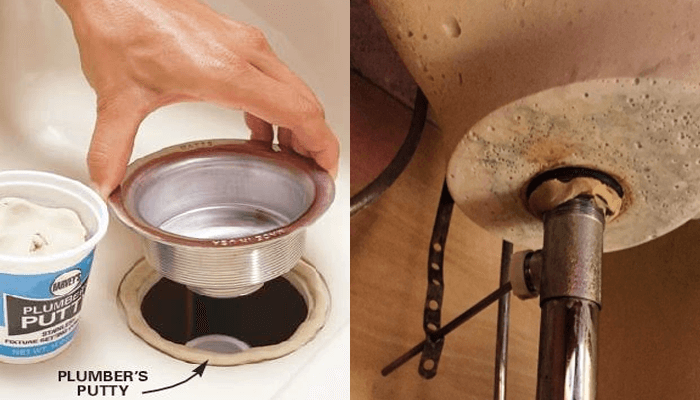
Roll a small amount of plumber's seal into a thin, snake-like shape.
Step 3:
Place the rolled seal around the edge of the sink opening, making sure it covers the entire perimeter.
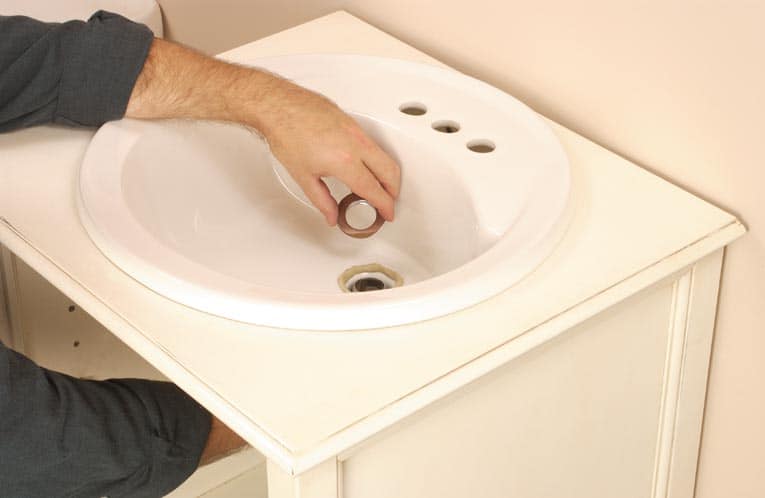
Step 4:
Carefully place the sink into the opening, pressing down gently to ensure the seal adheres to both the sink and the countertop.
Step 5:
Wipe off any excess seal using a damp cloth.
Step 6:
Allow the seal to dry for at least 24 hours before using the sink.
Now that you understand the importance and benefits of using plumber's seal, here's a step-by-step guide on how to apply it to your bathroom sink:
Step 1:
Clean the area where the seal will be applied. Use a mild cleaner to remove any dirt or debris.
Step 2:
Roll a small amount of plumber's seal into a thin, snake-like shape.
Step 3:
Place the rolled seal around the edge of the sink opening, making sure it covers the entire perimeter.
Step 4:
Carefully place the sink into the opening, pressing down gently to ensure the seal adheres to both the sink and the countertop.
Step 5:
Wipe off any excess seal using a damp cloth.
Step 6:
Allow the seal to dry for at least 24 hours before using the sink.
Conclusion
 In conclusion, using plumber's seal is an essential step in the installation of your bathroom sink. Not only does it prevent leaks and potential damage, but it also provides a durable and long-lasting seal. So, the next time you're designing your dream bathroom, don't forget to include plumber's seal in your list of must-haves for a functional and beautiful space.