A pull out handle on a kitchen sink faucet is a convenient feature that allows you to easily control the water flow and direction. However, over time, the handle may start to show signs of wear and tear or even break completely. In such cases, it's important to know how to replace the pull out handle on your kitchen sink faucet to ensure your faucet is functioning properly. In this article, we'll provide you with a step-by-step guide on how to replace a pull out handle on a kitchen sink faucet.How to Replace a Pull Out Handle on a Kitchen Sink Faucet


How to Replace a Pull Out Handle on a Kitchen Sink Faucet

If you notice that your pull out handle is loose, squeaky or just not functioning as it should, it's time to replace it. The first step is to determine the type of faucet you have. Some faucets have a single handle that controls both hot and cold water, while others have separate handles for hot and cold water. This will affect the type of replacement handle you need to purchase. Once you have the correct replacement handle, you can start the process of replacing the old one. Here's a simple step-by-step guide to help you through the process:Replacing a Pull Out Kitchen Faucet Handle


Replacing a Pull Out Kitchen Faucet Handle


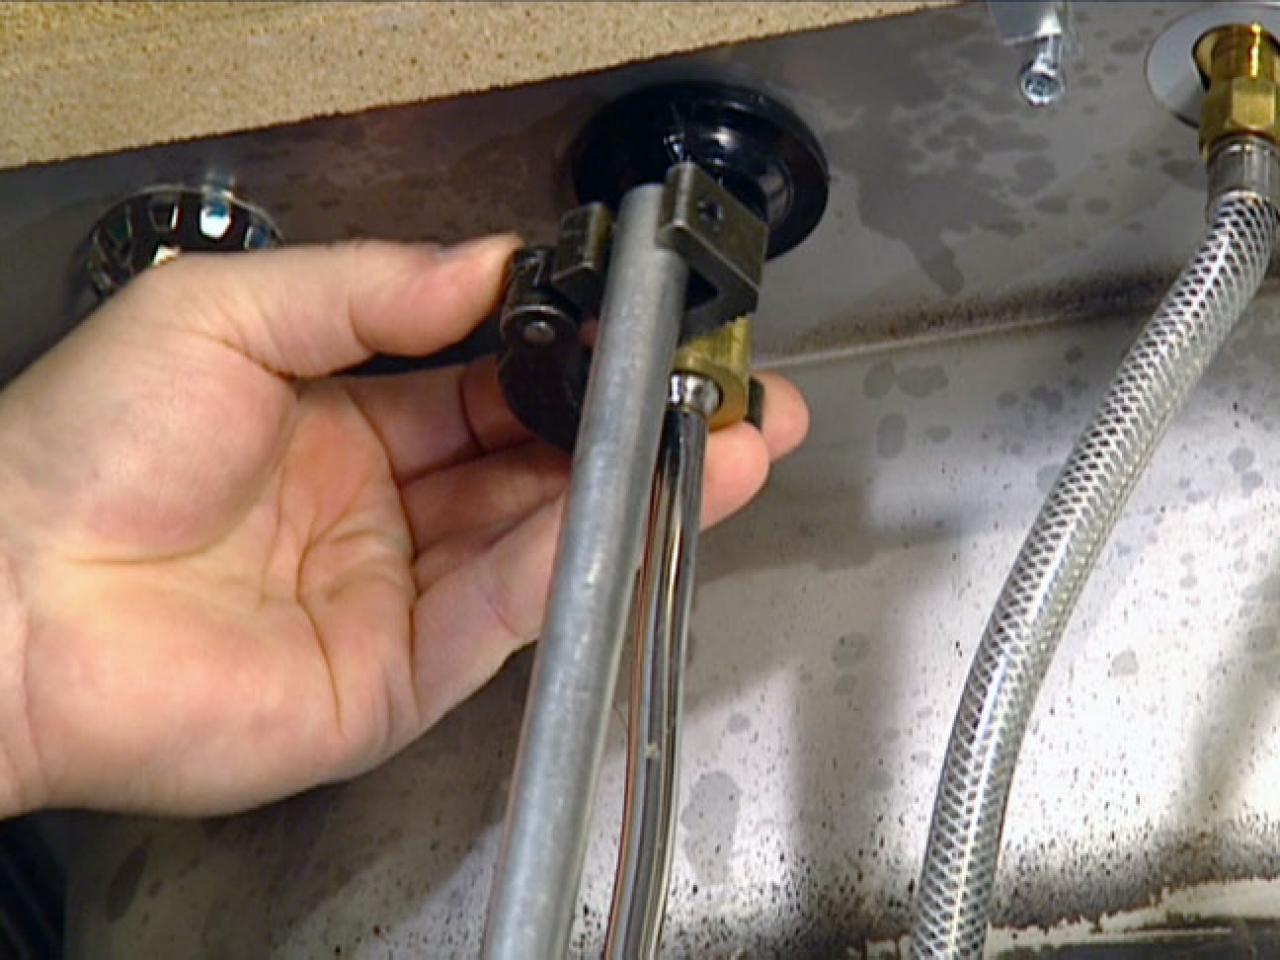
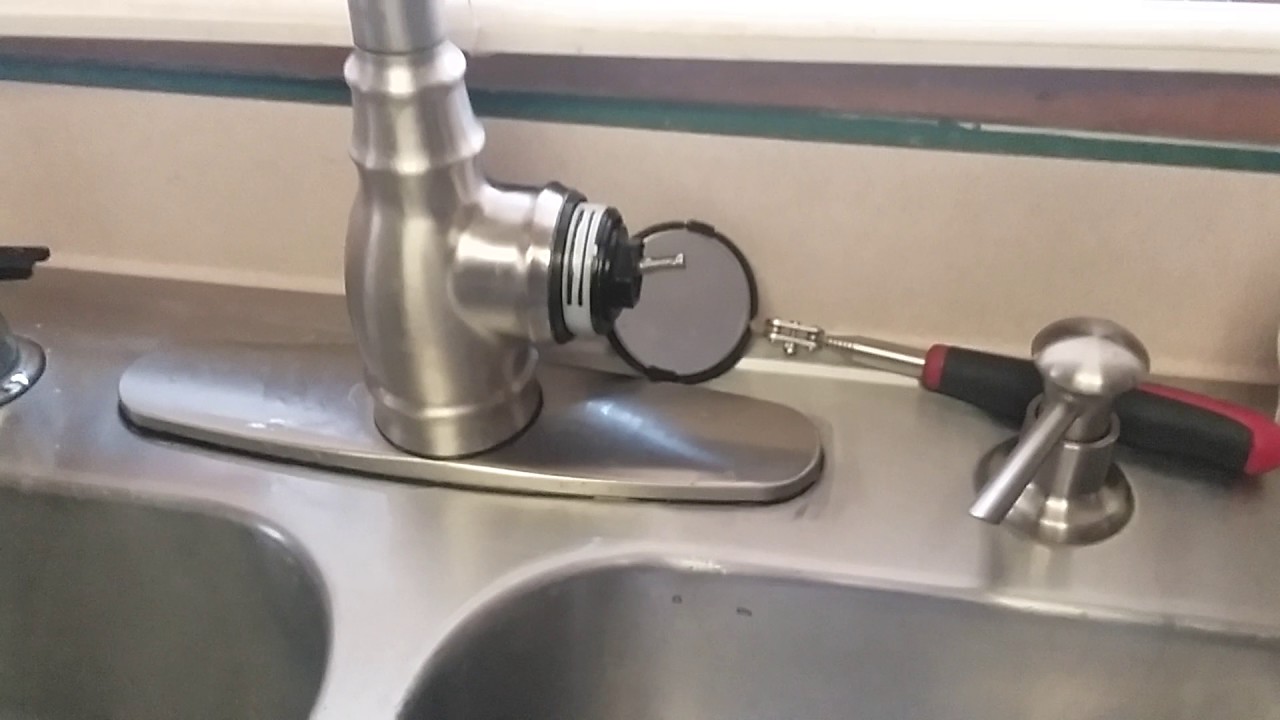
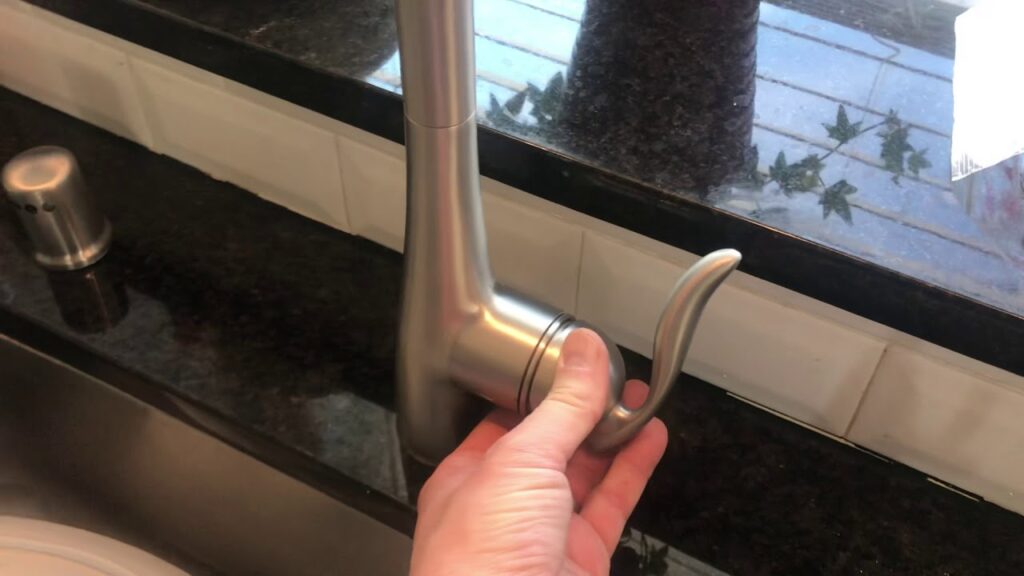
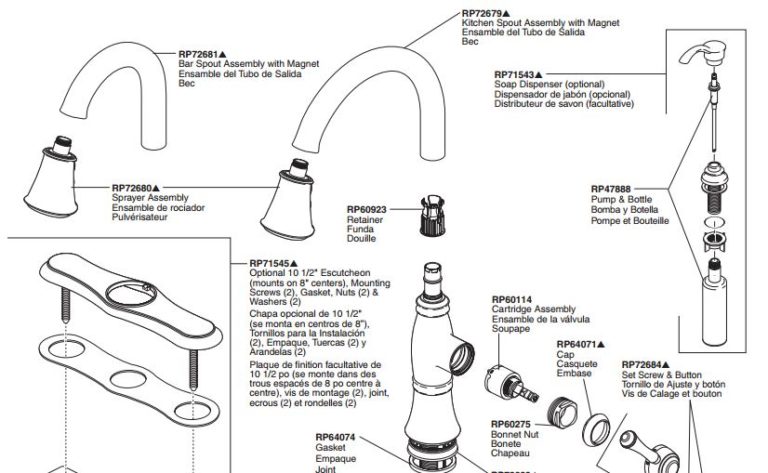
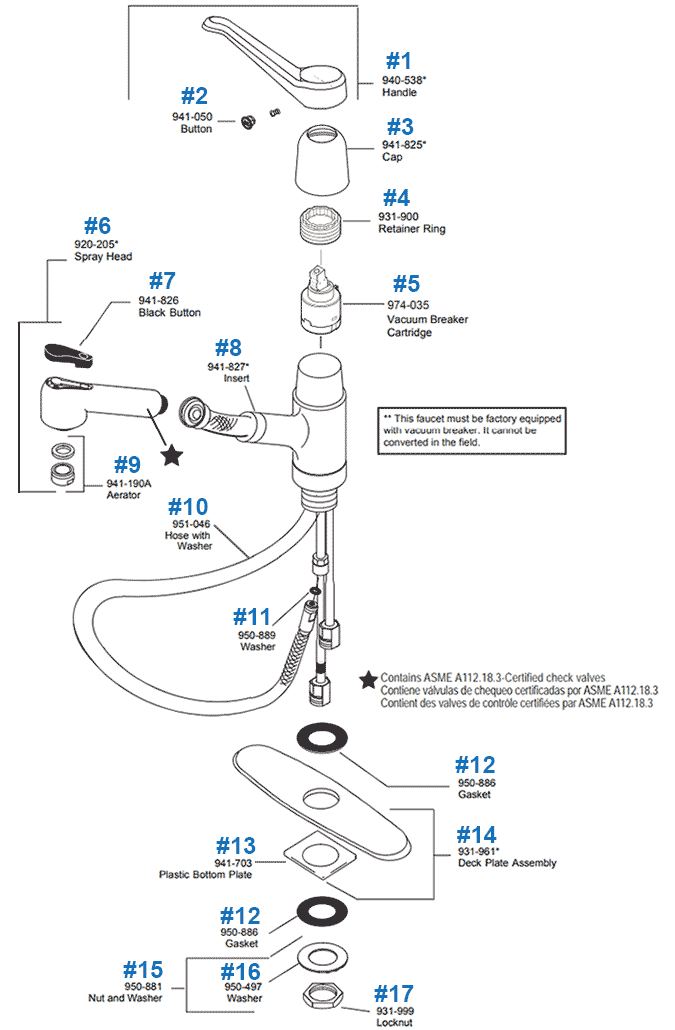
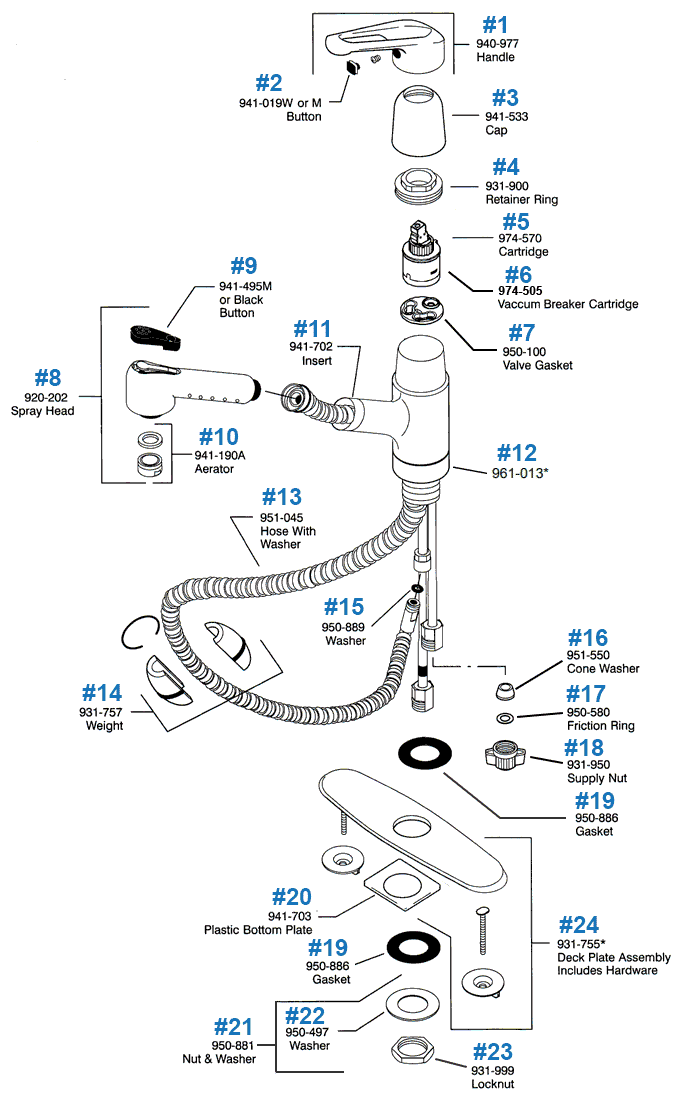
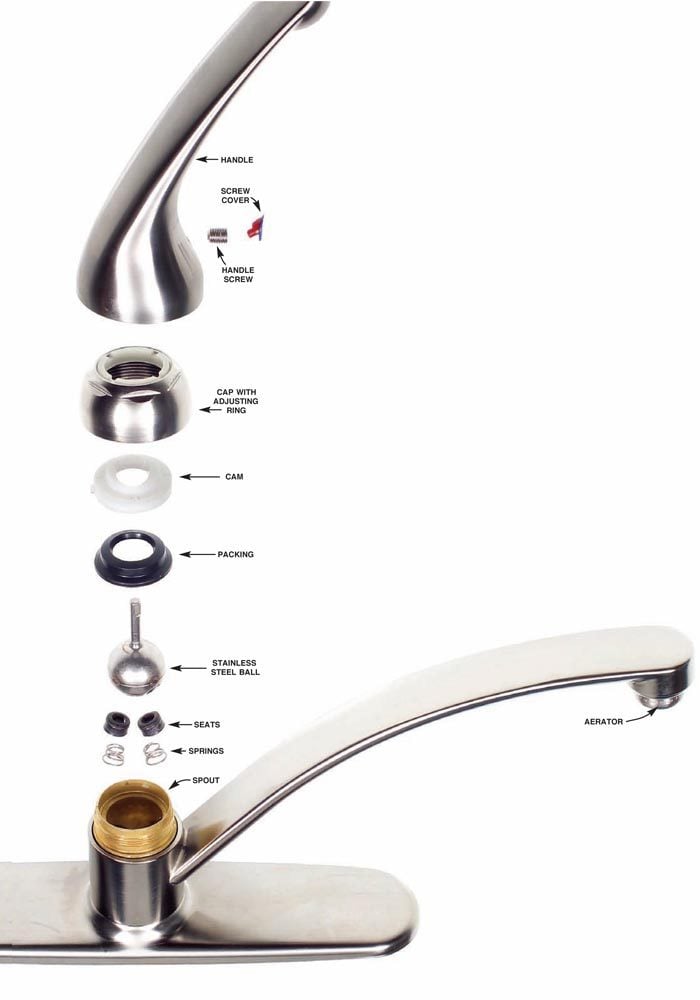
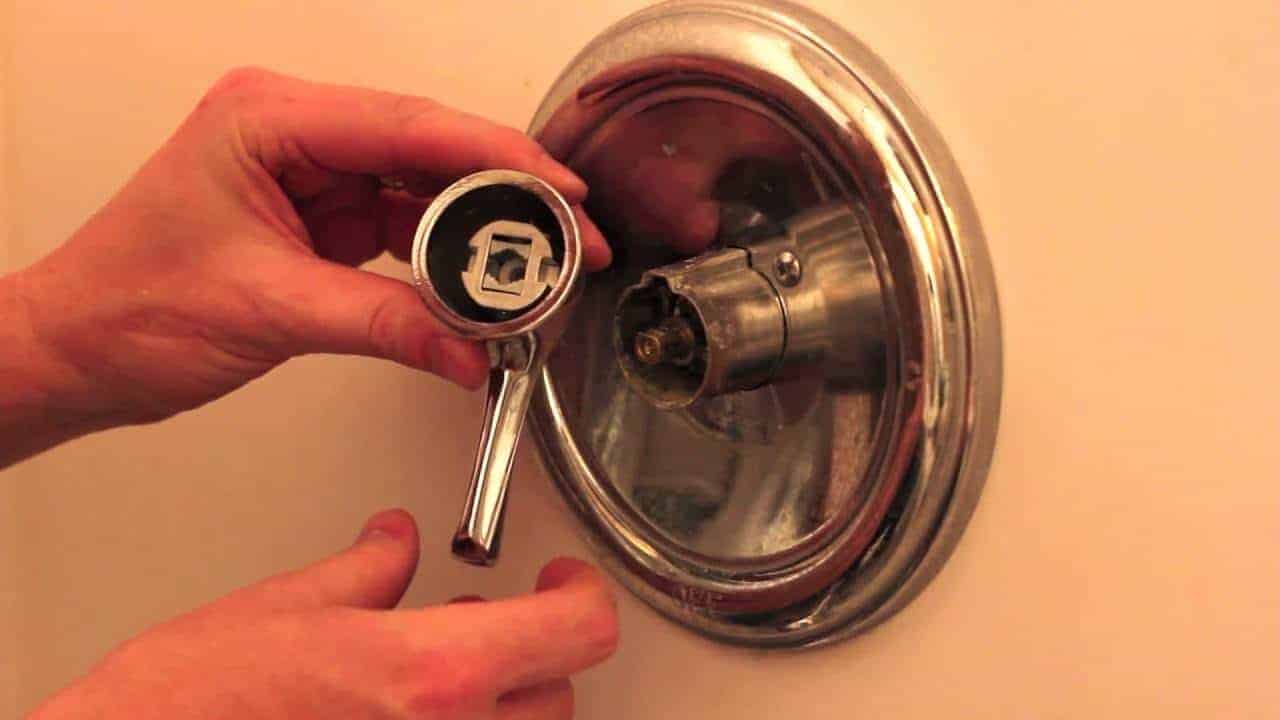
Step 1: Turn off the water supply to your kitchen sink faucet. This is usually done by turning off the shut-off valves located under the sink. Step 2: Remove the old handle by unscrewing it from the base. You may need to use a wrench or pliers to loosen it. Step 3: Once the handle is removed, you should be able to see the cartridge or valve assembly. This is the part that controls the water flow and temperature. Inspect it to make sure it's not damaged or worn out. If it is, you may need to replace it as well. Step 4: Install the new handle by screwing it onto the base. Make sure it's secure and tight. Step 5: Turn the water supply back on and test the new handle. Make sure it's working properly and there are no leaks. Step 6: If you replaced the cartridge or valve assembly, turn the water supply back off and install the new one following the manufacturer's instructions. Step 7: Turn the water supply back on and test the faucet again.Step-by-Step Guide to Replacing a Pull Out Handle on a Kitchen Sink Faucet


Step-by-Step Guide to Replacing a Pull Out Handle on a Kitchen Sink Faucet

If you're a DIY enthusiast, replacing a pull out handle on a kitchen sink faucet can be a fun and satisfying project. Not only will you save money on hiring a professional, but you'll also learn a new skill. Just make sure to follow the instructions carefully and take your time to avoid any mistakes.DIY: Replacing a Pull Out Handle on a Kitchen Sink Faucet


DIY: Replacing a Pull Out Handle on a Kitchen Sink Faucet


If you're new to home repairs and maintenance, replacing a pull out handle on a kitchen sink faucet may seem daunting. However, with the right tools and instructions, it can be an easy and manageable task. Just remember to turn off the water supply before starting and take your time to ensure everything is done correctly.Replacing a Kitchen Sink Faucet Handle: A Beginner's Guide


Replacing a Kitchen Sink Faucet Handle: A Beginner's Guide


Replacing a pull out handle on a kitchen sink faucet doesn't have to be a long and complicated process. With the right tools and approach, it can be a quick and easy task. Just make sure to purchase the correct replacement handle and follow the steps outlined above.Quick and Easy Steps to Replace a Pull Out Handle on a Kitchen Sink Faucet


Quick and Easy Steps to Replace a Pull Out Handle on a Kitchen Sink Faucet

Here are some tips and tricks to help make the process of replacing a pull out handle on a kitchen sink faucet even smoother: 1. Take a picture: Before removing the old handle, take a picture of it so you can reference it when installing the new one. 2. Use lubricant: If the handle is difficult to remove, use a lubricant like WD-40 to help loosen it. 3. Clean the area: Before installing the new handle, make sure to clean the area to remove any dirt or debris that may have accumulated. 4. Follow instructions: If you're replacing the cartridge or valve assembly, make sure to follow the manufacturer's instructions carefully to ensure proper installation.Replacing a Pull Out Handle on a Kitchen Sink Faucet: Tips and Tricks

Replacing a Pull Out Handle on a Kitchen Sink Faucet: Tips and Tricks
If you're looking for a comprehensive guide on replacing a pull out handle on a kitchen sink faucet, you've come to the right place. In this article, we've covered all the steps and tips you need to know to successfully replace your faucet handle.The Ultimate Guide to Replacing a Pull Out Handle on a Kitchen Sink Faucet

The Ultimate Guide to Replacing a Pull Out Handle on a Kitchen Sink Faucet


While replacing a pull out handle on a kitchen sink faucet may seem like a simple task, there are some common mistakes that people make which can lead to bigger issues down the line. Here are some mistakes to avoid: 1. Not turning off the water supply: This is a crucial step that many people forget, leading to a messy and potentially damaging situation. 2. Using the wrong tools: Make sure to use the correct tools for the job to avoid damaging the handle or other parts of the faucet. 3. Rushing the process: Take your time and follow the instructions carefully to ensure everything is done correctly.Replacing a Kitchen Sink Faucet Handle: Common Mistakes to Avoid


Replacing a Kitchen Sink Faucet Handle: Common Mistakes to Avoid


If you prefer a visual guide, there are plenty of tutorials available online that can walk you through the process of replacing a pull out handle on a kitchen sink faucet. Just make sure to follow a reliable source and double-check the steps before starting. Now that you know how to replace a pull out handle on a kitchen sink faucet, you can confidently tackle this task if and when needed. Remember to always turn off the water supply before starting and follow the instructions carefully for a successful replacement. With the right tools and approach, you can easily keep your kitchen sink faucet in top working condition.Step-by-Step Tutorial for Replacing a Pull Out Handle on a Kitchen Sink Faucet


Step-by-Step Tutorial for Replacing a Pull Out Handle on a Kitchen Sink Faucet

Why Replace the Pull Out Handle on Your Kitchen Sink Faucet?

Aesthetics
 Replacing the pull out handle on your kitchen sink faucet is not only a practical decision, but also a design choice. The handle is one of the most visible parts of your faucet and can greatly impact the overall look of your kitchen. If your current handle is worn out, outdated, or simply not to your liking, replacing it can give your sink a fresh and modern update. With a wide range of styles and finishes available, you can choose a handle that complements your kitchen's design and adds a touch of personalization.
Functionality
 Aside from aesthetics, the functionality of your kitchen sink faucet is also important. Over time, the pull out handle can become loose, making it difficult to control the water flow and temperature. It may also start leaking, causing water wastage and potential damage to your sink and cabinets. By replacing the handle, you can ensure smooth and precise operation of your faucet, making your daily kitchen tasks more efficient.
Cost-Effective Solution
 Replacing the pull out handle on your kitchen sink faucet may seem like an unnecessary expense, but it can actually save you money in the long run. Constantly repairing a faulty handle can add up over time, making a replacement a more cost-effective solution. Additionally, a new handle can also improve the overall performance of your faucet, potentially reducing your water bill.
DIY or Professional Installation
 Depending on your level of experience and comfort with plumbing tasks, you may choose to replace the pull out handle yourself or hire a professional. DIY installation can be a fun and rewarding project, but it requires some basic plumbing skills and tools. If you are unsure, it is best to leave the job to a professional to avoid any potential damage to your faucet or plumbing system.
In conclusion,
replacing the pull out handle on your kitchen sink faucet is a simple yet effective way to improve the aesthetics and functionality of your kitchen. It is a cost-effective solution that can also save you from the hassle of constantly repairing a faulty handle. Whether you choose to DIY or hire a professional, a new handle can make a big difference in your daily kitchen routine.
Depending on your level of experience and comfort with plumbing tasks, you may choose to replace the pull out handle yourself or hire a professional. DIY installation can be a fun and rewarding project, but it requires some basic plumbing skills and tools. If you are unsure, it is best to leave the job to a professional to avoid any potential damage to your faucet or plumbing system.
In conclusion,
replacing the pull out handle on your kitchen sink faucet is a simple yet effective way to improve the aesthetics and functionality of your kitchen. It is a cost-effective solution that can also save you from the hassle of constantly repairing a faulty handle. Whether you choose to DIY or hire a professional, a new handle can make a big difference in your daily kitchen routine.