If you've ever taken apart your kitchen sink drain for cleaning or repairs, you know that it can be a tricky process to put it back together. With all the small parts and pieces, it's easy to get confused and frustrated. But fear not, with the right tools and a step-by-step guide, you'll have your kitchen sink drain reassembled in no time.How to Put a Kitchen Sink Drain Back Together


How to Put a Kitchen Sink Drain Back Together


/how-to-install-a-sink-drain-2718789-hero-b5b99f72b5a24bb2ae8364e60539cece.jpg)

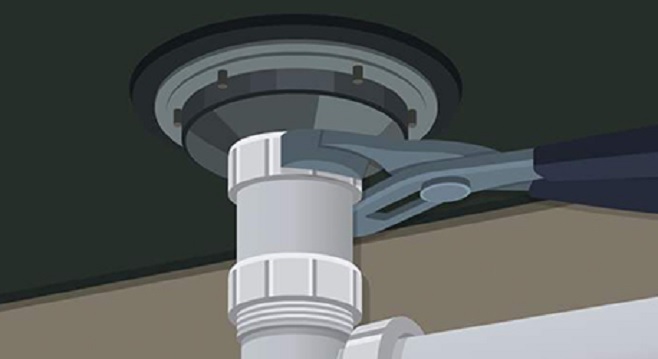
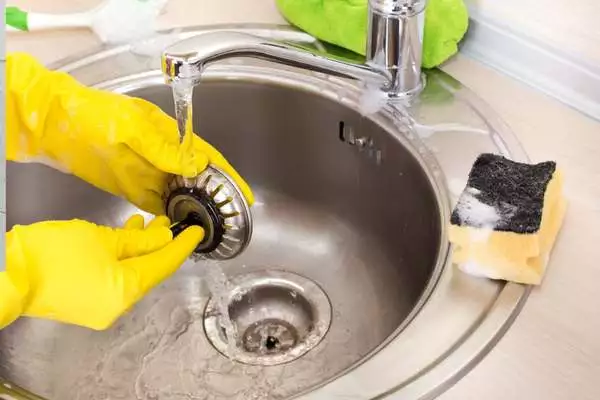
The first step to putting your kitchen sink drain back together is to gather all the necessary tools. You'll need a screwdriver, adjustable pliers, and plumber's putty. Once you have everything you need, you can begin reassembling the drain. Step 1: Clean the Drain Pieces Before putting your drain back together, it's important to clean all the pieces. Use a mild detergent and warm water to clean any debris or residue from the parts. This will ensure a proper seal and prevent any clogs in the future. Step 2: Apply Plumber's Putty Take a small amount of plumber's putty and roll it into a thin rope. Apply it around the lip of the drain opening in the sink. This will create a watertight seal and prevent any leaks. Step 3: Reattach the Drain Flange Place the drain flange over the opening in the sink and press down firmly. Use your adjustable pliers to tighten the locknut underneath the sink, securing the flange in place. Step 4: Install the Rubber Gasket and Friction Ring Next, insert the rubber gasket into the drain opening on the bottom side of the sink. Then, place the friction ring on top of the gasket and screw it into place using the screwdriver. Step 5: Attach the Drain Pipe Slide the drain pipe into the drain opening and tighten the slip nut with your adjustable pliers. Make sure the pipe is securely in place and aligned with the drain flange. Step 6: Connect the Drain Stopper Lastly, attach the drain stopper to the lift rod and insert it into the drain pipe. Test the stopper by pulling up on the lift rod to make sure it opens and closes properly.How to Reassemble a Kitchen Sink Drain


How to Reassemble a Kitchen Sink Drain


Here are a few tips to keep in mind when putting your kitchen sink drain back together: Tip 1: Use Plumber's Tape If you notice any leaks after reassembling your drain, try using plumber's tape on the slip nuts and connections. This will create a tighter seal and prevent any water from leaking out. Tip 2: Check for Proper Alignment Before tightening any nuts or connections, make sure all the parts are properly aligned. If they are not aligned, it can cause leaks or difficulty in using the drain stopper. Tip 3: Don't Over-Tighten Be careful not to over-tighten any nuts or connections as this can cause damage to the parts or create leaks. Use just enough force to create a secure seal.Tips for Reassembling a Kitchen Sink Drain

Step-by-Step Guide for Putting a Kitchen Sink Drain Back Together


:strip_icc()/how-to-clean-a-kitchen-sink-and-drain-04-5660035-d06ca6443e794a9f89b0963e6dba321d.jpg)

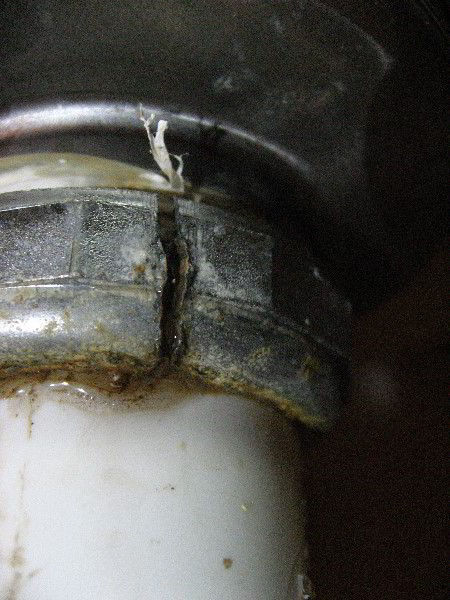
Even with the best intentions, mistakes can happen when putting a kitchen sink drain back together. Here are some common mistakes to avoid: Mistake 1: Forgetting to Clean the Parts Skipping the step of cleaning the drain parts can lead to a poor seal and potential clogs in the future. Take the time to clean all the pieces before reassembling them. Mistake 2: Not Using Plumber's Putty Plumber's putty is an essential part of creating a watertight seal in your kitchen sink drain. Don't forget to use it, or you may end up with leaks. Mistake 3: Not Aligning the Parts Properly If the parts are not aligned correctly, it can cause leaks or difficulty in using the drain stopper. Take the time to make sure everything is in the right place before tightening any connections.Common Mistakes When Putting a Kitchen Sink Drain Back Together


Tips for Reassembling a Kitchen Sink Drain
/how-to-install-a-sink-drain-2718789-hero-24e898006ed94c9593a2a268b57989a3.jpg)


To put your kitchen sink drain back together, you'll need the following tools: - Screwdriver - Adjustable pliers - Plumber's putty Make sure you have these tools on hand before starting the reassembly process.Tools Needed for Reassembling a Kitchen Sink Drain


Common Mistakes When Putting a Kitchen Sink Drain Back Together


If you're a visual learner, watching a video tutorial can be helpful when putting your kitchen sink drain back together. Check out this tutorial for a step-by-step guide: [Insert link to video tutorial here]Video Tutorial: Putting a Kitchen Sink Drain Back Together


Tools Needed for Reassembling a Kitchen Sink Drain


If you've had to replace your kitchen sink drain entirely, the process of putting it back together may be slightly different than reassembling it after cleaning. Here are a few additional steps to follow: Step 1: Apply Plumbers Tape Before assembling the new drain, wrap plumbers tape around the threads of the drain flange. This will create a better seal and prevent leaks. Step 2: Tighten the Locknut After attaching the drain flange to the sink, use your adjustable pliers to tighten the locknut securely. Step 3: Connect the New Drain Pipe Attach the new drain pipe to the drain flange and tighten the slip nut with your adjustable pliers. Make sure the pipe is aligned correctly and secure.Replacing a Kitchen Sink Drain: How to Put it Back Together
Video Tutorial: Putting a Kitchen Sink Drain Back Together

If you encounter any issues when putting your kitchen sink drain back together, here are a few tips to troubleshoot: Issue 1: Leaks If you notice any leaks, make sure all the parts are properly aligned and tightened. If the leak persists, try using plumber's tape on the connections. Issue 2: Difficulty Using Drain Stopper If the drain stopper is not opening or closing properly, check to make sure all the parts are aligned correctly and there are no obstructions in the drain pipe.Troubleshooting: Issues When Putting a Kitchen Sink Drain Back Together


Replacing a Kitchen Sink Drain: How to Put it Back Together


To ensure a successful and smooth reassembly of your kitchen sink drain, here are a few expert tips to keep in mind: Tip 1: Take Your Time Don't rush the process of putting your kitchen sink drain back together. Take your time to avoid mistakes and ensure a proper seal. Tip 2: Read the Instructions If you're using a new drain or have a complex sink setup, it's always helpful to read the manufacturer's instructions before reassembling the drain. Tip 3: Keep it Clean Regularly cleaning your kitchen sink drain can prevent clogs and make the reassembly process easier. Make it a part of your cleaning routine to avoid any future issues.Expert Tips for Putting a Kitchen Sink Drain Back Together


Troubleshooting: Issues When Putting a Kitchen Sink Drain Back Together


If you're looking to convert this article into HTML code, simply add the necessary tags around the headings and paragraphs. For example, <h2> before the heading and </h2> after the heading. Don't forget to add <p> and </p> around each paragraph.Convert to HTML


Expert Tips for Putting a Kitchen Sink Drain Back Together
Why Properly Putting Your Kitchen Sink Drain Back Together is Essential for a Functional Kitchen
The Importance of a Properly Functioning Kitchen Sink Drain
:max_bytes(150000):strip_icc()/how-to-install-a-sink-drain-2718789-hero-24e898006ed94c9593a2a268b57989a3.jpg) When it comes to designing a functional and efficient kitchen, the sink is often considered the heart of the space. From washing dishes to preparing food, a working sink is crucial for everyday tasks. And at the center of it all is the kitchen sink drain. This seemingly small component plays a vital role in keeping your sink and kitchen running smoothly. Not only does it allow water to flow out, but it also prevents any unwanted debris from clogging up your pipes. That's why it's essential to properly put your kitchen sink drain back together.
When it comes to designing a functional and efficient kitchen, the sink is often considered the heart of the space. From washing dishes to preparing food, a working sink is crucial for everyday tasks. And at the center of it all is the kitchen sink drain. This seemingly small component plays a vital role in keeping your sink and kitchen running smoothly. Not only does it allow water to flow out, but it also prevents any unwanted debris from clogging up your pipes. That's why it's essential to properly put your kitchen sink drain back together.
Common Issues with a Faulty Kitchen Sink Drain
 A malfunctioning kitchen sink drain can cause a host of problems in your kitchen. For one, a clogged drain can lead to standing water in your sink, making it difficult to use for cooking and cleaning. This standing water can also become a breeding ground for bacteria and unpleasant odors. Additionally, a faulty drain can cause leaks, leading to water damage and potential mold growth. And if ignored for too long, a damaged drain can result in costly repairs or replacements.
The Steps to Putting Your Kitchen Sink Drain Back Together
 While it may seem like a daunting task, putting your kitchen sink drain back together is actually quite simple. First, gather all the necessary tools and materials, including a drain wrench, plumber's putty, and a new drain assembly if needed. Then, carefully disassemble the old drain, making sure to clean and inspect each part for any damage. Next, apply plumber's putty to the underside of the new drain flange and insert it into the sink opening. Hand tighten the drain nut and then use the drain wrench to secure it in place. Finally, reattach the pipes and turn on the water to test for any leaks. Voila, your kitchen sink drain is back in working order!
Professional Help for Tricky Sink Drain Issues
 While putting your kitchen sink drain back together may seem easy, there are times when a professional's help may be needed. If you encounter any difficulties during the process or notice any significant damage to your sink or pipes, it's best to call a licensed plumber. They have the expertise and tools to handle any complex sink drain issues and ensure that your kitchen remains functional and safe.
In conclusion, a properly functioning kitchen sink drain is crucial for a well-designed kitchen. By following the steps mentioned above or seeking professional help, you can ensure that your sink drain is in top shape and your kitchen runs smoothly. Don't wait until it's too late, take care of your kitchen sink drain today for a hassle-free cooking and cleaning experience.
While putting your kitchen sink drain back together may seem easy, there are times when a professional's help may be needed. If you encounter any difficulties during the process or notice any significant damage to your sink or pipes, it's best to call a licensed plumber. They have the expertise and tools to handle any complex sink drain issues and ensure that your kitchen remains functional and safe.
In conclusion, a properly functioning kitchen sink drain is crucial for a well-designed kitchen. By following the steps mentioned above or seeking professional help, you can ensure that your sink drain is in top shape and your kitchen runs smoothly. Don't wait until it's too late, take care of your kitchen sink drain today for a hassle-free cooking and cleaning experience.