Are you planning to remodel your bathroom and need to plumb a new sink? Look no further, as we have compiled a step-by-step guide to help you with this project. From installing the sink drain to connecting the water supply lines, we have got you covered. Follow these easy steps and you'll have a fully functional bathroom sink in no time.Plumbing a Bathroom Sink: A Step-by-Step Guide


Plumbing a Bathroom Sink: A Step-by-Step Guide


Plumbing a bathroom sink may seem like a daunting task, but with the right tools and instructions, it can be a simple and straightforward process. Before you begin, make sure you have all the necessary materials, including a sink, faucet, drain assembly, and plumbing tools. Let's dive into the steps of how to plumb a bathroom sink.How to Plumb a Bathroom Sink: 5 Steps (with Pictures)


How to Plumb a Bathroom Sink: 5 Steps (with Pictures)


One of the essential parts of plumbing a bathroom sink is installing the drain. This is what ensures that the dirty water and waste is carried away from the sink and into the sewer or septic system. To install the drain, you will need to follow these steps:How to Install a Bathroom Sink Drain


How to Install a Bathroom Sink Drain


/bathroom-sink-drain-installation-2718843-03-6fee5b9d9f7d475abfe06a95ddb1f695.jpg)
In addition to the sink drain, there are other important plumbing aspects to consider when installing a bathroom sink. These include connecting the water supply lines, installing the faucet, and ensuring proper ventilation. Follow these 11 steps to successfully plumb your bathroom sink:How to Plumb a Bathroom: 11 Steps (with Pictures)


How to Plumb a Bathroom: 11 Steps (with Pictures)


Now that you have successfully plumbed your bathroom sink, it's time to install it. Here are 13 steps to help you with this final step:How to Install a Bathroom Sink: 13 Steps (with Pictures)

How to Install a Bathroom Sink: 13 Steps (with Pictures)


As you can see, plumbing a bathroom sink involves a few important steps, but it is not as complicated as it may seem. With the right tools and instructions, you can easily complete this project yourself. Remember to always turn off the water supply before starting any plumbing work and double-check for any leaks before using the sink. Happy plumbing!How to Plumb a Bathroom Sink: 5 Steps (with Pictures)


How to Plumb a Bathroom Sink: 5 Steps (with Pictures)
How to Plumb a Bathroom Sink: A Step-by-Step Guide
Introduction to Bathroom Sink Plumbing
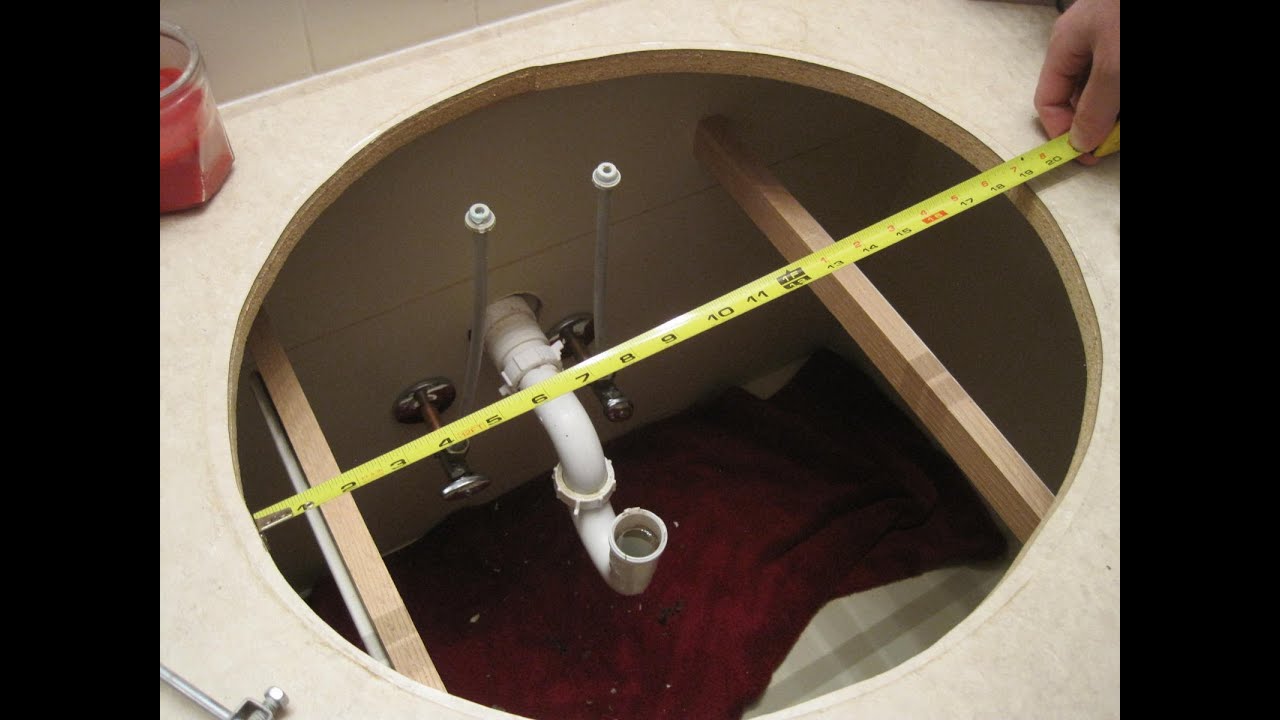
Step 1: Gather the Necessary Tools and Materials
 Before starting any plumbing project, it is essential to have all the necessary tools and materials on hand. For plumbing a bathroom sink, you will need a sink assembly, water supply lines, P-trap, plumber's tape, adjustable wrench, and a hacksaw. Make sure to gather all these items before starting the project to avoid any delays.
Step 2: Install the Sink Assembly
 The sink assembly is the part of the sink that connects to the countertop and houses the faucets and handles. Start by placing the sink assembly on top of the countertop and secure it with clips or brackets. Next, connect the hot and cold water supply lines to the corresponding faucets using plumber's tape to ensure a tight seal.
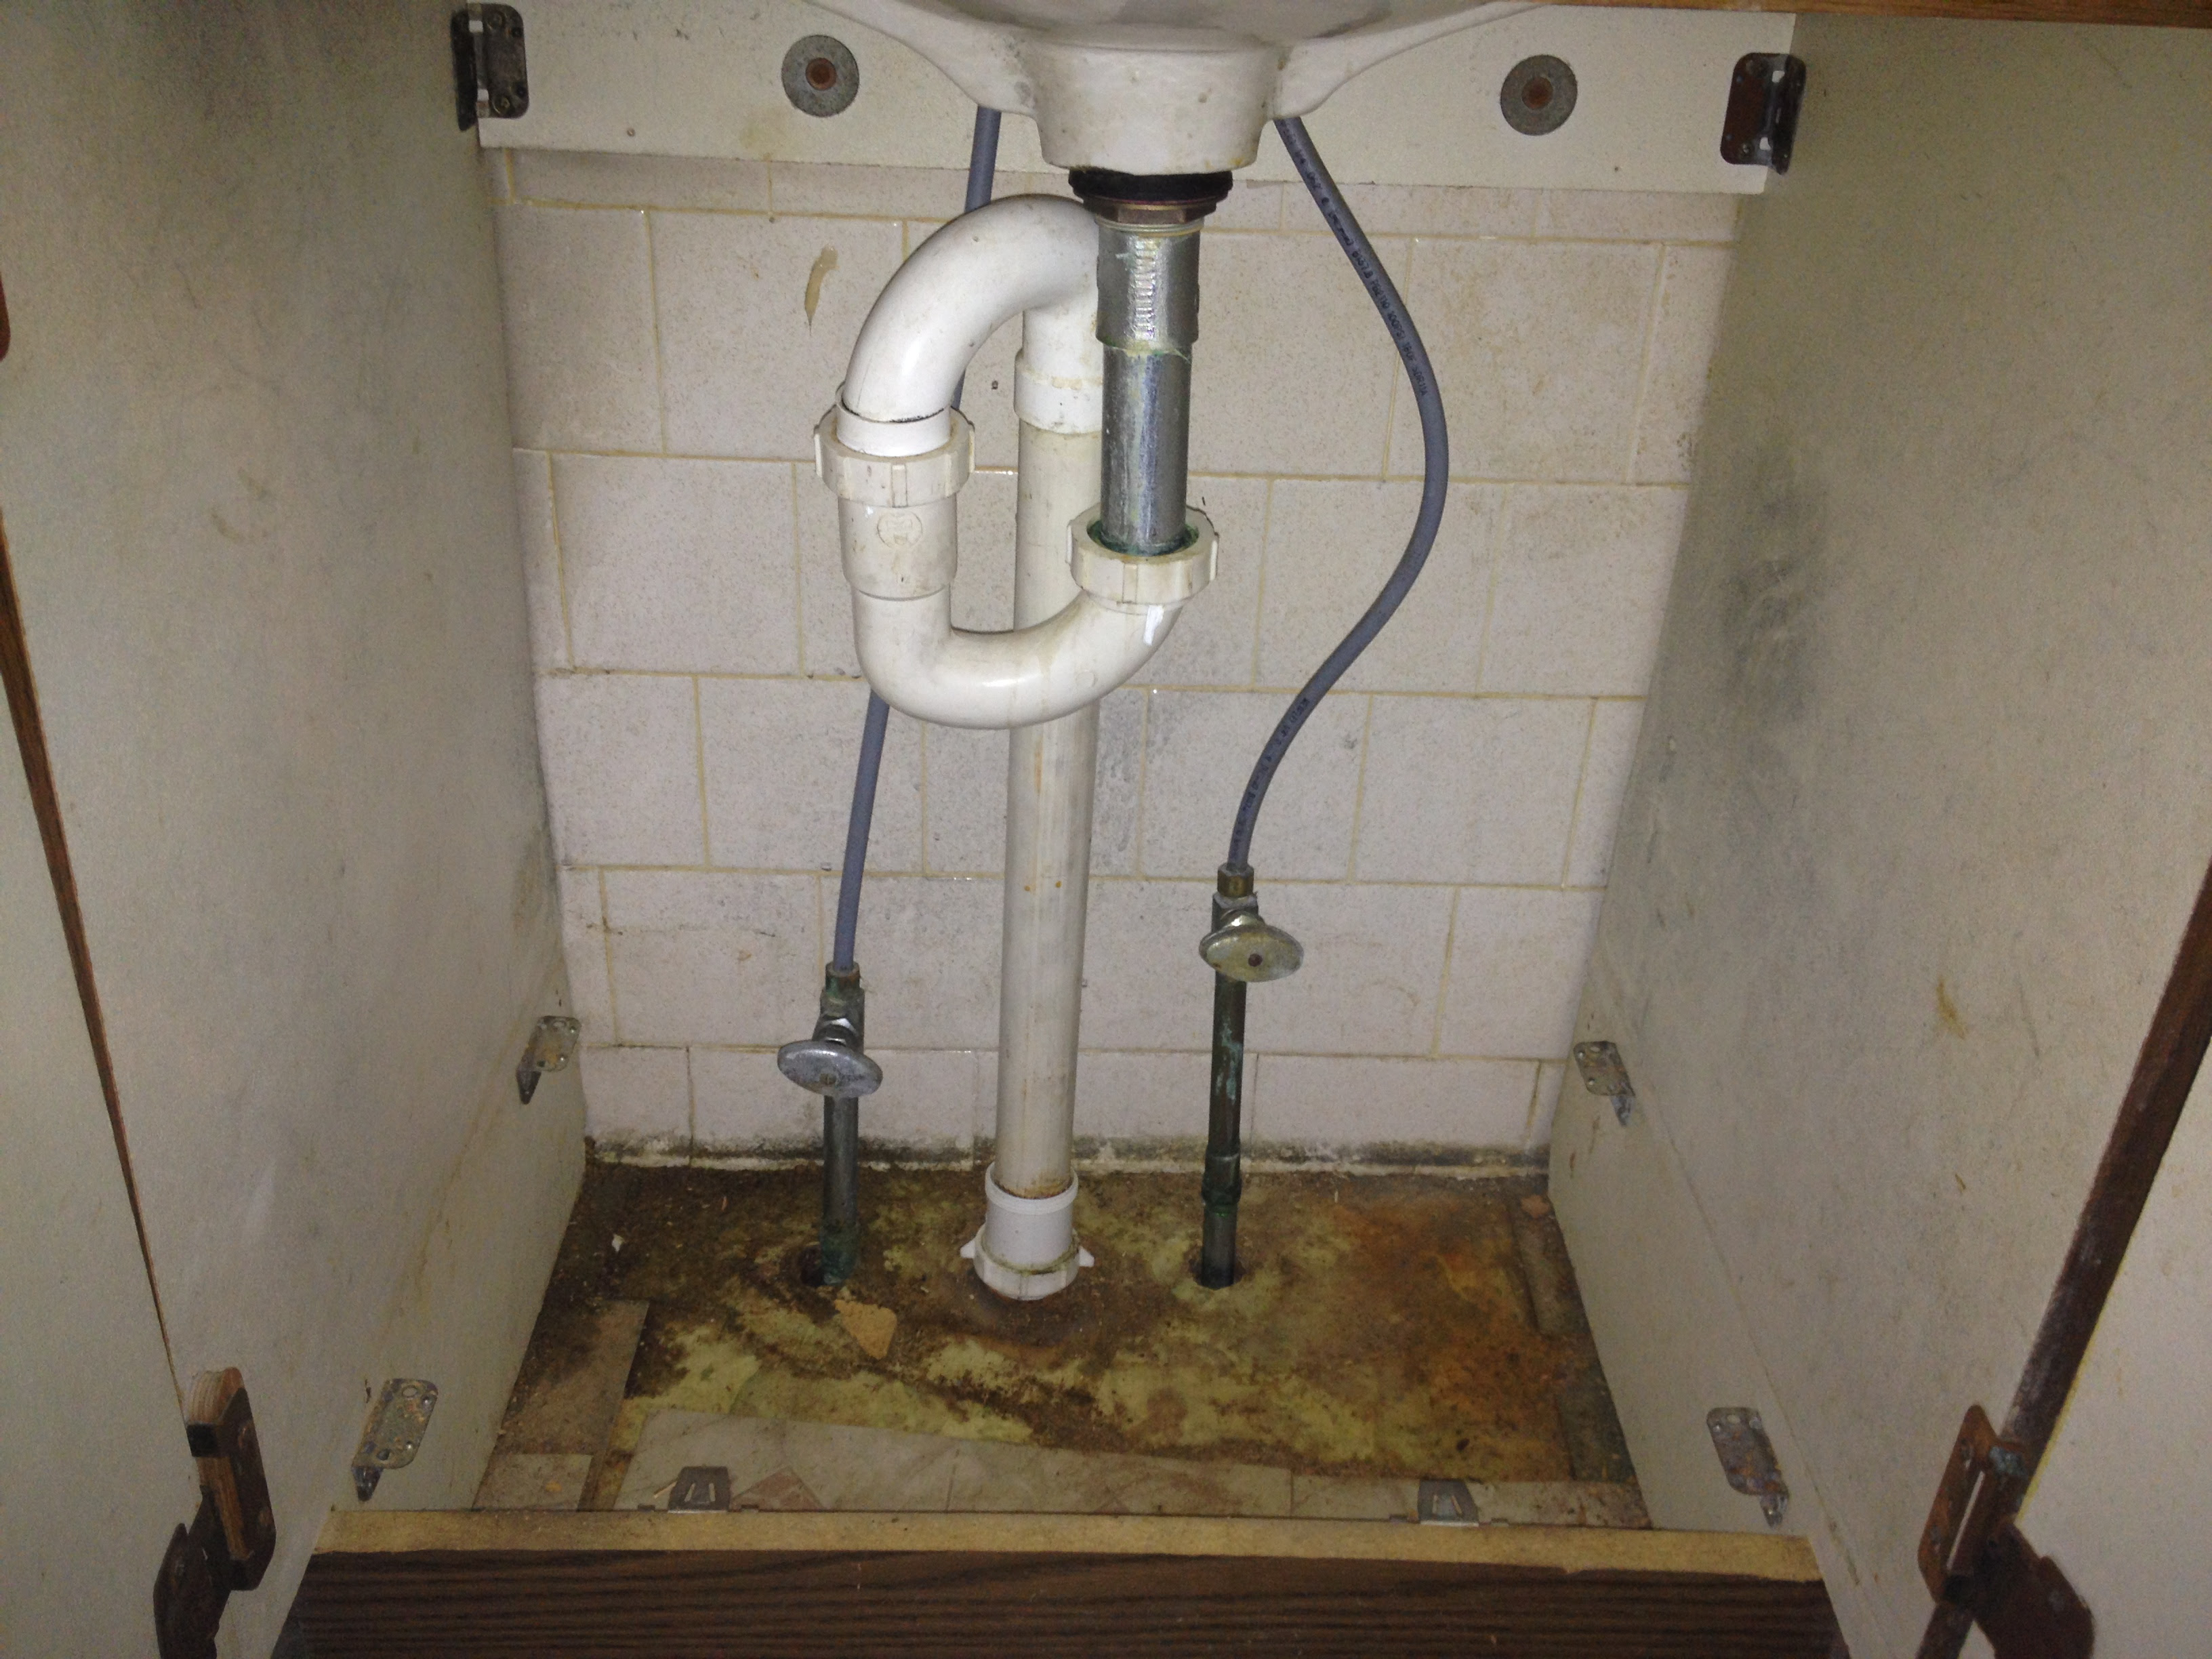
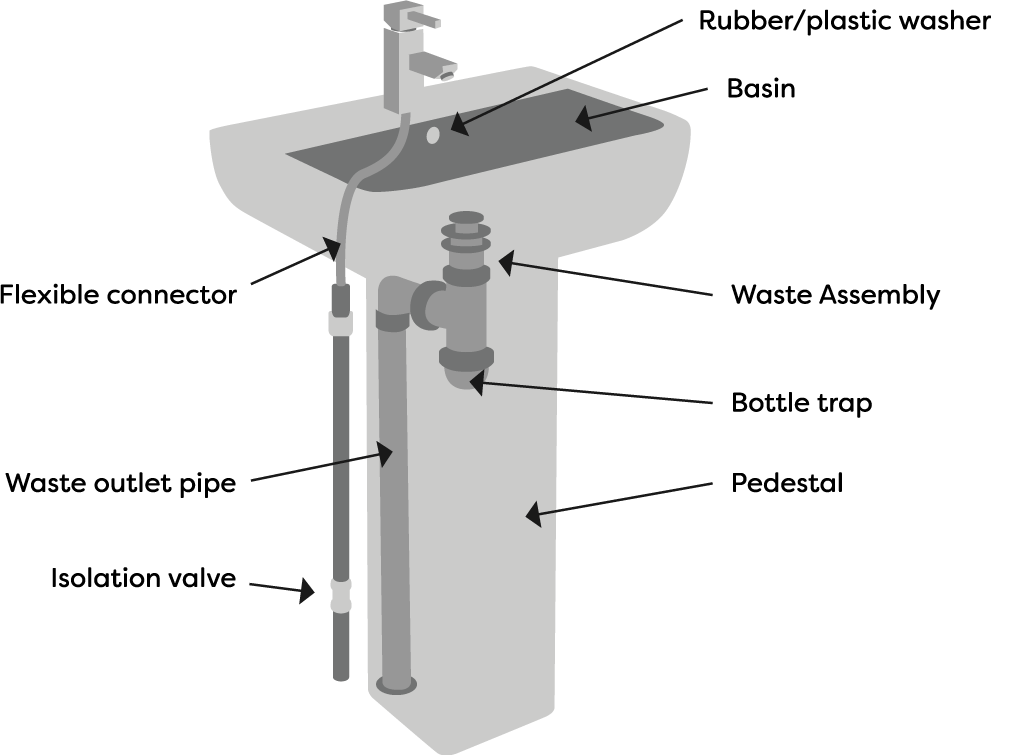
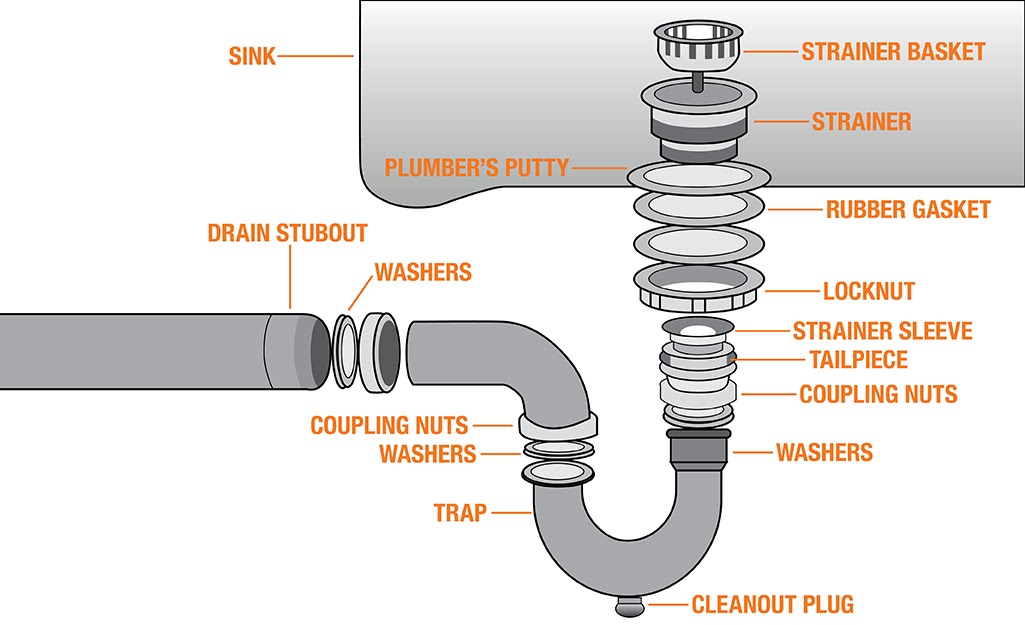
Step 3: Install the P-Trap
 The P-trap is a curved pipe that connects the sink drain to the main drainpipe. It is essential to prevent sewer gases from entering your bathroom and causing unpleasant odors. To install the P-trap, first, measure and cut the pipe to fit between the drain and the main drainpipe. Then, use the adjustable wrench to tighten the connections and ensure there are no leaks.
Step 4: Connect the Drain Stopper
 The drain stopper is the mechanism that allows you to open and close the sink drain. It is connected to a lever behind the faucet handles. To install the drain stopper, thread the connecting rod through the hole in the stopper and attach it to the lever. Adjust the length of the rod if necessary, and test the stopper to ensure it opens and closes smoothly.
Step 5: Test for Leaks and Adjust as Needed
 Once all the components are installed, turn on the water and check for any leaks. If there are any, use the adjustable wrench to tighten the connections. If the leak persists, you may need to replace a faulty component.
Conclusion
 Plumbing a bathroom sink may seem like a daunting task, but with the right tools and a proper guide, it can be a manageable project. By following the steps outlined in this article and referring to the diagram, you can successfully plumb your bathroom sink and have it functioning efficiently in no time. Remember to take your time and be thorough to ensure the best results.