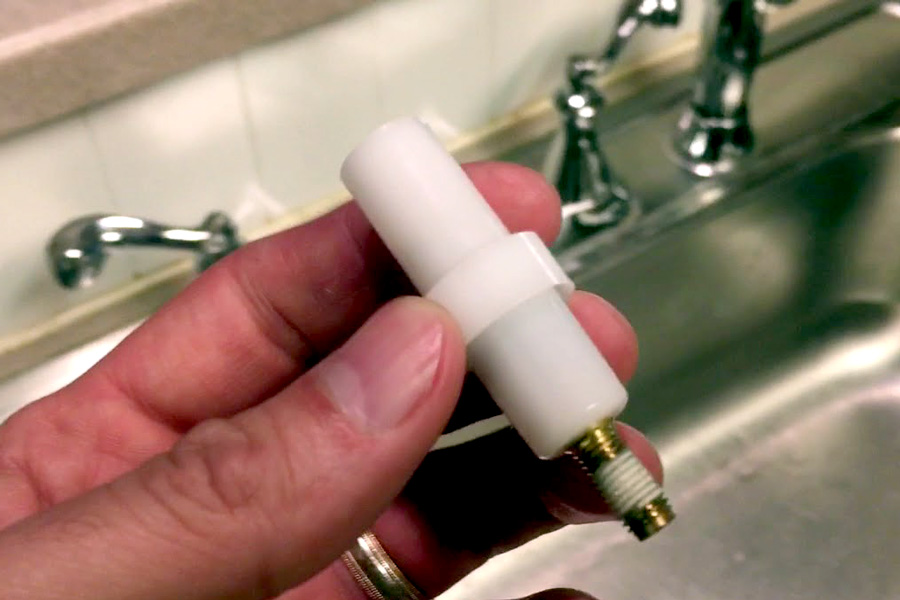
If your kitchen sink diverter is not functioning properly, it may be time for a replacement. Fortunately, replacing a kitchen sink diverter is a simple process that can be done in just a few steps. Follow this guide to learn how to replace your kitchen sink diverter and get your sink back in working order. Step 1: Gather Materials Before you begin, make sure you have all the necessary tools and materials. This may include a new diverter valve, a wrench, pliers, and a screwdriver. You may also want to have a towel or rag handy to clean up any water that may spill during the process. Step 2: Turn Off Water Supply To avoid any potential flooding, turn off the water supply to your kitchen sink. This can usually be done by turning the shut-off valves located under the sink. If you cannot locate the shut-off valves, you can turn off the main water supply to your home. Step 3: Remove Old Diverter Using your wrench, loosen the nut that attaches the diverter to the faucet. Once the nut is loose, you should be able to pull the diverter out of the faucet. If the diverter is stuck, you may need to use pliers to carefully remove it. Step 4: Install New Diverter Take your new diverter valve and insert it into the faucet. Make sure it is properly aligned and then tighten the nut with your wrench. If the diverter came with a new nut, use that instead of the old one. Step 5: Turn On Water Supply Once the new diverter is securely in place, turn the water supply back on. Check for any leaks and make sure the water is running properly through the faucet and into the sink. Step 6: Test the Diverter To ensure that the new diverter is working correctly, turn on the faucet and pull up the diverter handle. The water should now flow into the sprayer rather than the main faucet. If the diverter is not working, you may need to adjust it or try a different one.How to Replace a Kitchen Sink Diverter


How to Replace a Kitchen Sink Diverter


A leaky kitchen sink diverter can be a frustrating and costly problem. Not only does it waste water, but it can also cause damage to your sink and surrounding areas. Follow these steps to fix a leaky kitchen sink diverter and prevent any further issues. Step 1: Identify the Leaky Diverter The first step in fixing a leaky diverter is to identify which part of the diverter is causing the leak. This can usually be determined by examining the area and looking for any obvious signs of wear or damage. Step 2: Replace Damaged Parts If the leak is caused by a damaged or worn out part, you will need to replace it. This may involve purchasing a new diverter valve or a specific component of the diverter. Make sure to follow the manufacturer's instructions for proper replacement. Step 3: Tighten Connections In some cases, a leaky kitchen sink diverter can be caused by loose connections. Use a wrench or pliers to tighten any loose nuts or bolts that may be contributing to the leak. Step 4: Check for Mineral Buildup Mineral buildup can also cause a leaky kitchen sink diverter. If you notice any mineral deposits around the diverter, use a solution of vinegar and water to clean the area. This should help to remove any buildup and prevent future leaks. Step 5: Replace the Diverter If none of the above steps fix the leak, it may be time to replace the entire diverter. Follow the steps for replacing a kitchen sink diverter mentioned above to properly install a new one.How to Fix a Leaky Kitchen Sink Diverter


How to Fix a Leaky Kitchen Sink Diverter


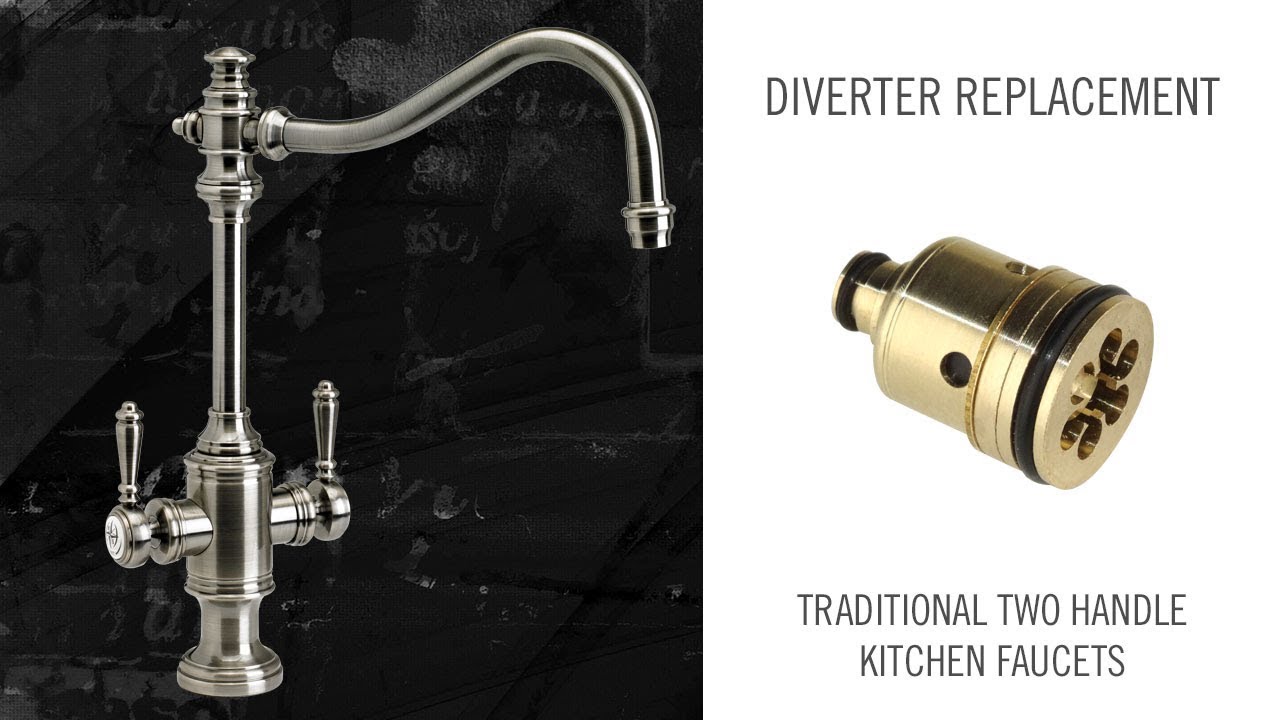
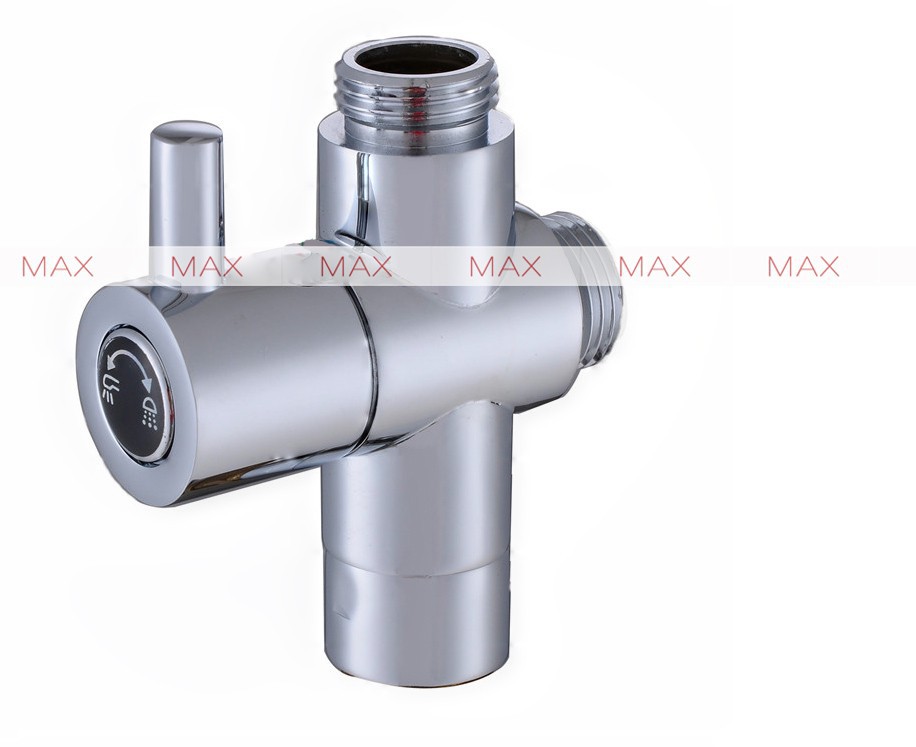
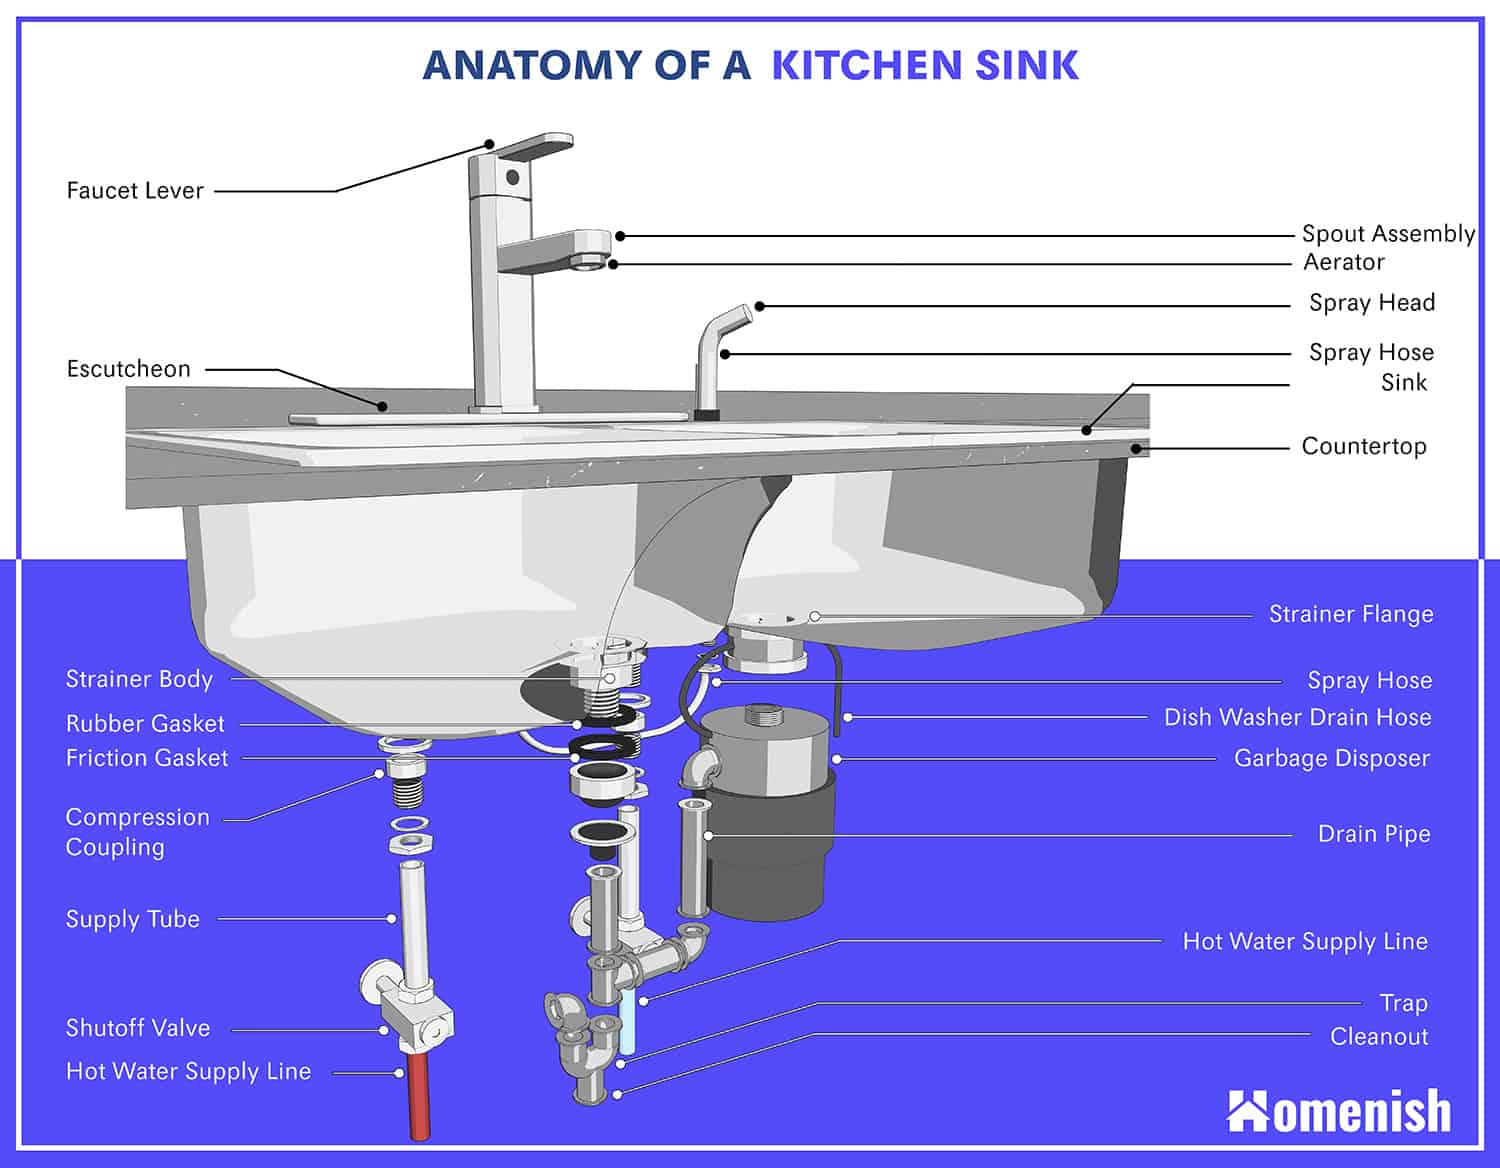
A kitchen sink diverter valve diagram is a helpful tool for understanding the various parts and components of a kitchen sink diverter. It can also be useful for troubleshooting any issues that may arise with the diverter. Here is a breakdown of the different parts included in a kitchen sink diverter valve diagram: Diverter Valve The main component of the kitchen sink diverter, this valve controls the flow of water to either the faucet or the sprayer. Handle The handle is used to activate the diverter valve and switch the water flow between the faucet and sprayer. Nut The nut secures the diverter valve in place and keeps it from moving or leaking. Hose The hose connects the diverter valve to the sprayer, allowing water to flow between the two. Sprayer The sprayer is the part of the sink that allows for a more direct and powerful flow of water for cleaning and rinsing.Kitchen Sink Diverter Valve Diagram


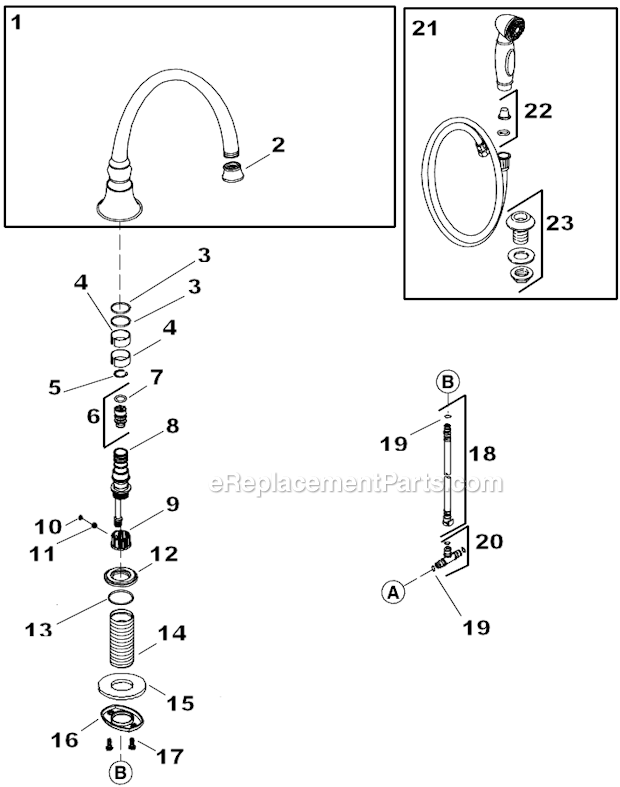
Kitchen Sink Diverter Valve Diagram


A kitchen sink diverter can become damaged or worn out over time, causing it to malfunction. Here are some tips for repairing a kitchen sink diverter and getting it back in working order: Inspect for Damage Before attempting to repair a kitchen sink diverter, make sure to thoroughly inspect it for any visible signs of damage. This may include cracks, mineral buildup, or worn out parts. Replace Damaged Parts If you notice any damaged parts, it is important to replace them as soon as possible. This may involve purchasing a new diverter valve or a specific component of the diverter. Tighten Connections Loose connections can also cause a kitchen sink diverter to malfunction. Use a wrench or pliers to tighten any loose nuts or bolts that may be contributing to the issue. Check for Mineral Buildup Mineral buildup can also be a common cause of kitchen sink diverter problems. Use a solution of vinegar and water to clean the area and remove any buildup. Replace the Diverter If none of the above steps work, it may be necessary to replace the entire diverter. Follow the steps for replacing a kitchen sink diverter mentioned above for proper installation.Kitchen Sink Diverter Repair


Kitchen Sink Diverter Repair


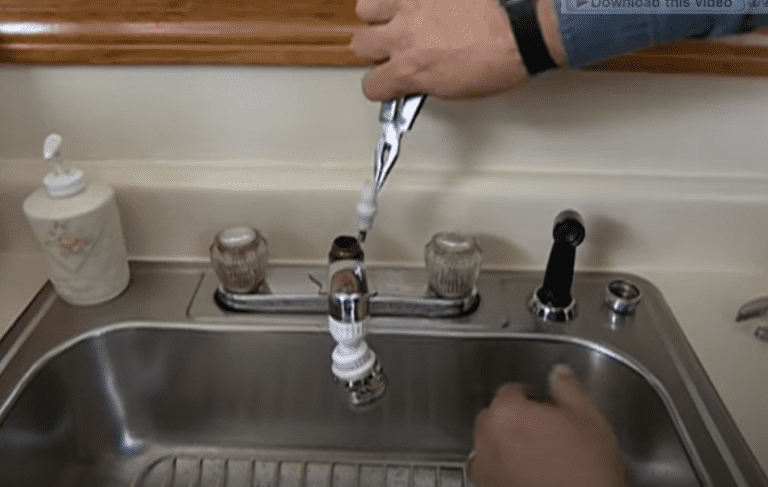
If your kitchen sink diverter is beyond repair, it may be time for a replacement. Here are some tips for replacing a kitchen sink diverter: Turn Off Water Supply Before you begin, make sure to turn off the water supply to your kitchen sink. This can usually be done by turning the shut-off valves located under the sink. Remove Old Diverter Using a wrench, loosen the nut that attaches the diverter to the faucet. Once the nut is loose, you should be able to pull the diverter out of the faucet. If the diverter is stuck, you may need to use pliers to carefully remove it. Install New Diverter Take your new diverter valve and insert it into the faucet. Make sure it is properly aligned and then tighten the nut with your wrench. If the diverter came with a new nut, use that instead of the old one. Turn On Water Supply Once the new diverter is securely in place, turn the water supply back on. Check for any leaks and make sure the water is running properly through the faucet and into the sink. Test the Diverter To ensure that the new diverter is working correctly, turn on the faucet and pull up the diverter handle. The water should now flow into the sprayer rather than the main faucet. If the diverter is not working, you may need to adjust it or try a different one.Kitchen Sink Diverter Replacement


Kitchen Sink Diverter Replacement


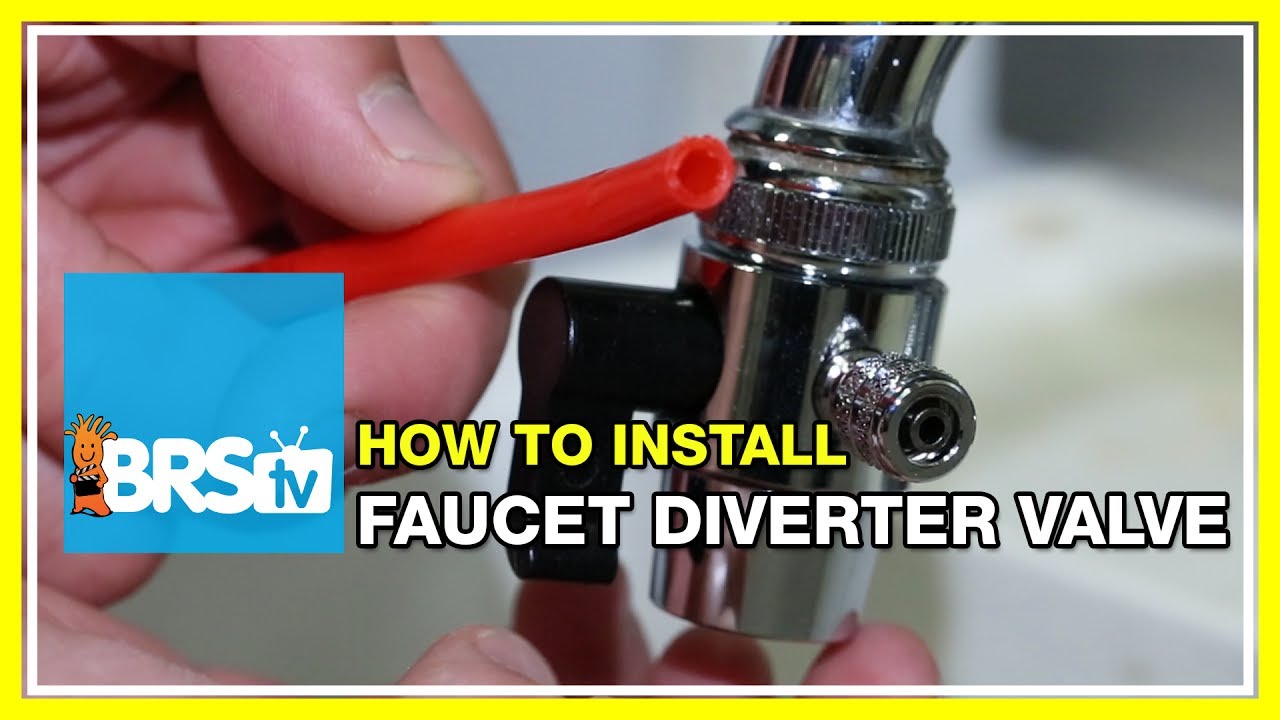
Installing a kitchen sink diverter can be a simple and straightforward process. Here are the steps for installing a new kitchen sink diverter: Step 1: Gather Materials Before you begin, make sure you have all the necessary tools and materials. This may include a new diverter valve, a wrench, pliers, and a screwdriver. You may also want to have a towel or rag handy to clean up any water that may spill during the process. Step 2: Turn Off Water Supply To avoid any potential flooding, turn off the water supply to your kitchen sink. This can usually be done by turning the shut-off valves located under the sink. If you cannot locate the shut-off valves, you can turn off the main water supply to your home. Step 3: Remove Old Diverter Using your wrench, loosen the nut that attaches the diverter to the faucet. Once the nut is loose, you should be able to pull the diverter out of the faucet. If the diverter is stuck, you may need to use pliers to carefully remove it. Step 4: Install New Diverter Take your new diverter valve and insert it into the faucet. Make sure it is properly aligned and then tighten the nut with your wrench. If the diverter came with a new nut, use that instead of the old one. Step 5: Turn On Water Supply Once the new diverter is securely in place, turn the water supply back on. Check for any leaks and make sure the water is running properly through the faucet and into the sink. Step 6: Test the Diverter To ensure that the new diverter is working correctly, turn on the faucet and pull up the diverter handle. The water should now flow into the sprayer rather than the main faucet. If the diverter is not working, you may need to adjust it or try a different one.Kitchen Sink Diverter Installation


Kitchen Sink Diverter Installation
:no_upscale()/cdn.vox-cdn.com/uploads/chorus_asset/file/19495086/drain_0.jpg)


Understanding the different parts of a kitchen sink diverter can be helpful when it comes to troubleshooting and repairing any issues. Here is a breakdown of the main parts of a kitchen sink diverter: Diverter Valve The main component of the kitchen sink diverter, this valve controls the flow of water to either the faucet or the sprayer. Handle The handle is used to activate the diverter valve and switch the water flow between the faucet and sprayer. Nut The nut secures the diverter valve in place and keeps it from moving or leaking. Hose The hose connects the diverter valve to the sprayer, allowing water to flow between the two. Sprayer The sprayer is the part of the sink that allows for a more direct and powerful flow of water for cleaning and rinsing.Kitchen Sink Diverter Parts

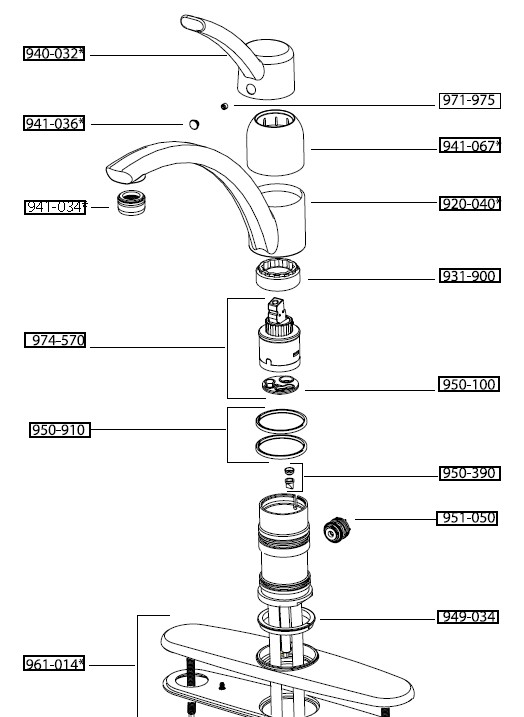
Kitchen Sink Diverter Parts


If your kitchen sink diverter is not working properly, there may be a simple solution to the problem. Here are some common issues and troubleshooting tips for kitchen sink diverters: Leaking Diverter If your kitchen sink diverter is leaking, it may be due to a damaged or worn out part. Follow the steps for repairing a leaky diverter mentioned above. Stuck Diverter A stuck diverter can be caused by mineral buildup or debris. Use a solution of vinegar and water to clean the area and remove any buildup. If the diverter is still stuck, you may need to replace it. Not Working Properly If the diverter is not properly switching the water flow between the faucet and sprayer, it may be a sign of a damaged or faulty valve. Follow the steps for replacing a kitchen sink diverter mentioned above.Kitchen Sink Diverter Troubleshooting


Kitchen Sink Diverter Troubleshooting


If your kitchen sink diverter is not working at all, it may be time for a replacement. Here are some steps for replacing a kitchen sink diverter: Step 1: Gather Materials Before you begin, make sure you have all the necessary tools and materials. This may include a new diverter valve, a wrench, pliers, and a screwdriver. You may also want to have a towel or rag handy to clean up any water that may spill during the process. Step 2: Turn Off Water Supply To avoid any potential flooding, turn off the water supply to your kitchen sink. This can usually be done by turning the shut-off valves located under the sink. If you cannot locate the shut-off valves, you can turn off the main water supply to your home. Step 3: Remove Old DiverterKitchen Sink Diverter Not Working


Kitchen Sink Diverter Not Working


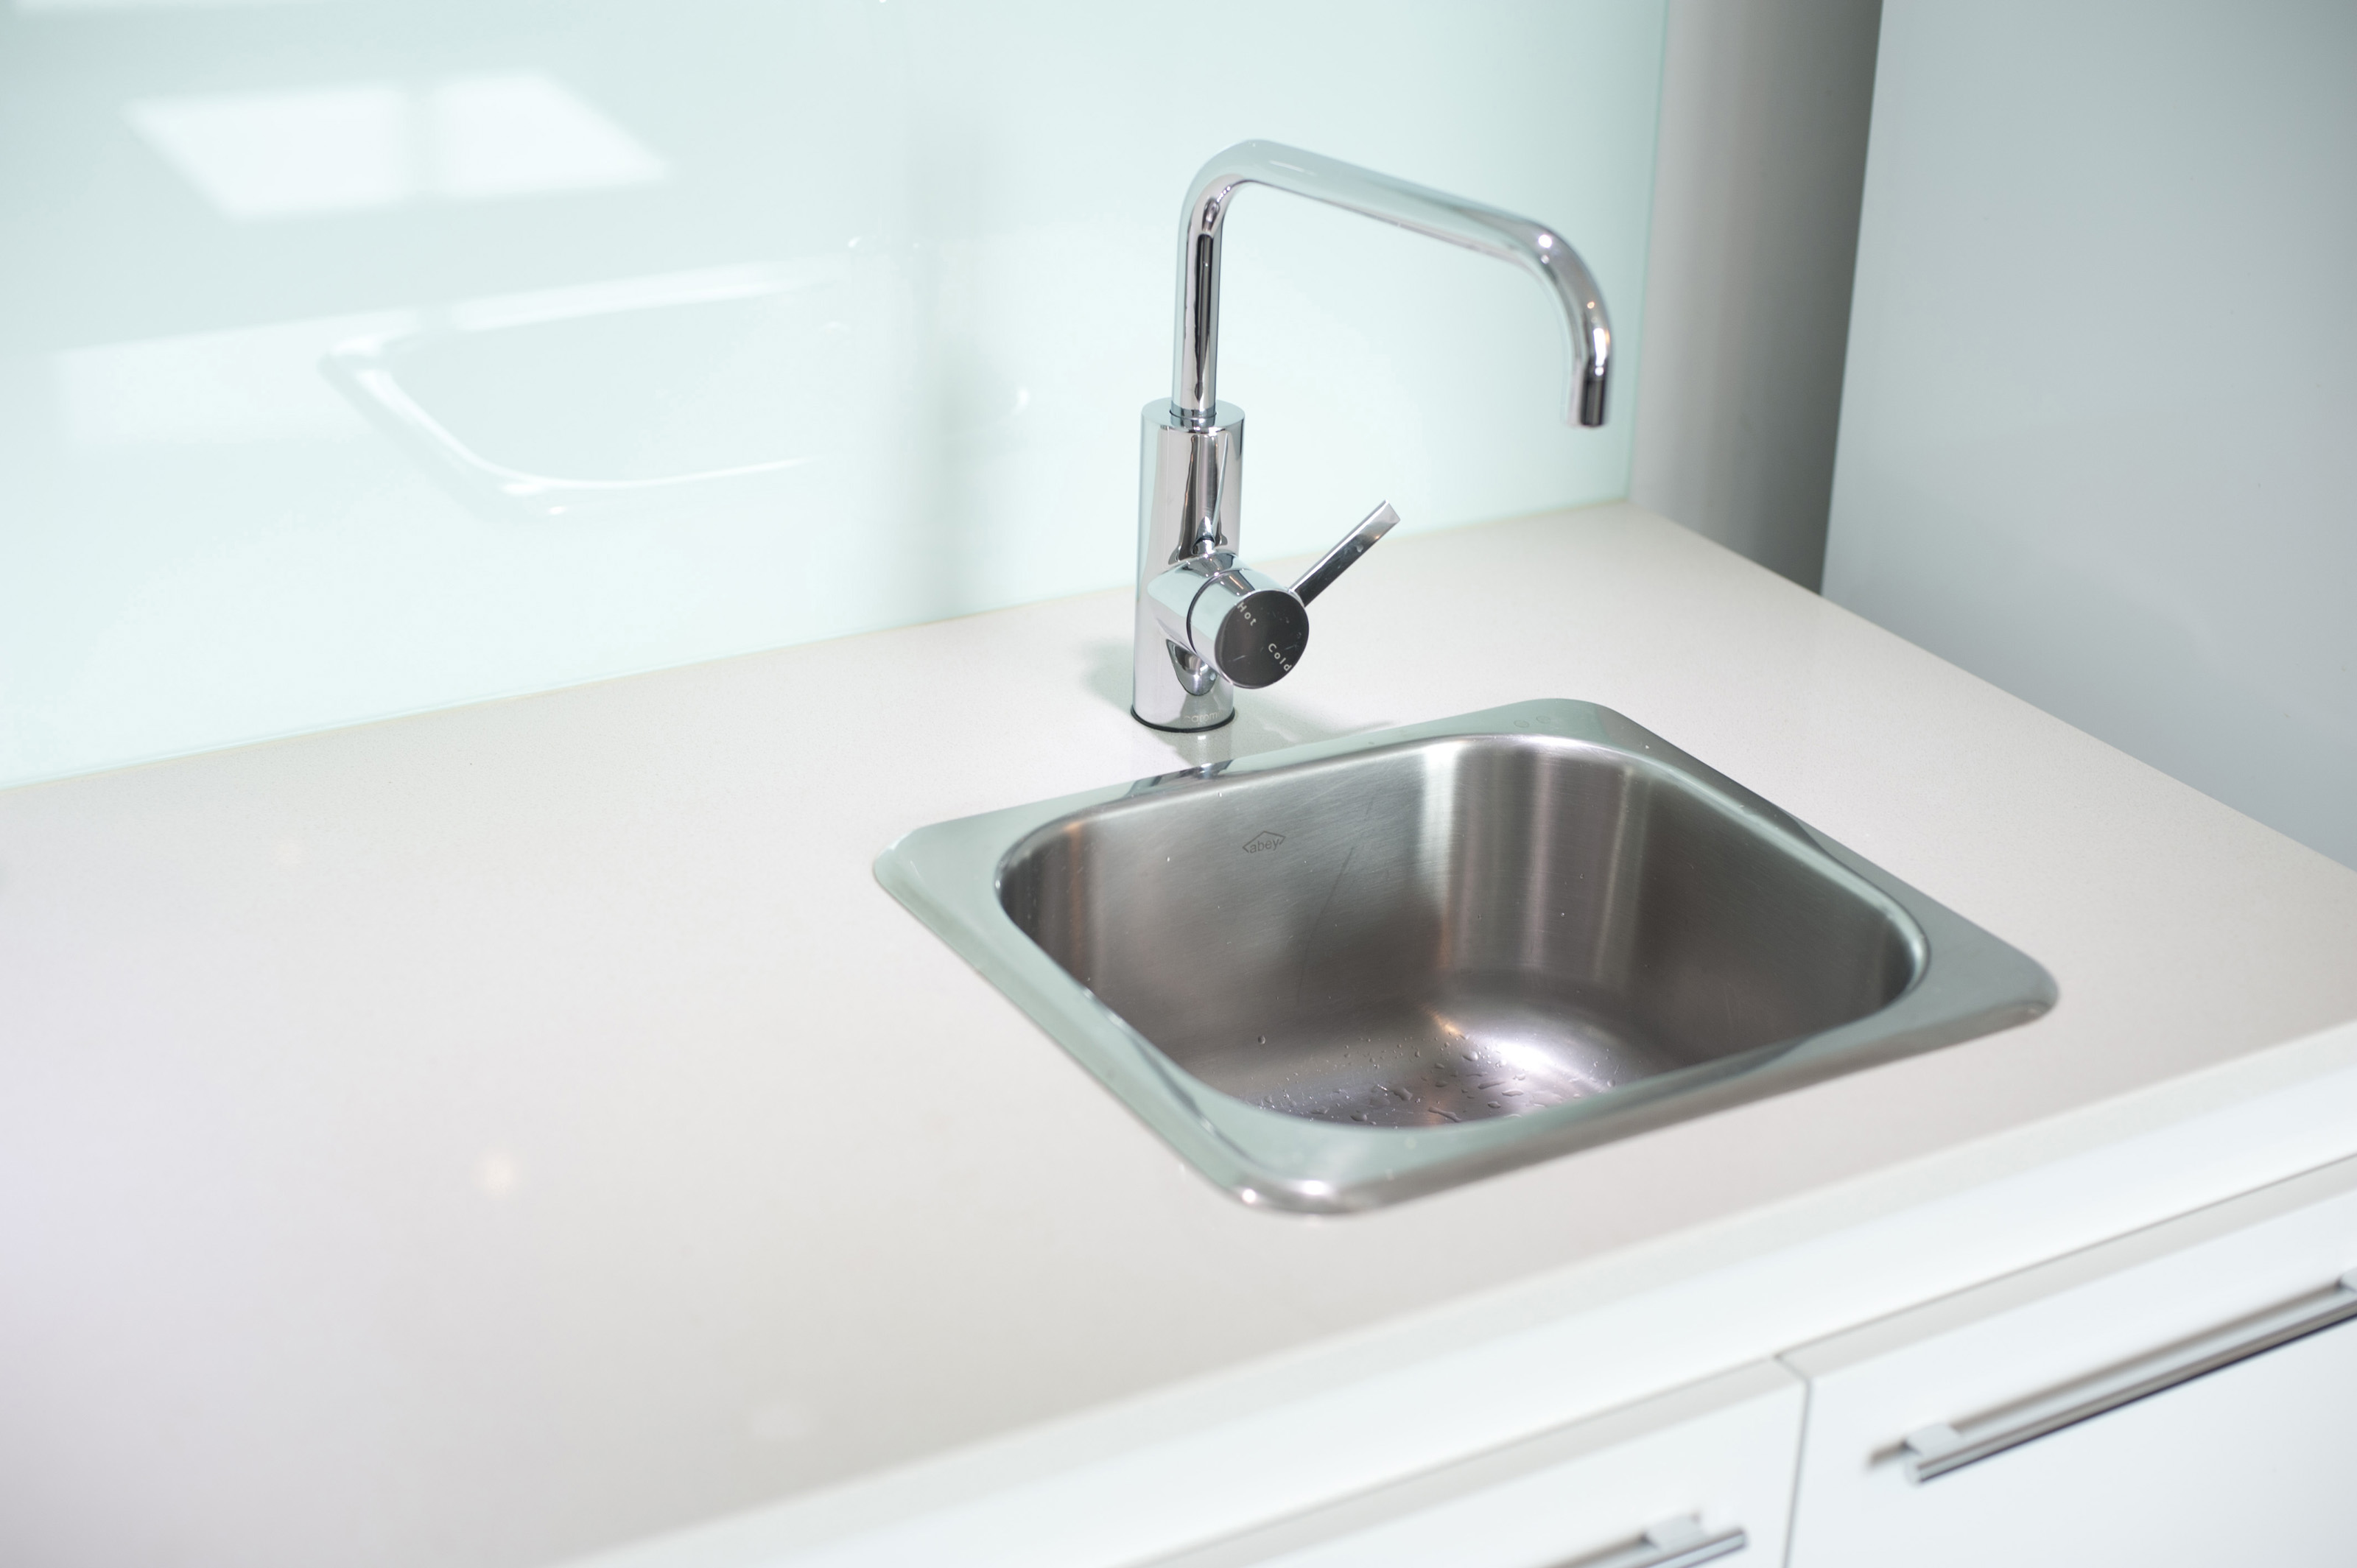
The Importance of a Kitchen Sink Diverter in House Design

Efficient Use of Space
 When it comes to designing a house, every inch of space counts. This is especially true for smaller kitchens where every appliance and fixture needs to be strategically placed in order to maximize the available space. This is where a
kitchen sink diverter
comes in handy. With its compact design, it allows for more counter space and eliminates the need for a separate sprayer. This not only makes the kitchen look more organized and spacious, but also makes it easier to move around and work in.
When it comes to designing a house, every inch of space counts. This is especially true for smaller kitchens where every appliance and fixture needs to be strategically placed in order to maximize the available space. This is where a
kitchen sink diverter
comes in handy. With its compact design, it allows for more counter space and eliminates the need for a separate sprayer. This not only makes the kitchen look more organized and spacious, but also makes it easier to move around and work in.
Convenient Functionality
 A
kitchen sink diverter
may seem like a small detail in house design, but it plays a crucial role in the functionality of a kitchen. With the ability to switch between a steady stream and a powerful spray, it offers convenience and versatility for everyday tasks. Whether you need to fill up a pot or rinse off dishes, the
kitchen sink diverter
makes it easier and more efficient. This not only saves time and effort, but also adds to the overall convenience and functionality of the kitchen.
A
kitchen sink diverter
may seem like a small detail in house design, but it plays a crucial role in the functionality of a kitchen. With the ability to switch between a steady stream and a powerful spray, it offers convenience and versatility for everyday tasks. Whether you need to fill up a pot or rinse off dishes, the
kitchen sink diverter
makes it easier and more efficient. This not only saves time and effort, but also adds to the overall convenience and functionality of the kitchen.
Cost-Effective Solution
 In addition to its practicality, a
kitchen sink diverter
also offers a cost-effective solution for house design. Installing a separate sprayer can be an expensive and time-consuming process. With a
kitchen sink diverter
, there is no need for additional plumbing or installation costs. This makes it a more budget-friendly option for those looking to upgrade their kitchen without breaking the bank. Plus, its durable and low-maintenance design ensures long-term use and cost savings in the future.
In conclusion, a
kitchen sink diverter
may seem like a small and insignificant detail in house design, but it offers numerous benefits that cannot be overlooked. From its space-saving and convenient functionality, to its cost-effective solution, it is a must-have in any modern kitchen. So, when designing or renovating your kitchen, don't forget to consider the importance of a
kitchen sink diverter
for a more efficient and practical space.
In addition to its practicality, a
kitchen sink diverter
also offers a cost-effective solution for house design. Installing a separate sprayer can be an expensive and time-consuming process. With a
kitchen sink diverter
, there is no need for additional plumbing or installation costs. This makes it a more budget-friendly option for those looking to upgrade their kitchen without breaking the bank. Plus, its durable and low-maintenance design ensures long-term use and cost savings in the future.
In conclusion, a
kitchen sink diverter
may seem like a small and insignificant detail in house design, but it offers numerous benefits that cannot be overlooked. From its space-saving and convenient functionality, to its cost-effective solution, it is a must-have in any modern kitchen. So, when designing or renovating your kitchen, don't forget to consider the importance of a
kitchen sink diverter
for a more efficient and practical space.