Welcome to our comprehensive guide on measuring an undermount kitchen sink. Whether you are planning to install a new sink or replace an old one, accurate measurements are crucial for a successful installation. In this guide, we will walk you through the step-by-step process of measuring an undermount kitchen sink, as well as provide you with useful tips and tricks to avoid common mistakes. Let's get started!How to Measure an Undermount Kitchen Sink


How to Measure an Undermount Kitchen Sink


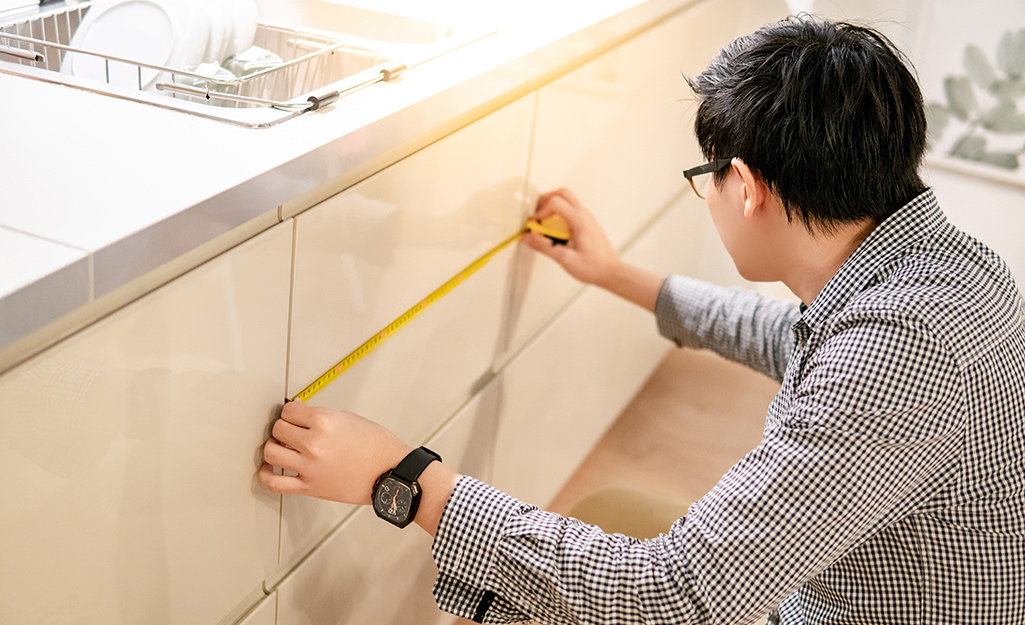
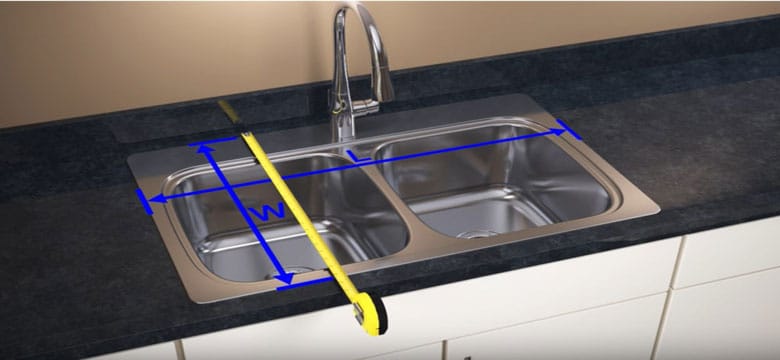
Before you begin, make sure you have all the necessary tools and materials ready. This includes a measuring tape, pencil, paper, and a level. Now, let's dive into the steps: Step 1: Measure the width of your sink cabinet. This will determine the maximum width of your undermount sink. Take the measurement from the inside of the cabinet, from left to right. Be sure to account for any obstacles such as pipes or garbage disposal. Step 2: Measure the depth of your sink cabinet. This will determine the maximum depth of your undermount sink. Take the measurement from the inside of the cabinet, from front to back. Again, make sure to account for any obstacles. Step 3: Measure the distance from the back of the sink cabinet to the center of your drain. This will help you determine the location of your sink and where the holes for the faucet and accessories should be drilled. Step 4: Measure the distance from the side of the sink cabinet to the center of your drain. This will give you the proper placement for your sink and faucet. Step 5: Measure the distance from the top of the counter to the bottom of the cabinet. This will determine the height of your undermount sink and ensure it fits properly under the countertop. Step 6: Measure the distance from the edge of the countertop to the center of your faucet. This will ensure your faucet is centered above your sink.Step-by-Step Guide for Measuring an Undermount Kitchen Sink


Step-by-Step Guide for Measuring an Undermount Kitchen Sink


:no_upscale()/cdn.vox-cdn.com/uploads/chorus_asset/file/19495086/drain_0.jpg)

Now that you have the measurements for your kitchen sink, it's time to double check and make sure everything is accurate. Here are some additional tips to help you get the most precise measurements: Tip 1: Use a level to ensure your measurements are straight and even. This will help you avoid any crooked or uneven installations. Tip 2: Take multiple measurements to ensure accuracy. It's always better to be safe than sorry, especially when it comes to something as important as your kitchen sink. Tip 3: Consider the size and shape of your sink. Undermount sinks come in various sizes and shapes, so make sure to choose one that fits your needs and the measurements of your cabinet.Measuring an Undermount Kitchen Sink: A Comprehensive Guide


Measuring an Undermount Kitchen Sink: A Comprehensive Guide


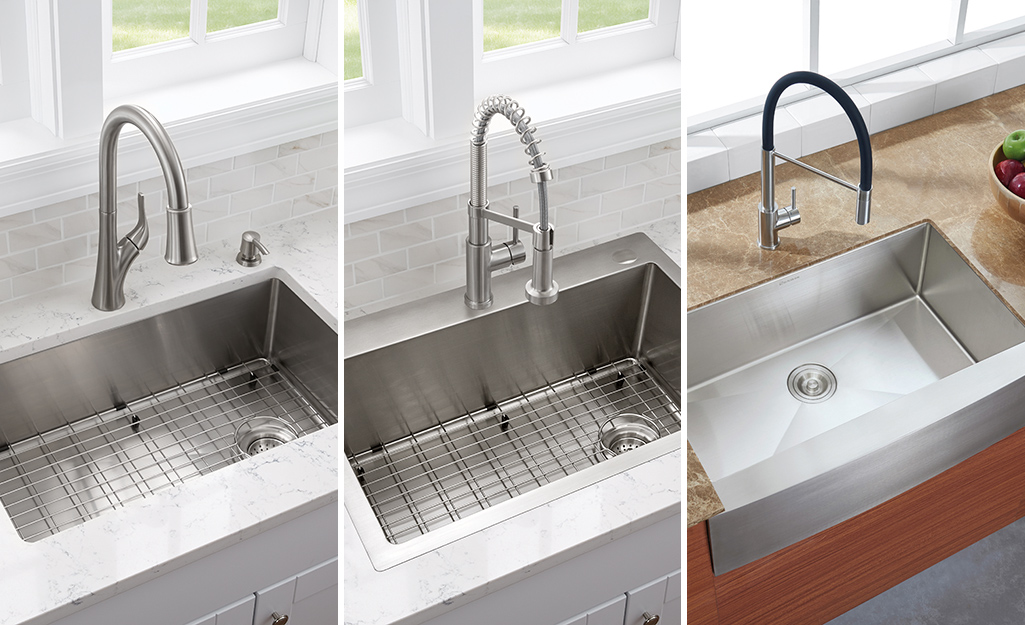
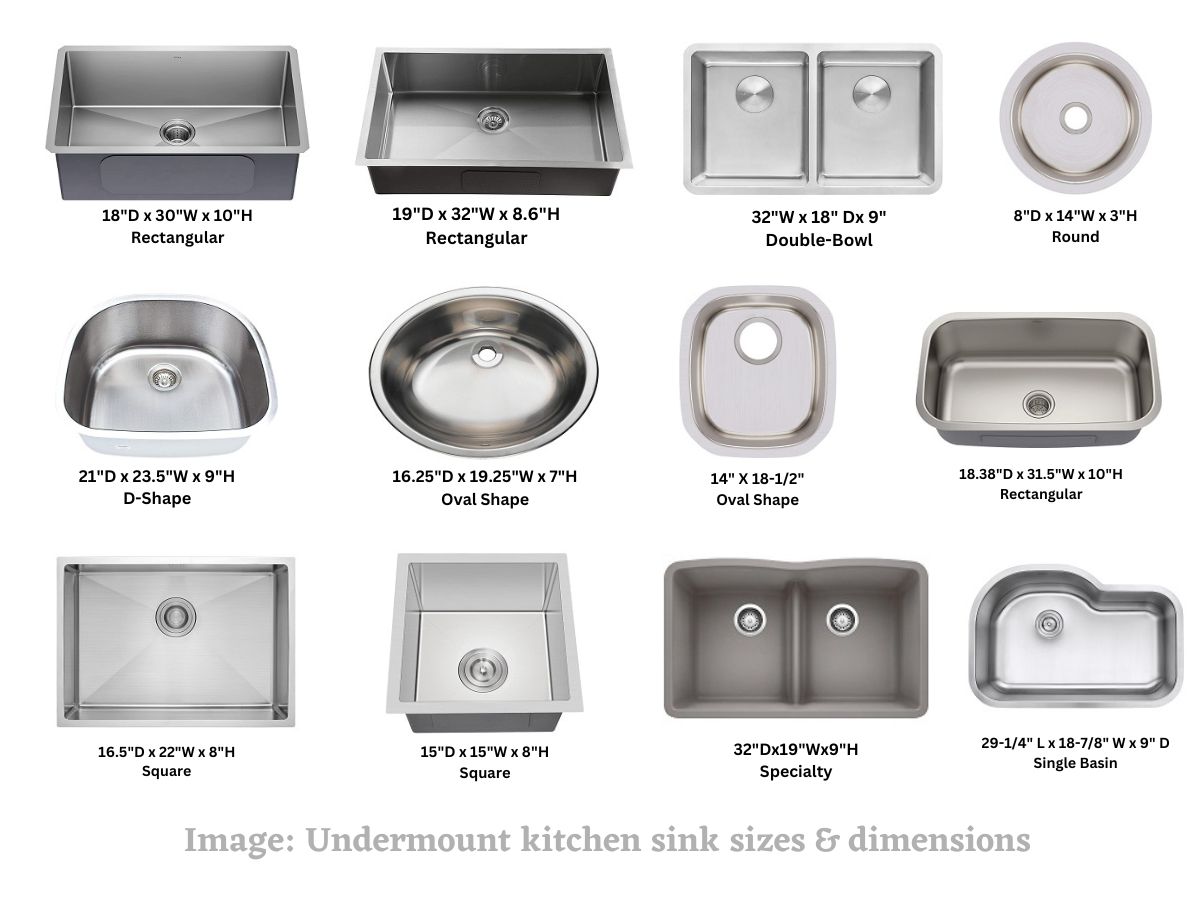
Once you have all the necessary measurements, it's time to choose your undermount kitchen sink. When selecting a sink, make sure to consider the material, color, and style that will best match your kitchen. You can also choose from different configurations, such as single or double bowl, to fit your specific needs. Tip 1: Opt for a sink with a slightly smaller width than your cabinet. This will make installation easier and allow for a snug fit. Tip 2: Choose a sink with rounded corners. Not only do they look aesthetically pleasing, but they also make cleaning easier and prevent food and debris from getting stuck in sharp corners. Tip 3: Consider the depth of your sink. If you have a small kitchen, a shallow sink will give you more counter space, while a deeper sink is ideal for larger kitchens and heavy-duty cooking.The Ultimate Guide to Measuring an Undermount Kitchen Sink


The Ultimate Guide to Measuring an Undermount Kitchen Sink


Now that you have all the measurements and have chosen your sink, it's time to prepare for the installation. Here are some tips and tricks to keep in mind: TIP 1: Place a towel or blanket underneath your sink before installation to protect your countertop from any scratches or damage. TIP 2: Use a silicone adhesive to secure your sink to the underside of the countertop. This will provide a strong bond and prevent any movement or leaks. TIP 3: Double check all measurements before drilling any holes for your faucet or accessories. It's better to catch any mistakes beforehand than to have to redo the installation.Measuring an Undermount Kitchen Sink: Tips and Tricks


Measuring an Undermount Kitchen Sink: Tips and Tricks


Congratulations, you now have all the knowledge and tools to measure and install your undermount kitchen sink successfully. However, there are a few more things you should know to ensure your sink lasts for years to come: Tip 1: Keep your sink clean and dry to prevent any water or food stains from forming. Tip 2: Avoid using harsh chemicals or abrasive cleaners on your sink, as they can damage the finish and cause scratches. Tip 3: Regularly check for any leaks or damage and address them immediately to prevent further issues.Measuring an Undermount Kitchen Sink: What You Need to Know


Measuring an Undermount Kitchen Sink: What You Need to Know


Even with the best intentions and careful measurements, mistakes can still happen. Here are some common mistakes to avoid when measuring and installing an undermount kitchen sink: Mistake 1: Forgetting to account for the thickness of the countertop. This can result in a sink that is too small or too large for the space. Mistake 2: Not checking for any unevenness in the cabinet or countertop before installation. This can cause the sink to not sit properly and potentially lead to leaks. Mistake 3: Skipping the step of measuring the distance from the back of the cabinet to the center of the drain. This can result in incorrect placement of the sink and faucet holes.Measuring an Undermount Kitchen Sink: Common Mistakes to Avoid


Measuring an Undermount Kitchen Sink: Common Mistakes to Avoid


If you are replacing an old undermount kitchen sink, it's important to measure the existing sink and compare it to the new one to ensure a proper fit. Here's how: Step 1: Measure the width and depth of the old sink. Step 2: Measure the distance from the center of the drain to the backsplash. Step 3: Measure the distance from the center of the drain to the faucet holes. Step 4: Compare these measurements to the new sink and make any necessary adjustments.How to Measure for an Undermount Kitchen Sink Installation


How to Measure for an Undermount Kitchen Sink Installation
:no_upscale()/cdn.vox-cdn.com/uploads/chorus_asset/file/19495086/drain_0.jpg)
There are a few different tools and techniques you can use to measure an undermount kitchen sink. These include: Technique 1: Measure the inside of the cabinet with a measuring tape. Technique 2: Use a level to ensure straight and even measurements. Technique 3: Use a template provided by the sink manufacturer to help with accurate measurements.Measuring an Undermount Kitchen Sink: Tools and Techniques


Measuring an Undermount Kitchen Sink: Tools and Techniques

If you are replacing an old undermount kitchen sink, here's a step-by-step guide to help you measure accurately: Step 1: Remove the old sink from the cabinet. Step 2: Clean and dry the area where the old sink was installed. Step 3: Measure the width, depth, and distance from the center of the drain to the backsplash and faucet holes of the old sink. Step 4: Compare these measurements to the new sink and make any necessary adjustments. Congratulations, you have now successfully measured an undermount kitchen sink for replacement! In conclusion, measuring an undermount kitchen sink may seem like a daunting task, but with the right tools and techniques, it can be done easily and accurately. Remember to double check all measurements and take your time to ensure a successful installation. We hope this guide has been helpful and wish you the best of luck with your undermount kitchen sink project!A Step-by-Step Guide to Measuring an Undermount Kitchen Sink for Replacement


A Step-by-Step Guide to Measuring an Undermount Kitchen Sink for Replacement

Why an Undermount Kitchen Sink is the Perfect Choice for Your Kitchen

The Advantages of an Undermount Kitchen Sink
 An undermount kitchen sink is a popular choice among homeowners for its sleek and modern look. Unlike traditional top-mounted sinks, undermount sinks are installed
underneath
the countertop, creating a smooth and uninterrupted surface. This not only adds a touch of sophistication to your kitchen, but it also has several practical benefits.
One of the main advantages of an undermount sink is its
easier maintenance
. Since there is no rim or lip on the sink, crumbs and debris can easily be wiped into the sink without getting caught on edges. This makes cleaning up after meals a breeze. Additionally, undermount sinks are
less likely to develop leaks
and mold compared to top-mounted sinks, as there are no crevices for water to collect.
An undermount kitchen sink is a popular choice among homeowners for its sleek and modern look. Unlike traditional top-mounted sinks, undermount sinks are installed
underneath
the countertop, creating a smooth and uninterrupted surface. This not only adds a touch of sophistication to your kitchen, but it also has several practical benefits.
One of the main advantages of an undermount sink is its
easier maintenance
. Since there is no rim or lip on the sink, crumbs and debris can easily be wiped into the sink without getting caught on edges. This makes cleaning up after meals a breeze. Additionally, undermount sinks are
less likely to develop leaks
and mold compared to top-mounted sinks, as there are no crevices for water to collect.
How to Measure for an Undermount Kitchen Sink
 Before purchasing an undermount kitchen sink, it is important to measure your existing countertop space to ensure a proper fit. Start by measuring the length and width of the existing sink opening.
Make sure to measure from edge to edge
, including any lip or trim around the opening.
Next, measure the depth of the sink and
add an extra inch
to account for the thickness of the countertop. This will ensure that the sink is properly secured underneath the countertop. It is also important to measure the distance between the sink and any other fixtures, such as a backsplash or faucet, to ensure there is enough clearance for the new sink.
Before purchasing an undermount kitchen sink, it is important to measure your existing countertop space to ensure a proper fit. Start by measuring the length and width of the existing sink opening.
Make sure to measure from edge to edge
, including any lip or trim around the opening.
Next, measure the depth of the sink and
add an extra inch
to account for the thickness of the countertop. This will ensure that the sink is properly secured underneath the countertop. It is also important to measure the distance between the sink and any other fixtures, such as a backsplash or faucet, to ensure there is enough clearance for the new sink.
Consult a Professional for Installation
 While measuring for an undermount kitchen sink may seem like a simple task, it is always best to consult a professional for installation. They have the experience and expertise to ensure that the sink is installed correctly and securely. Plus, they can offer valuable advice on the best type of sink for your specific kitchen layout and needs.
In conclusion, an undermount kitchen sink is a great choice for both its aesthetic appeal and practical benefits. By following these simple steps and consulting a professional, you can easily measure and install an undermount sink in your kitchen, adding both style and convenience to your daily routine.
While measuring for an undermount kitchen sink may seem like a simple task, it is always best to consult a professional for installation. They have the experience and expertise to ensure that the sink is installed correctly and securely. Plus, they can offer valuable advice on the best type of sink for your specific kitchen layout and needs.
In conclusion, an undermount kitchen sink is a great choice for both its aesthetic appeal and practical benefits. By following these simple steps and consulting a professional, you can easily measure and install an undermount sink in your kitchen, adding both style and convenience to your daily routine.


