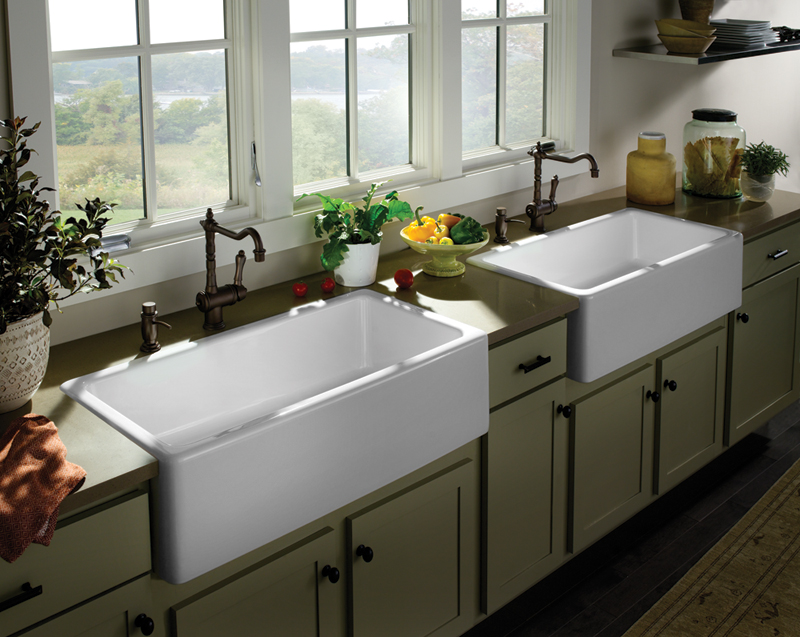
If you're looking to add some charm and character to your kitchen, a wood valance over the sink is the perfect DIY project. It's a simple and budget-friendly way to elevate the look of your kitchen and make a statement. You can customize the wood valance to match your kitchen's style and create a unique focal point above your sink. To make a DIY wood valance, you'll need some basic woodworking tools and materials. You can choose any type of wood, but for a rustic and farmhouse look, reclaimed or distressed wood would be the perfect choice. You can also paint or stain the wood to match your kitchen's color scheme. Start by measuring the width of your sink and adding a few inches on each side. This will be the length of your wood valance. Next, measure the height from the top of your sink to the bottom of your cabinets. This will be the height of your wood valance. Cut the wood to the desired size using a saw, and make sure to sand down any rough edges. Once you have your wood pieces, you can assemble them using wood glue and nails. You can also add decorative elements like trim or corbels to give your wood valance a more intricate look. Once everything is assembled, you can attach the wood valance to the wall above your sink using screws or brackets. Lastly, add some finishing touches like a coat of polyurethane to protect the wood and give it a glossy finish. You can also add some hooks or shelves to the bottom of the wood valance for additional storage and functionality. Your DIY wood valance over the kitchen sink is now complete and ready to impress!1. DIY Wood Valance Over Kitchen Sink


1. DIY Wood Valance Over Kitchen Sink


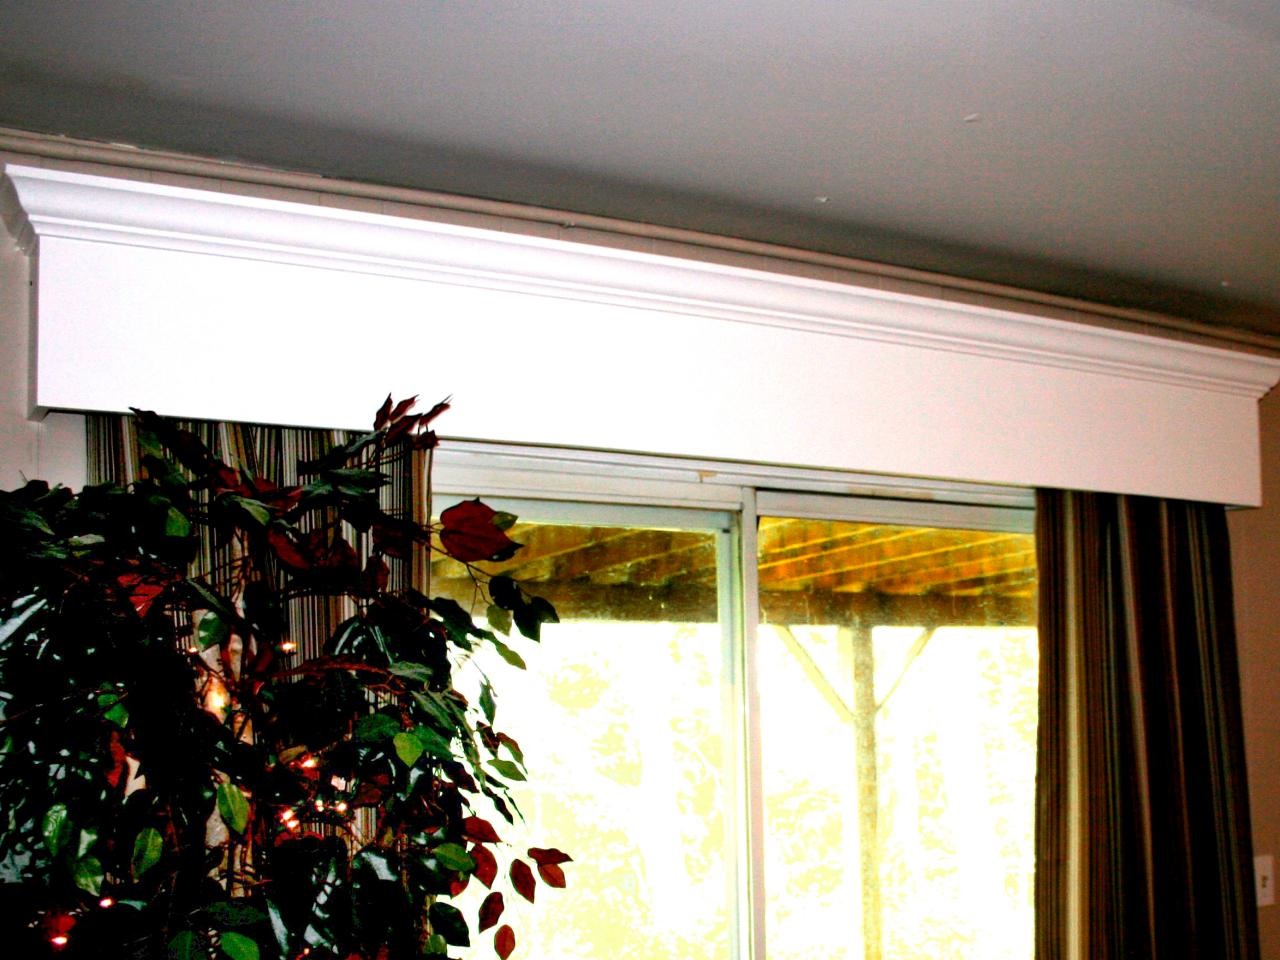


If you're someone who loves a good DIY project, making a wood valance for your kitchen sink is a fun and rewarding task. It's a great way to add a personal touch to your kitchen and showcase your creativity. Plus, it's a budget-friendly alternative to expensive window treatments. With just a few supplies and some basic woodworking skills, you can create a beautiful wood valance that will make a statement in your kitchen. To start, you'll need to gather your materials. You can use any type of wood, but pine or cedar would be a good choice for a natural and rustic look. You'll also need some wood glue, screws, a saw, and sandpaper. You can also add some decorative elements like trim or paint to personalize your wood valance. First, measure the width of your sink and add a few inches on each side. This will be the length of your wood valance. Next, measure the height from the top of your sink to the bottom of your cabinets. This will be the height of your wood valance. Cut the wood to the desired size using a saw and sand down any rough edges. Next, you can assemble the wood pieces using wood glue and screws. You can also add trim or decorative elements at this stage. Once everything is assembled, you can attach the wood valance above your sink using screws or brackets. You can also add some hooks or shelves to the bottom of the valance for additional storage and functionality. Finally, add a coat of polyurethane to protect the wood and give it a glossy finish. Your homemade wood valance is now complete and ready to add some character to your kitchen sink area.2. How to Make a Wood Valance for Your Kitchen Sink


2. How to Make a Wood Valance for Your Kitchen Sink


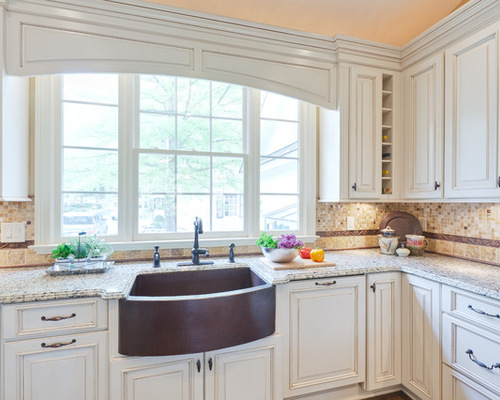
If you're a fan of the rustic and farmhouse style, a wood valance over your kitchen sink window is the perfect addition to your decor. It's a simple and inexpensive way to bring some natural elements into your kitchen and add a touch of charm. A rustic wood valance can also add warmth and character to an otherwise plain and boring window area. To create a rustic wood valance, you can use reclaimed or distressed wood for a weathered and aged look. You can also stain the wood in a dark color to give it a more rustic feel. You can choose to leave the wood unfinished for a more natural look, or paint it in a color that complements your kitchen's color scheme. Start by measuring the width of your sink and adding a few inches on each side. This will be the length of your wood valance. Next, measure the height from the top of your sink to the bottom of your cabinets. This will be the height of your wood valance. Cut the wood to the desired size using a saw and sand down any rough edges. Next, you can assemble the wood pieces using wood glue and nails. You can also add decorative elements like trim or corbels to give your wood valance a more intricate look. Once everything is assembled, you can attach the wood valance to the wall above your sink using screws or brackets. Add some finishing touches like a coat of polyurethane to protect the wood and give it a glossy finish. Your rustic wood valance over the kitchen sink window is now complete and ready to impress your guests.3. Rustic Wood Valance for Kitchen Sink Window


3. Rustic Wood Valance for Kitchen Sink Window


If you're looking for a quick and easy way to spruce up your kitchen, a DIY wood valance over the sink is the perfect solution. It's a simple project that anyone can do, even if you're not very handy. With just a few materials and some basic tools, you can create a beautiful and functional wood valance that will add a touch of elegance to your kitchen. To make an easy DIY kitchen sink valance, you'll need some wood, wood glue, screws, and a saw. You can choose any type of wood, but pine or cedar would work well for a natural and rustic look. You can also paint or stain the wood to match your kitchen's style. Start by measuring the width of your sink and adding a few inches on each side. This will be the length of your wood valance. Next, measure the height from the top of your sink to the bottom of your cabinets. This will be the height of your wood valance. Cut the wood to the desired size using a saw and sand down any rough edges. Next, you can assemble the wood pieces using wood glue and screws. You can also add some decorative elements like trim or paint to personalize your wood valance. Once everything is assembled, you can attach the wood valance above your sink using screws or brackets. Finally, add a coat of polyurethane to protect the wood and give it a glossy finish. Your easy DIY kitchen sink valance is now complete and ready to add some style to your kitchen.4. Easy DIY Kitchen Sink Valance


4. Easy DIY Kitchen Sink Valance


Farmhouse style has been a popular trend in home decor for a while now, and it's not going away anytime soon. If you want to add some farmhouse charm to your kitchen, a wood valance over the sink is a must. It's a simple and budget-friendly way to bring that rustic and cozy feel to your kitchen and make a statement. To create a farmhouse style wood valance, you can use reclaimed or distressed wood for a weathered and aged look. You can also paint the wood in a white or light color to give it a more farmhouse feel. You can choose to leave the wood unfinished for a more natural look, or paint it in a color that complements your kitchen's color scheme. Start by measuring the width of your sink and adding a few inches on each side. This will be the length of your wood valance. Next, measure the height from the top of your sink to the bottom of your cabinets. This will be the height of your wood valance. Cut the wood to the desired size using a saw and sand down any rough edges. Next, you can assemble the wood pieces using wood glue and nails. You can also add decorative elements like trim or corbels to give your wood valance a more intricate look. Once everything is assembled, you can attach the wood valance to the wall above your sink using screws or brackets. Add some finishing touches like a coat of polyurethane to protect the wood and give it a glossy finish. Your farmhouse style wood valance for the kitchen sink is now complete and ready to impress your guests.5. Farmhouse Style Wood Valance for Kitchen Sink


5. Farmhouse Style Wood Valance for Kitchen Sink


A wood valance over your kitchen sink window is a simple and effective way to add some style and functionality to your kitchen. It's a great alternative to traditional window treatments and can add a touch of elegance to your kitchen's decor. A simple wood valance is also easy to make and can be customized to match your kitchen's style. To make a simple wood valance for your kitchen sink window, you'll need some wood, wood glue, screws, and a saw. You can choose any type of wood, but pine or cedar would work well for a natural and rustic look. You can also paint or stain the wood to match your kitchen's color scheme. Start by measuring the width of your sink and adding a few inches on each side. This will be the length of your wood valance. Next, measure the height from the top of your sink to the bottom of your cabinets. This will be the height of your wood valance. Cut the wood to the desired size using a saw and sand down any rough edges. Next, you can assemble the wood pieces using wood glue and screws. You can also add some decorative elements like trim or paint to personalize your wood valance. Once everything is assembled, you can attach the wood valance above your sink using screws or brackets. Finally, add a coat of polyurethane to protect the wood and give it a glossy finish. Your simple wood valance for the kitchen sink window is now complete and ready to add some character to your kitchen.6. Simple Wood Valance for Kitchen Sink Window

6. Simple Wood Valance for Kitchen Sink Window


If you're on a tight budget but still want to add some style to your kitchen, a wood valance over the sink is a perfect choice. It's a budget-friendly alternative to expensive window treatments and can be made using inexpensive materials. You can also customize the wood valance to match your kitchen's style and create a unique focal point above your sink. To make a budget-friendly wood valance, you'll need some basic woodworking tools and materials. You can choose any type of wood, but for a rustic and farmhouse look, reclaimed or distressed wood would be the perfect choice. You can also paint or stain the wood to match your kitchen's color scheme. Start by measuring the width of your sink and adding a few inches on each side. This will be the length of your wood valance. Next, measure the height from the top of your sink to the bottom of your cabinets. This will be the height of your wood valance. Cut the wood to the desired size using a saw and sand down any rough edges. Once you have your wood pieces, you can assemble them using wood glue and nails. You can also add decorative elements like trim or corbels to give your wood valance a more intricate look. Once everything is assembled, you can attach the wood valance to the wall above your sink using screws or brackets. Lastly, add some finishing touches like a coat of polyurethane to protect the wood and give it a glossy finish. Your budget-friendly wood valance for the kitchen sink is now complete and ready to impress!7. Budget-Friendly Wood Valance for Kitchen Sink
7. Budget-Friendly Wood Valance for Kitchen Sink


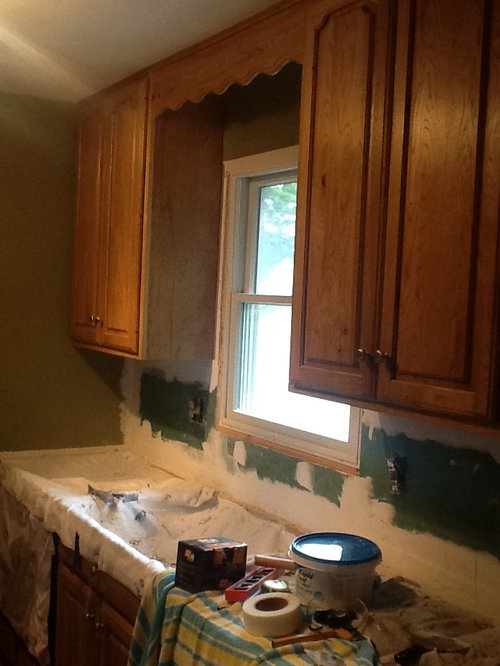
Installing a wood valance over your kitchen sink is a simple and straightforward process that anyone can do. It's a great way to add some style and functionality to your kitchen and create a unique focal point above your sink. With just a few tools and materials, you can have a beautiful wood valance installed in no time. To start, you'll need to gather your materials. You'll need some wood, wood glue, screws, a drill, a saw, and sandpaper. You'll also need a measuring tape and a level to ensure the valance is installed evenly. You can choose any type of wood, but pine or cedar would work well for a natural and rustic look. First, measure the width of your sink and add a few inches on each side. This will be the length of your wood valance. Next, measure the height from the top of your sink to the bottom of your cabinets. This will be the height of your wood valance. Cut the wood to the desired size using a saw and sand down any rough edges. Next, assemble the wood pieces using wood glue and screws. You can also add some decorative elements like trim or corbels to give your wood valance a more intricate look. Once everything is assembled, you can attach the wood valance to the wall above your sink using screws or brackets. Make sure to use a level to ensure the valance is straight and even. You can also add some hooks or shelves to the bottom of the valance for additional storage and functionality. Finally, add a coat of polyurethane to protect the wood and give it a glossy finish. Your wood valance is now installed and ready to enhance the look of your kitchen sink area.8. Step-by-Step Guide to Installing a Wood Valance Over Your Kitchen Sink
8. Step-by-Step Guide to Installing a Wood Valance Over Your Kitchen Sink


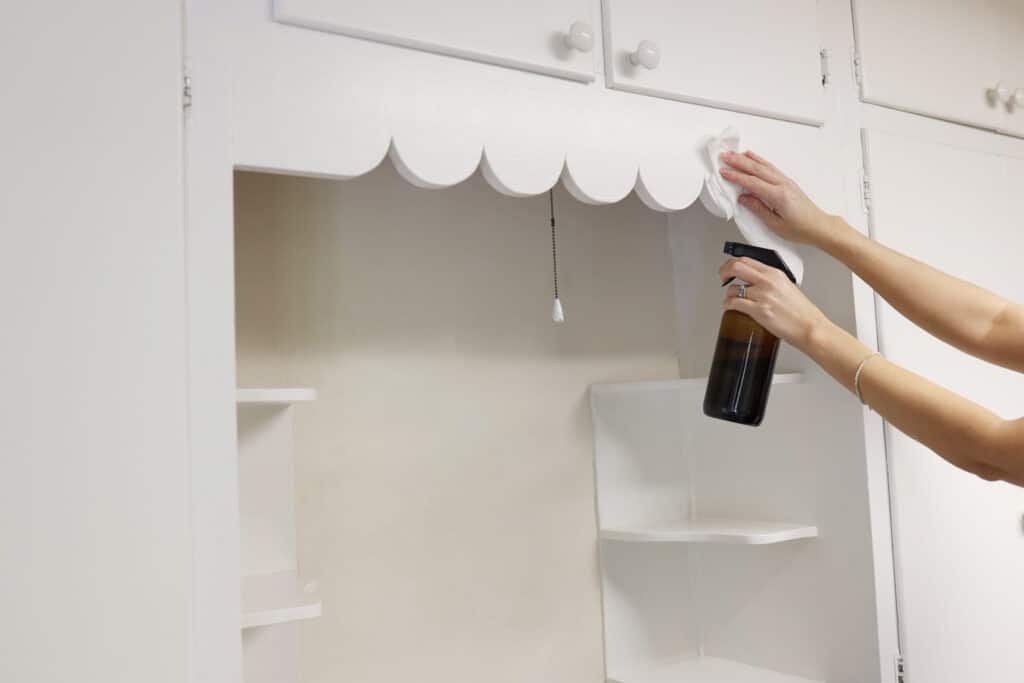
A wood valance over the kitchen sink is not only functional but also serves as a decorative element in your kitchen. It's a great way to add some personality and style to your kitchen and make a statement. While the wood valance itself is beautiful, there are some creative ways to decorate it and make it stand out even more.9. Creative Ideas for Decorating a Wood Valance Over Kitchen Sink


9. Creative Ideas for Decorating a Wood Valance Over Kitchen Sink


The Versatility of Adding a Wood Vallance Over the Kitchen Sink

Adding a Touch of Warmth to Your Kitchen Design
 When it comes to designing a kitchen, often the focus is on functionality and practicality. However, it is important to also consider adding elements that bring warmth and personality to the space. One simple yet effective way to achieve this is by incorporating a wood vallance over the kitchen sink. This small addition can make a big impact on the overall design, bringing in natural warmth and texture to the kitchen.
Creating a Focal Point
 The kitchen sink area is often overlooked in terms of design, but it is a highly functional space that can benefit from some attention. Adding a wood vallance above the sink creates a focal point, drawing the eye and adding interest to an otherwise mundane area. This can be especially useful in open concept kitchens where the sink may be visible from other areas of the home.
Customizable to Your Style and Needs
 One of the great things about a wood vallance is that it can be customized to fit your personal style and needs. Whether you prefer a rustic farmhouse look or a sleek modern design, there is a wood vallance option to suit your taste. From different types of wood to various finishes and stains, the possibilities are endless. Additionally, a wood vallance can also serve a functional purpose by incorporating shelving or hooks for hanging kitchen utensils or plants.
Easy to Install and Budget-Friendly
 Another benefit of adding a wood vallance over the kitchen sink is that it is a relatively easy and budget-friendly home improvement project. With the right tools and materials, it can be installed in just a few hours. This makes it a great option for those looking to update their kitchen design without breaking the bank.
Final Thoughts
 Incorporating a wood vallance over the kitchen sink is a simple yet effective way to add warmth and character to your kitchen design. With its versatility, customizable options, and budget-friendly nature, it is a design element that can easily elevate the look and feel of your kitchen. So why not consider adding a wood vallance to your kitchen and see the difference it can make?